RFID Access8.0
Note
🌟 Welcome to the SunFounder Facebook Community! Whether you’re into Raspberry Pi, Arduino, or ESP32, you’ll find inspiration, help ideas here.
✅ Be the first to get free learning resources.
✅ Stay updated on new products & exclusive giveaways.
✅ Share your creations and get real feedback.
Kit purchase
Looking for parts? Check out our all-in-one kits below — packed with components, beginner-friendly guides, and tons of fun.

Name |
Includes Arduino board |
PURCHASE LINK |
|---|---|---|
Elite Explorer Kit |
Arduino Uno R4 WiFi |
|
Inventor Lab Kit |
Arduino Uno R3 |
Course Introduction
In this lesson, we’ll build a 8.0 access-control system using the MFRC522 module, I2C LCD, a digital servo motor, buzzer module, traffic light.
Note
If this is your first time working with an Arduino project, we recommend downloading and reviewing the basic materials first.
Required Components
In this project, we need the following components:
SN |
COMPONENT INTRODUCTION |
QUANTITY |
PURCHASE LINK |
|---|---|---|---|
1 |
Arduino UNO R4 Minima/Arduino UNO R4 WIFI |
1 |
|
2 |
USB Type-C cable |
1 |
|
3 |
Breadboard |
1 |
|
4 |
Wires |
Several |
|
5 |
Traffic Light LED |
1 |
|
6 |
Buzzer Modudle |
1 |
|
7 |
MFRC522 Module |
1 |
|
8 |
Power Supply Module |
1 |
|
9 |
Digital Servo Motor |
1 |
|
10 |
I2C LCD 1602 |
1 |
Wiring
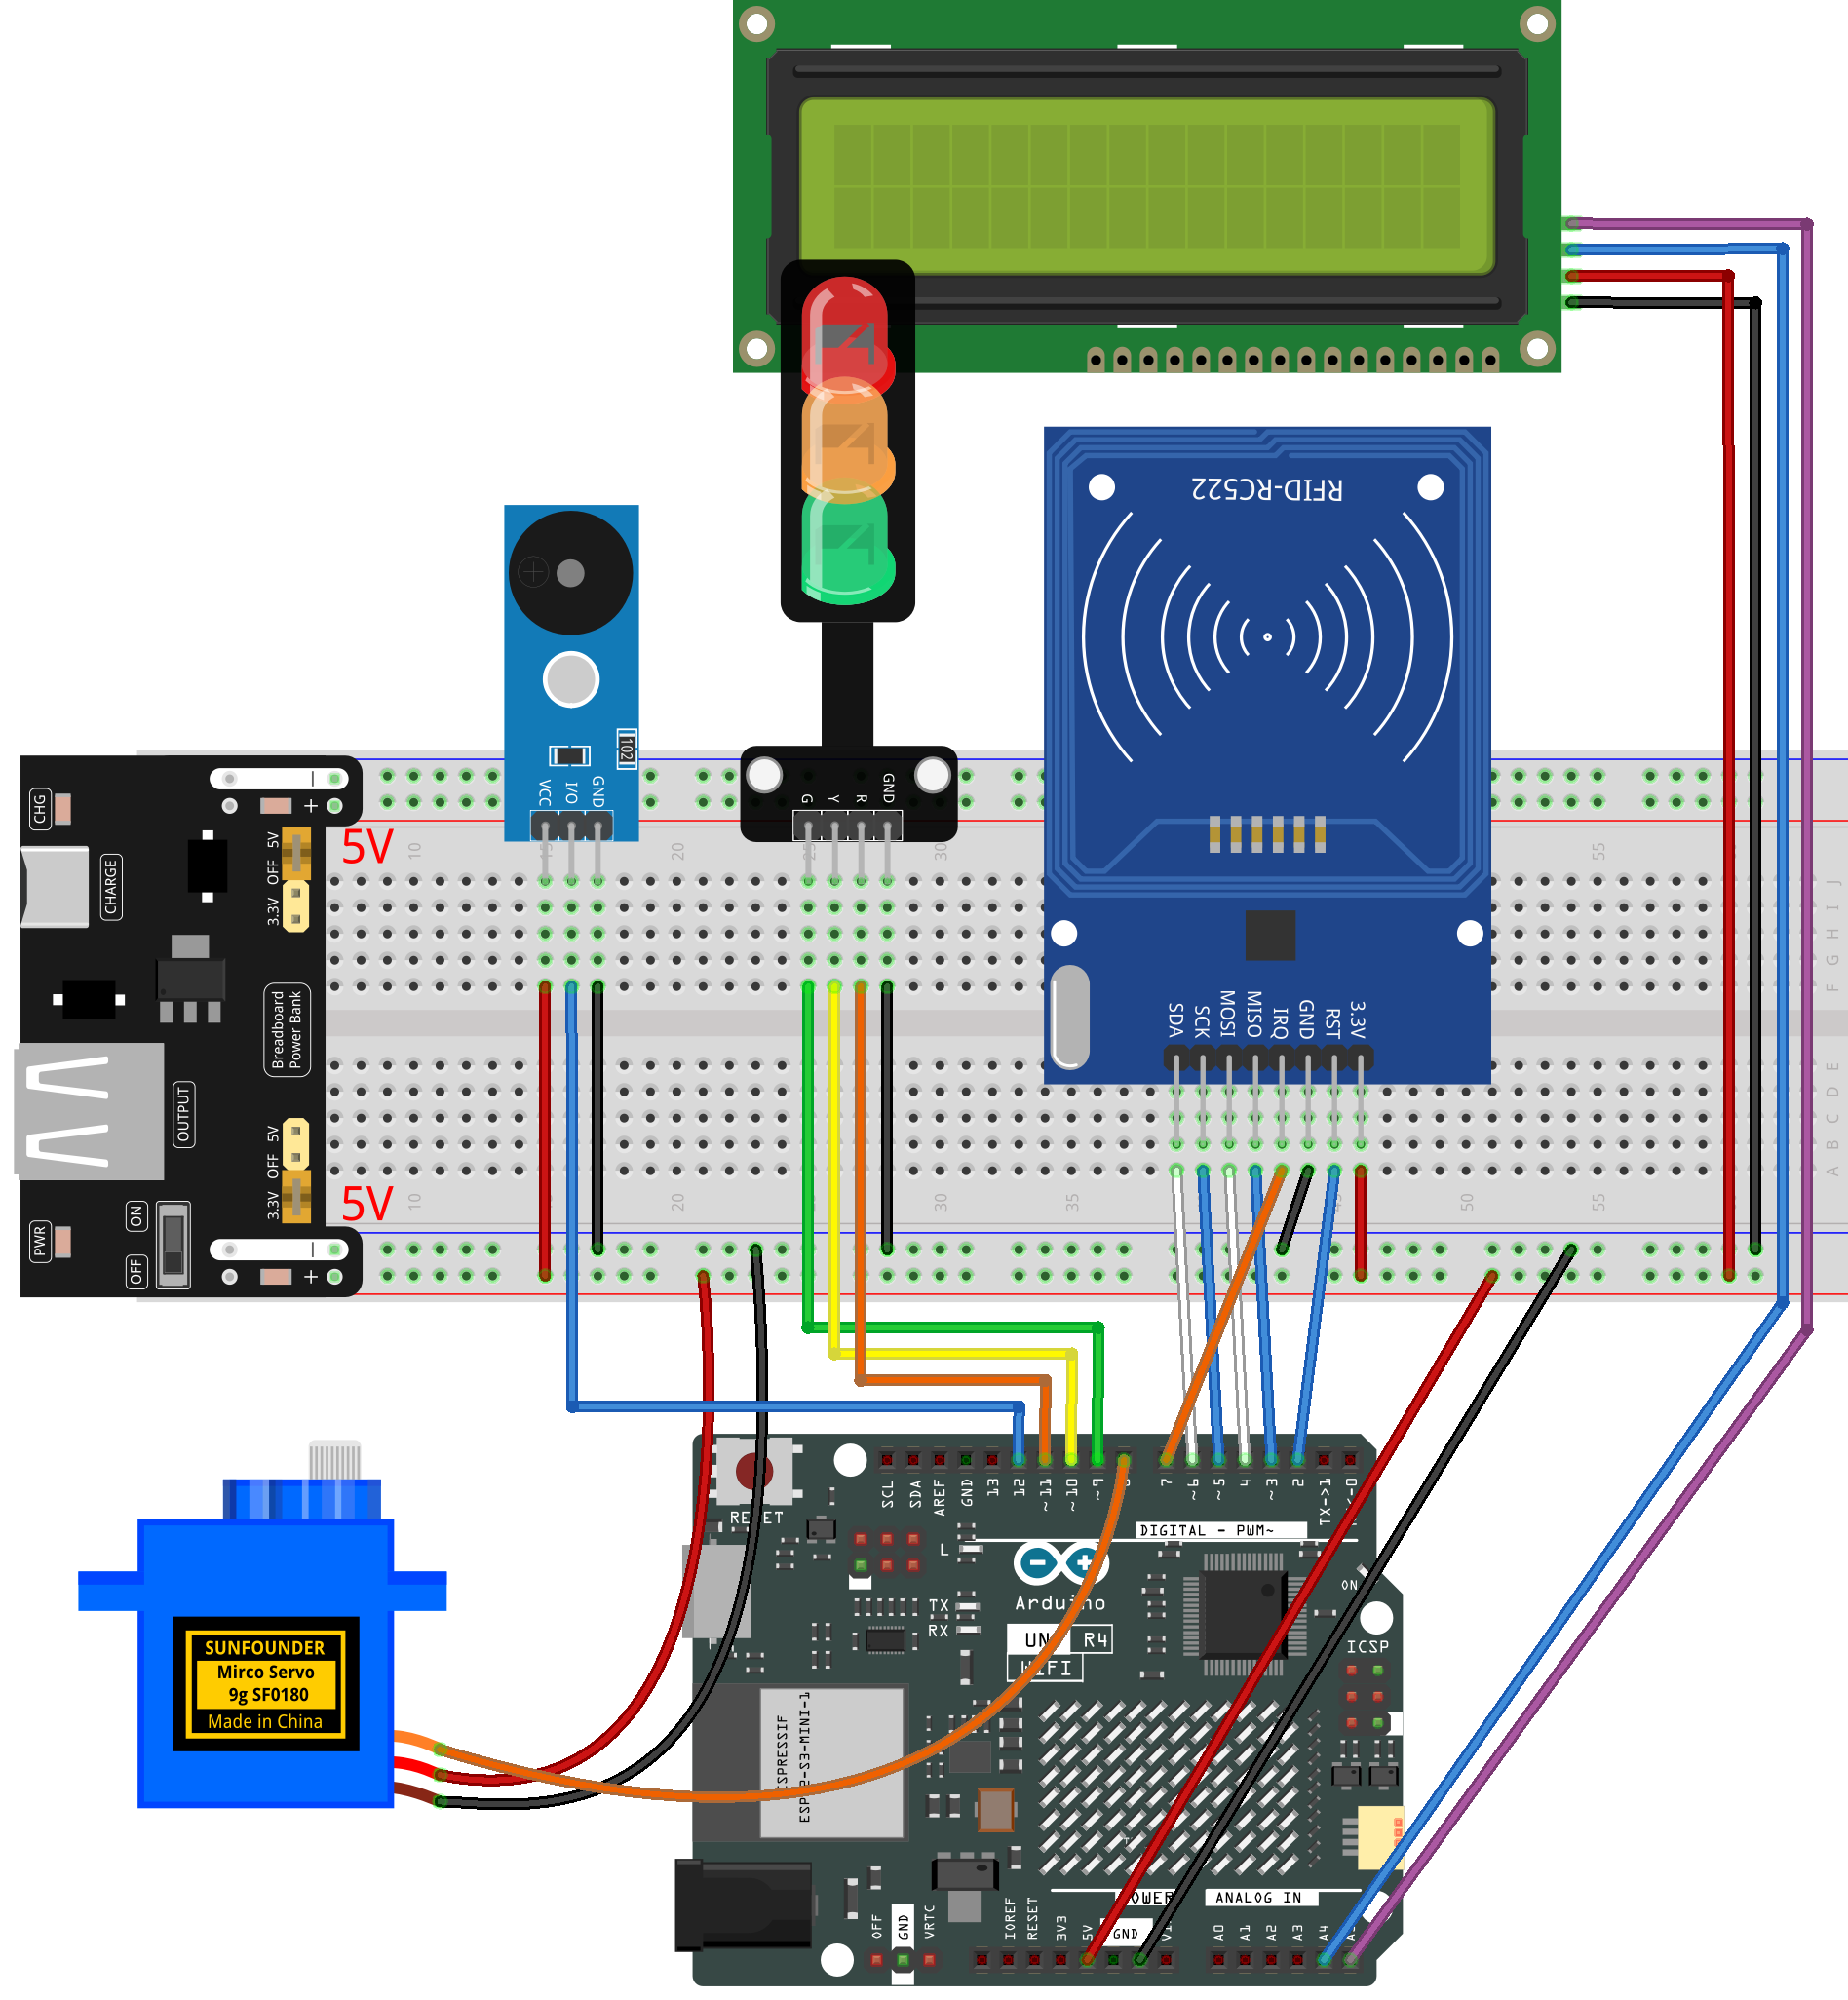
Common Connections:
MFRC522 Module
IRQ: Connect to 7 on the ESP32.
SDA: Connect to 6 on the ESP32.
SCK: Connect to 5 on the ESP32.
MOSI: Connect to 4 on the ESP32.
MISO: Connect to 3 on the ESP32.
GND: Connect to breadboard’s negative power bus.
RST: Connect to 2 on the ESP32.
3.3V: Connect to breadboard’s passive power bus.
Traffic light LED
R: Connect to 11 on the Arduino.
Y: Connect to 10 on the Arduino.
G: Connect to 9 on the Arduino.
GND: Connect to breadboard’s negative power bus.
Buzzer Module
I/0: Connect to 12 on the Arduino.
+: Connect to breadboard’s red power bus.
-: Connect to breadboard’s negative power bus.
Digital Servo Motor
Connect to breadboard’s positive power bus.
Connect to breadboard’s negative power bus.
Connect to 8 on the Arduino.
I2C LCD 1602
SDA: Connect to A4 on the Arduino.
SCL: Connect to A5 on the Arduino.
GND: Connect to breadboard’s negative power bus.
VCC: Connect to breadboard’s red power bus.
Writing the Code
Note
You can copy this code into Arduino IDE.
The
RFID1library is used here. You can click hereRFID1.zipto download it.Don’t forget to select the board(Arduino UNO R4 WIFI) and the correct port before clicking the Upload button.
#include <rfid1.h>
#include <Servo.h>
#include <LiquidCrystal_I2C.h>

#define ID_LEN 4   // Length of the RFID card UID (4 bytes)

RFID1 rfid;
Servo myServo;
LiquidCrystal_I2C lcd(0x27, 16, 2);  // I2C LCD (address 0x27, 16 columns, 2 rows)

// Pin definitions
const int servoPin  = 8;
const int buzzerPin = 12;

const int greenPin  = 9;
const int yellowPin = 10;
const int redPin    = 11;

// Authorized card UID (modify to your own card)
uchar userId[ID_LEN] = {0x33, 0xF8, 0xB8, 0x1A};
uchar userIdRead[ID_LEN];

int currentPos = 0;     // Current servo angle
int targetPos  = 0;     // Target servo angle

bool busy = false;      // Prevents scanning while gate animation plays


// Smoothly move the servo toward the target angle
void setServoAngle(int angle) {
  targetPos = constrain(angle, 0, 90);
}

bool servoSmoothRun() {
  static unsigned long lastStep = 0;

  // Update every 15 ms for smooth movement
  if (millis() - lastStep >= 15) {
    lastStep = millis();

    if (currentPos < targetPos) currentPos++;
    else if (currentPos > targetPos) currentPos--;
    else return true;  // Movement completed

    myServo.write(currentPos);
  }
  return false;
}


// Default LCD interface
void showNormal() {
  lcd.clear();
  lcd.setCursor(0,0); lcd.print("Gate Locked");
  lcd.setCursor(0,1); lcd.print("Tap Your Card");
}


// Short beep for authorized card
void beepShort() {
  tone(buzzerPin, 1800);
  delay(80);
  noTone(buzzerPin);
}

// Softer beep for denied card
void beepDeniedSoft() {
  tone(buzzerPin, 1200);
  delay(60);
  noTone(buzzerPin);
}


// Read RFID UID
void getId() {
  uchar status, str[MAX_LEN];
  status = rfid.anticoll(str);
  if (status == MI_OK) {
    for (int i = 0; i < ID_LEN; i++)
      userIdRead[i] = str[i];
    rfid.halt();
  }
}

// Compare scanned UID to authorized UID
bool idVerify() {
  for (int i = 0; i < ID_LEN; i++)
    if (userIdRead[i] != userId[i]) return false;
  return true;
}

void clearBuffer() {
  for (int i = 0; i < ID_LEN; i++)
    userIdRead[i] = 0;
}


// Authorized card behavior
void authorizedSequence() {
  busy = true;

  beepShort();
  lcd.clear();
  lcd.setCursor(0,0); lcd.print("Access Granted");
  lcd.setCursor(0,1); lcd.print("Please Pass");

  digitalWrite(redPin, LOW);
  digitalWrite(greenPin, LOW);
  digitalWrite(yellowPin, LOW);

  // Open gate
  setServoAngle(90);
  while (true) {
    bool done = servoSmoothRun();

    // Yellow blinking during opening
    static unsigned long t = 0;
    if (millis() - t >= 150) {
      t = millis();
      digitalWrite(yellowPin, !digitalRead(yellowPin));
    }
    if (done) break;
  }

  digitalWrite(yellowPin, LOW);
  digitalWrite(greenPin, HIGH);  // Green ON
  delay(1000);                   // Wait 1 second

  // Close gate
  setServoAngle(0);
  digitalWrite(greenPin, LOW);

  while (true) {
    bool done = servoSmoothRun();

    // Yellow blinking during closing
    static unsigned long t2 = 0;
    if (millis() - t2 >= 150) {
      t2 = millis();
      digitalWrite(yellowPin, !digitalRead(yellowPin));
    }
    if (done) break;
  }

  digitalWrite(yellowPin, LOW);
  digitalWrite(redPin, HIGH);  // Red ON (locked)

  showNormal();
  busy = false;
}


// Denied card behavior — Version B (LED first → then sound)
void deniedSequence() {
  busy = true;

  lcd.clear();
  lcd.setCursor(0,0); lcd.print("Access Denied");
  lcd.setCursor(0,1); lcd.print("No Entry");

  // Flash 4 times
  for (int i = 0; i < 4; i++) {

    // LED ON first (visual priority)
    digitalWrite(redPin, HIGH);
    delay(80);

    // Then beep (sound follows light)
    tone(buzzerPin, 1200);
    delay(80);
    noTone(buzzerPin);

    // LED OFF
    digitalWrite(redPin, LOW);
    delay(80);
  }

  // Keep red ON after flashing
  digitalWrite(redPin, HIGH);

  delay(500);  // Keep LCD message visible

  showNormal();
  busy = false;
}


// =============================
// setup()
// Runs once at startup
// =============================
void setup() {

  // Initialize RFID module (pins depend on library)
  rfid.begin(7,5,4,3,6,2);
  rfid.init();

  // Attach servo to pin
  myServo.attach(servoPin);

  // Set pin modes
  pinMode(buzzerPin, OUTPUT);
  pinMode(greenPin, OUTPUT);
  pinMode(yellowPin, OUTPUT);
  pinMode(redPin, OUTPUT);

  // Start with gate fully closed
  myServo.write(0);
  currentPos = 0;
  targetPos = 0;

  // Initialize LCD screen
  lcd.init();
  lcd.backlight();
  showNormal();  // Display idle screen

  // Default traffic light state
  digitalWrite(redPin, HIGH);   // Gate locked
}


// =============================
// loop()
// Main program — runs forever
// =============================
void loop() {

  // If gate animation is running, ignore card scanning
  if (busy) return;

  // Check for RFID card
  uchar status, str[MAX_LEN];
  status = rfid.request(PICC_REQIDL, str);

  // Card detected
  if (status == MI_OK) {
    getId();

    // Authorized card
    if (idVerify()) {
      clearBuffer();
      authorizedSequence();
    }
    // Unauthorized card
    else {
      clearBuffer();
      deniedSequence();
    }
  }
}