Brick Breaker2.0
Note
🌟 Welcome to the SunFounder Facebook Community! Whether you’re into Raspberry Pi, Arduino, or ESP32, you’ll find inspiration, help ideas here.
✅ Be the first to get free learning resources.
✅ Stay updated on new products & exclusive giveaways.
✅ Share your creations and get real feedback.
Kit purchase
Looking for parts? Check out our all-in-one kits below — packed with components, beginner-friendly guides, and tons of fun.

Name |
Includes Arduino board |
PURCHASE LINK |
|---|---|---|
Ultimate Sensor Kit |
Arduino Uno R4 Minima |
|
Elite Explorer Kit |
Arduino Uno R4 WiFi |
|
3 in 1 Ultimate Starter Kit |
Arduino Uno R4 Minima |
|
Universal Maker Sensor Kit |
× |
Course Introduction
In this lesson, we’ll build a Breakout-style game on an SSD1306 OLED using a joystick, LEDs, and an active buzzer, where you control a paddle to bounce a ball, break bricks, and win before the ball falls.
Note
If this is your first time working with an Arduino project, we recommend downloading and reviewing the basic materials first.
Required Components
In this project, we need the following components:
SN |
COMPONENT INTRODUCTION |
QUANTITY |
PURCHASE LINK |
|---|---|---|---|
1 |
Arduino UNO R4 WIFI |
1 |
|
2 |
USB Type-C cable |
1 |
|
3 |
Breadboard |
1 |
|
4 |
Wires |
Several |
|
5 |
Joystick Module |
1 |
|
6 |
OLED Display Module |
1 |
|
7 |
Active Buzzer |
1 |
|
8 |
LED |
2 |
Wiring
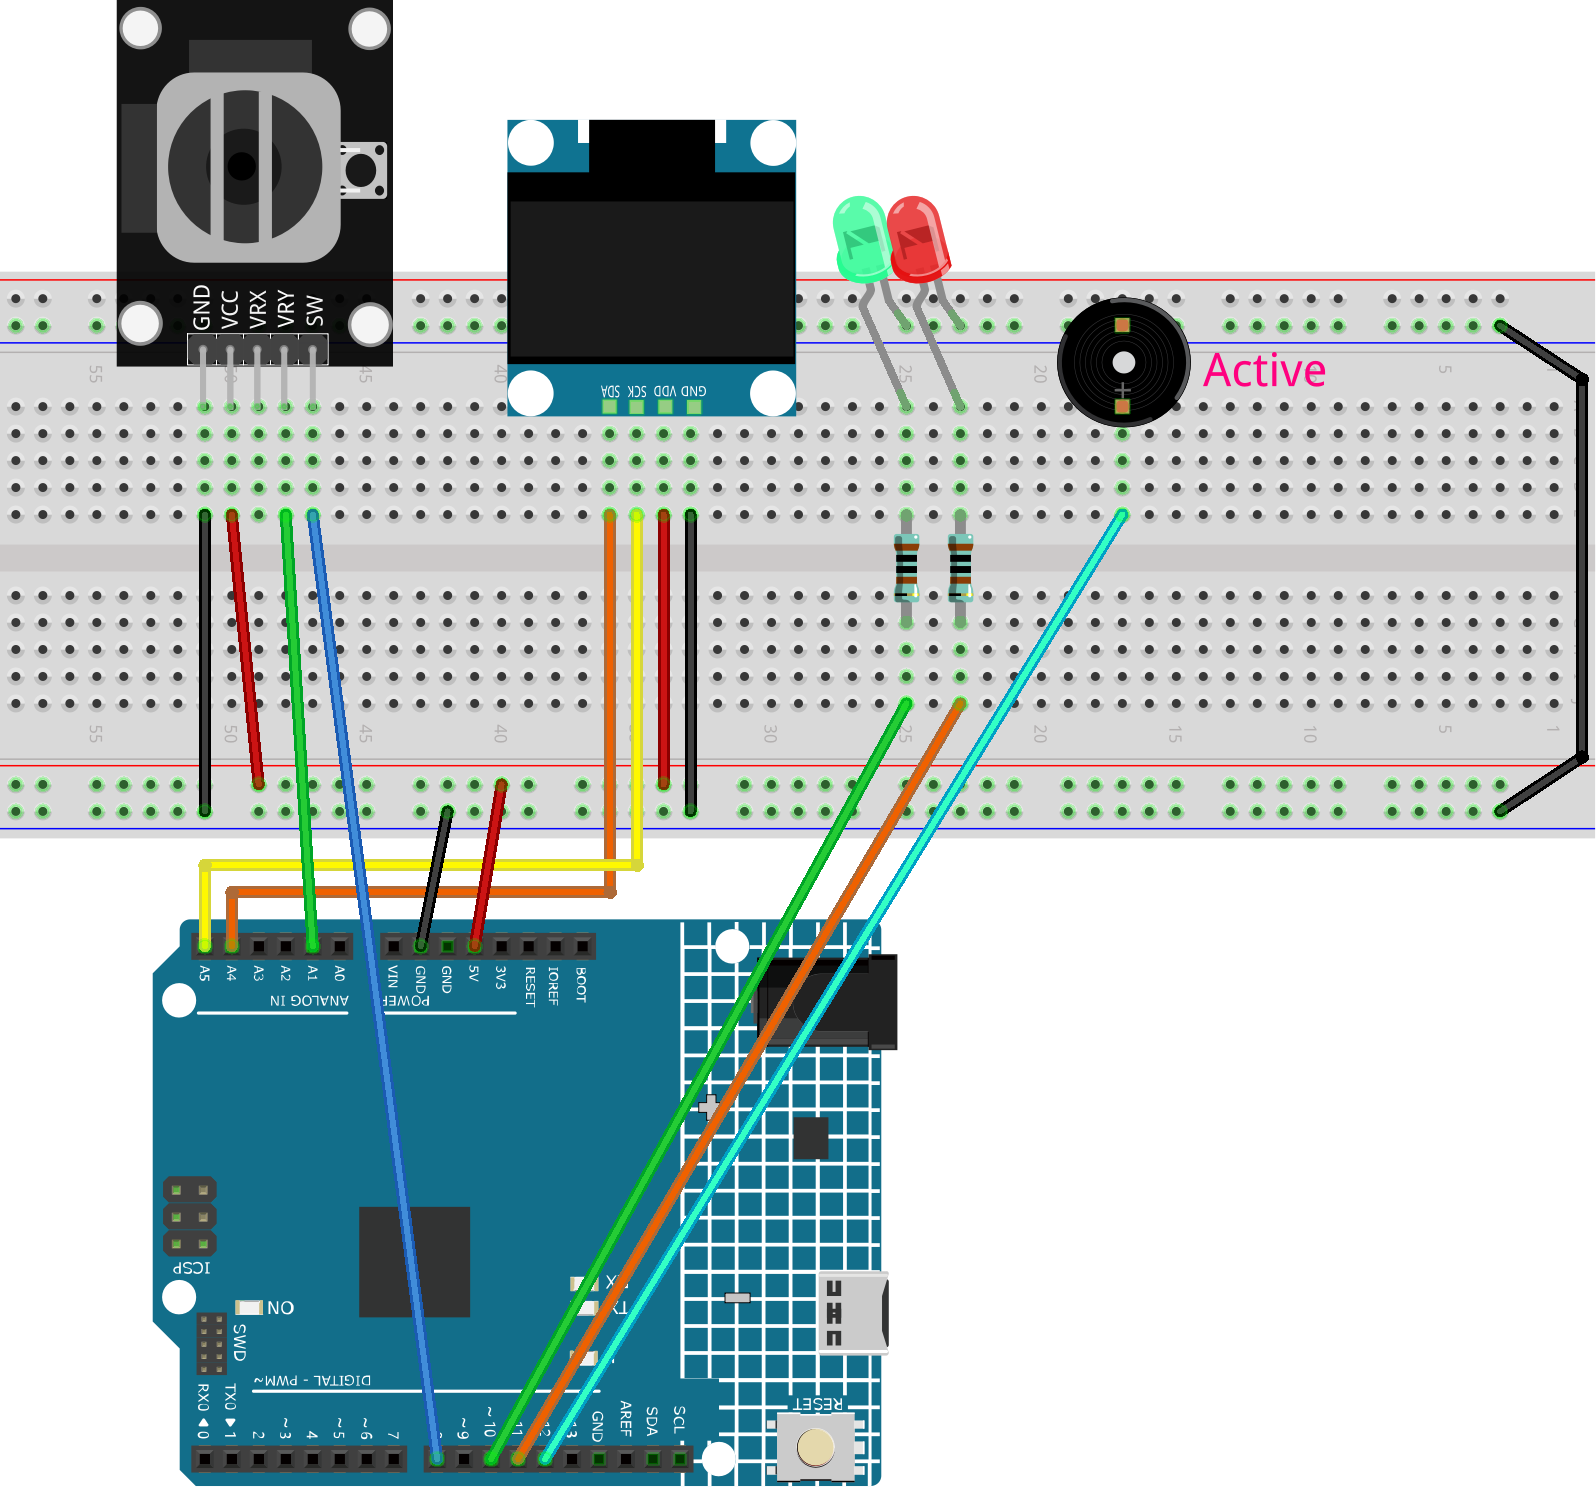
Common Connections:
OLED Display Module
SDA: Connect to A4 on the Arduino.
SCK: Connect to A5 on the Arduino.
GND: Connect to breadboard’s negative power bus.
VCC: Connect to breadboard’s red power bus.
Joystick Module
VRY: Connect to A1 on the Arduino.
SW: Connect to 8 on the Arduino.
GND: Connect to breadboard’s negative power bus.
VCC: Connect to breadboard’s red power bus.
Active Buzzer
+: Connect to 12 on the Arduino.
-: Connect to breadboard’s negative power bus.
LEDS
Green: Connect the LED anode to a 1kΩ resistor, then to 10 on the Arduino, and the cathode to the negative power bus on the breadboard.
Red: Connect the LED anode to a 1kΩ resistor, then to 11 on the Arduino, and the cathode to the negative power bus on the breadboard.
Writing the Code
Note
You can copy this code into Arduino IDE.
To install the library, use the Arduino Library Manager and search for Adafruit_GFX and Adafruit SSD1306 and install it.
Don’t forget to select the board(Arduino UNO R4 Minima) and the correct port before clicking the Upload button.
/*
  Simple Breakout Game on SSD1306 OLED (128x64)
  - Display: SSD1306 I2C OLED (address 0x3C)
  - Input: Analog joystick (we only use the Y axis on A1), Reset button on D8 (INPUT_PULLUP)
  - Outputs:
      * Active buzzer on D12 (HIGH = ON)
      * Red LED on D11
      * Green LED on D10
  - Behavior:
      * Before game starts (or on end screen): Red ON, Green OFF
      * During gameplay: Red OFF, Green ON
      * Beep once when a brick is hit
      * Different end sounds for win/lose (rhythm patterns; active buzzer has a fixed tone)
  NOTE:
      If your panel is 128x32, change SCREEN_HEIGHT to 32 and reduce brick rows.
*/

#include <Wire.h>
#include <Adafruit_GFX.h>
#include <Adafruit_SSD1306.h>

// -------------------- Display configuration --------------------
// OLED logical width/height in pixels. 128x64 is common for 0.96" panels.
// If you see graphics "wrapping" on top, double-check this height.
#define SCREEN_WIDTH 128
#define SCREEN_HEIGHT 64

// -1 means we are not using a dedicated RESET pin for the OLED module.
#define OLED_RESET -1
// I2C address for many SSD1306 modules is 0x3C.
#define SCREEN_ADDRESS 0x3C

// Create a display object bound to the global Wire (I2C) bus.
Adafruit_SSD1306 display(SCREEN_WIDTH, SCREEN_HEIGHT, &Wire, OLED_RESET);

// -------------------- Inputs --------------------
// We only use the joystick's Y-axis (A1). Analog reads return 0..1023.
// Center is usually ~512. You'll see slight variations with real hardware.
const int yPin = A1;

// Reset button pin. With INPUT_PULLUP, the pin reads HIGH when not pressed,
// and reads LOW when the button is pressed (wired to ground).
const int swPin = 8;

// -------------------- Outputs --------------------
// Active buzzer: plays a fixed tone when set HIGH.
// (Different from a passive buzzer that needs tone() to generate frequency.)
const int buzzerPin  = 12;

// Two status LEDs to indicate game states.
const int redLedPin  = 11;
const int greenLedPin= 10;

// Brick-hit beep length in milliseconds. Adjust to taste (50..100 is common).
const int BEEP_MS    = 60;

// -------------------- Game objects and parameters --------------------
// Paddle horizontal position. Y is fixed near the bottom.
int paddleX;

// Paddle size in pixels. Height is small so ball can slip past it if missed.
const int paddleWidth = 30;
const int paddleHeight = 3;

// Bricks arranged in a grid (rows x cols).
const int brickRows = 3;
const int brickCols = 6;

// Each brick's width is computed to fill the screen width evenly.
const int brickWidth = SCREEN_WIDTH / brickCols;
// Brick height in pixels. Thin bricks make the playfield taller.
const int brickHeight = 5;

// 2D boolean grid indicating whether a brick is still present.
bool bricks[brickRows][brickCols];

// Joystick "dead zone" (ignore tiny movements around center).
const int deadZone = 100;

// Paddle step per frame when joystick is tilted far enough.
const int speed = 8;

// Ball speed (pixels per frame). It increases as the player hits the paddle
// more times. We normalize the (dx,dy) so magnitude equals this speed.
float ballSpeed = 3.0;

// Game state flags.
bool gameOver = false;
bool gameWin = false;

// Ball position (float allows sub-pixel movement for smoother motion).
float ballX, ballY;
// Ball velocity components.
float ballDX, ballDY;

// Counts how many times the ball has hit the paddle.
// Used to ramp up the ballSpeed at certain milestones.
int hitCount = 0;

// -------------------- Helpers: buzzer & LEDs --------------------

// Play a single short beep on the active buzzer.
// NOTE: This uses delay() and is blocking for the duration.
// For small effects like hits/end sounds it's fine.
void buzzOnce(int ms = BEEP_MS) {
  digitalWrite(buzzerPin, HIGH);
  delay(ms);
  digitalWrite(buzzerPin, LOW);
}

// "Win" jingle using rhythm only (active buzzer has fixed tone).
// Pattern: short - short - long
void playWinSound() {
  for (int i = 0; i < 2; i++) {
    buzzOnce(80);
    delay(80);   // small gap between beeps
  }
  buzzOnce(200);
}

// "Lose" jingle using rhythm only.
// Pattern: long - short - short
void playLoseSound() {
  buzzOnce(200);
  delay(80);
  for (int i = 0; i < 2; i++) {
    buzzOnce(80);
    delay(80);
  }
}

// LED state: waiting (before start or on end screen).
void setWaitingLeds() {
  digitalWrite(redLedPin, HIGH);
  digitalWrite(greenLedPin, LOW);
}

// LED state: actively playing.
void setPlayingLeds() {
  digitalWrite(redLedPin, LOW);
  digitalWrite(greenLedPin, HIGH);
}

// -------------------- Arduino setup() --------------------
void setup() {
  // Button uses the internal pull-up resistor.
  pinMode(swPin, INPUT_PULLUP);

  // Serial is optional but helpful for debugging.
  Serial.begin(9600);

  // Use an unconnected analog pin to seed the random generator.
  // This adds some real-world noise so ball angles vary each reset.
  randomSeed(analogRead(A2));

  // Configure outputs.
  pinMode(buzzerPin, OUTPUT);
  pinMode(redLedPin, OUTPUT);
  pinMode(greenLedPin, OUTPUT);
  digitalWrite(buzzerPin, LOW);

  // Show "waiting" state on power-up until the game is initialized.
  setWaitingLeds();

  // Initialize the OLED. If it fails, print an error and halt.
  if (!display.begin(SSD1306_SWITCHCAPVCC, SCREEN_ADDRESS)) {
    Serial.println(F("SSD1306 allocation failed"));
    for (;;); // Trap CPU here if display is not found or fails to init.
  }

  // Start immediately. You can change this to wait for a button press if desired.
  resetGame(); // Also switches LEDs to "playing" state.
}

// -------------------- Arduino loop() --------------------
void loop() {
  // If the game has ended, show the end screen and handle restart.
  if (gameOver || gameWin) {
    showGameOverScreen();
    return; // Prevent normal gameplay logic from running.
  }

  // ----- 1) Read joystick and move paddle -----
  // Analog read returns 0..1023; center is ~512. We ignore values near center
  // (dead zone) to avoid jitter when the stick is released.
  int yValue = analogRead(yPin);

  if (abs(yValue - 512) > deadZone) {
    // Below ~400 means "tilted left", above ~600 means "tilted right".
    // These thresholds are a simple way to decide direction.
    if (yValue < 400) paddleX -= speed;      // move left
    else if (yValue > 600) paddleX += speed; // move right
  }

  // Keep the paddle inside the screen horizontally.
  paddleX = constrain(paddleX, 0, SCREEN_WIDTH - paddleWidth);

  // ----- 2) Move the ball -----
  // Save previous position; we use it to guess collision side on bricks.
  int oldBallX = ballX;
  int oldBallY = ballY;

  // Add velocity to position.
  ballX += ballDX;
  ballY += ballDY;

  // ----- 3) Collide with screen boundaries -----
  // Left/right walls: invert X velocity when we touch edges.
  if (ballX <= 0 || ballX >= SCREEN_WIDTH - 2) ballDX = -ballDX;

  // Top wall: invert Y velocity when we touch the top.
  if (ballY <= 0) ballDY = -ballDY;

  // ----- 4) Collide with the paddle -----
  // Simple AABB check: is the ball near the bottom where the paddle is,
  // and horizontally within the paddle width?
  if (ballY >= SCREEN_HEIGHT - paddleHeight - 1 &&
      ballX >= paddleX && ballX <= paddleX + paddleWidth) {
    // Bounce upward
    ballDY = -ballDY;

    // Count paddle hits and increase ball speed at certain milestones.
    hitCount++;
    if (hitCount == 2) ballSpeed = 4.0;
    if (hitCount == 4) ballSpeed = 5.0;
    if (hitCount == 6) ballSpeed = 6.0;

    // Cap the max speed for playability.
    ballSpeed = min(ballSpeed, 6.0);

    // Re-normalize (dx,dy) so their magnitude equals ballSpeed.
    normalizeBallSpeed();
  }

  // ----- 5) Collide with bricks (and beep when a brick is hit) -----
  // We also keep track of how many bricks remain to detect "win".
  int remainingBricks = 0;

  for (int i = 0; i < brickRows; i++) {
    for (int j = 0; j < brickCols; j++) {
      if (bricks[i][j]) {
        remainingBricks++;

        // Compute this brick's top-left corner.
        int brickX = j * brickWidth;
        int brickY = i * brickHeight;

        // Very simple overlap test: treat the ball as a small box of size ~4x4
        // by checking +/- 2 pixels around its center.
        bool hitX = (ballX + 2 >= brickX && ballX - 2 <= brickX + brickWidth);
        bool hitY = (ballY + 2 >= brickY && ballY - 2 <= brickY + brickHeight);

        if (hitX && hitY) {
          // Remove the brick.
          bricks[i][j] = false;

          // Reflect ball depending on which side we likely hit.
          // We compare with the old position to "guess" the collision axis.
          if (oldBallX < brickX || oldBallX > brickX + brickWidth) {
            ballDX = -ballDX; // Hit from left/right -> flip X
          }
          if (oldBallY < brickY || oldBallY > brickY + brickHeight) {
            ballDY = -ballDY; // Hit from top/bottom -> flip Y
          }

          // Play a short beep for feedback.
          buzzOnce(BEEP_MS);

          // Keep speed consistent after direction change.
          normalizeBallSpeed();

          // Exit inner loop early so we don't hit multiple bricks in one frame.
          break;
        }
      }
    }
  }

  // ----- 6) Win/Lose checks -----
  // Win: all bricks removed.
  if (remainingBricks == 0) {
    gameWin = true;
  }

  // Lose: ball falls below the bottom edge of the screen.
  if (ballY > SCREEN_HEIGHT) {
    gameOver = true;
  }

  // ----- 7) Draw the current frame -----
  drawGame();

  // ----- 8) Frame pacing -----
  // This small delay helps regulate the game speed and reduces CPU usage.
  // Note: Beeps and end sounds also use delay(), so overall pacing is human-friendly.
  delay(10);
}

// -------------------- Reset the game --------------------
void resetGame() {
  // Clear game-over flags and set initial paddle/ball states.
  gameOver = false;
  gameWin = false;

  // Place the paddle at the horizontal center near the bottom.
  paddleX = SCREEN_WIDTH / 2 - paddleWidth / 2;

  // Place the ball roughly in the middle of the screen.
  ballX = SCREEN_WIDTH / 2;
  ballY = SCREEN_HEIGHT / 2;

  // Reset the ball speed and the hit counter.
  ballSpeed = 3.0;
  hitCount = 0;

  // Choose a random launch angle. We pick two ranges:
  // 30..60 degrees or 120..150 degrees, then aim upward (negative Y).
  float angle;
  if (random(0, 2) == 0) {
    angle = random(30, 60);
  } else {
    angle = random(120, 150);
  }

  // Convert degrees to radians and compute initial velocity components.
  ballDX = ballSpeed * cos(radians(angle));
  ballDY = -ballSpeed * sin(radians(angle));  // negative Y = up on the screen

  // Initialize all bricks to "present".
  for (int i = 0; i < brickRows; i++) {
    for (int j = 0; j < brickCols; j++) {
      bricks[i][j] = true;
    }
  }

  // Switch LEDs to indicate active gameplay.
  setPlayingLeds();

  // Draw the initial frame.
  drawGame();
}

// -------------------- Keep ball speed consistent --------------------
// Normalize (dx,dy) so that sqrt(dx^2 + dy^2) == ballSpeed.
// This prevents the ball from gradually speeding up or slowing down after bounces.
void normalizeBallSpeed() {
  float magnitude = sqrt(ballDX * ballDX + ballDY * ballDY);
  if (magnitude == 0) return; // Avoid division by zero (should not happen)
  ballDX = (ballDX / magnitude) * ballSpeed;
  ballDY = (ballDY / magnitude) * ballSpeed;
}

// -------------------- Render everything on the OLED --------------------
void drawGame() {
  // Clear the internal display buffer (does not show until display.display()).
  display.clearDisplay();

  // Draw paddle at the bottom. Y is SCREEN_HEIGHT - paddleHeight.
  display.fillRect(paddleX, SCREEN_HEIGHT - paddleHeight, paddleWidth, paddleHeight, WHITE);

  // Draw the ball. Radius=2 pixels is a good size for this resolution.
  display.fillCircle(ballX, ballY, 2, WHITE);

  // Draw remaining bricks. We subtract 1px from width/height to create a small gap.
  for (int i = 0; i < brickRows; i++) {
    for (int j = 0; j < brickCols; j++) {
      if (bricks[i][j]) {
        display.fillRect(j * brickWidth, i * brickHeight, brickWidth - 1, brickHeight - 1, WHITE);
      }
    }
  }

  // Push the buffer to the panel so the player can see the frame.
  display.display();
}

// -------------------- End screen & restart handling --------------------
void showGameOverScreen() {
  // On the end screen we show "waiting" LEDs: red ON, green OFF.
  setWaitingLeds();

  // Prepare the message.
  display.clearDisplay();
  display.setTextSize(2);   // Bigger text for readability
  display.setTextColor(WHITE);
  display.setCursor(20, 30);

  // Show message and play the corresponding sound.
  if (gameWin) {
    display.println("You Win!");
    display.display();
    playWinSound();
  } else {
    display.println("Game Over");
    display.display();
    playLoseSound();
  }

  // Wait here until the button is pressed (active LOW).
  // Because we use INPUT_PULLUP, HIGH means "not pressed".
  while (digitalRead(swPin) == HIGH);

  // Basic debounce: wait a bit after the press is detected.
  delay(500);

  // Start a new game.
  resetGame();
}