Controll eyes
Note
🌟 Welcome to the SunFounder Facebook Community! Whether you’re into Raspberry Pi, Arduino, or ESP32, you’ll find inspiration, help ideas here.
✅ Be the first to get free learning resources.
✅ Stay updated on new products & exclusive giveaways.
✅ Share your creations and get real feedback.
Kit purchase
Looking for parts? Check out our all-in-one kits below — packed with components, beginner-friendly guides, and tons of fun.

Name |
Includes Arduino board |
PURCHASE LINK |
|---|---|---|
Ultimate Sensor Kit |
Arduino Uno R4 Minima |
|
Elite Explorer Kit |
Arduino Uno R4 WiFi |
|
3 in 1 Ultimate Starter Kit |
Arduino Uno R4 Minima |
|
Universal Maker Sensor Kit |
× |
Course Introduction
This Arduino project animates a pair of interactive eyes on an OLED screen, controlled by a joystick.
The eyes track the joystick’s movement, simulating the effect of following an object within a defined range.
Pressing the joystick button triggers a blinking animation that mimics a natural blink by covering the upper part of the eyes.
Note
If this is your first time working with an Arduino project, we recommend downloading and reviewing the basic materials first.
Required Components
In this project, we need the following components:
SN |
COMPONENT INTRODUCTION |
QUANTITY |
PURCHASE LINK |
|---|---|---|---|
1 |
Arduino UNO R4 Minima |
1 |
|
2 |
USB Type-C cable |
1 |
|
3 |
Breadboard |
1 |
|
4 |
Wires |
Several |
|
5 |
Joystick Module |
1 |
|
6 |
OLED Display Module |
1 |
Wiring
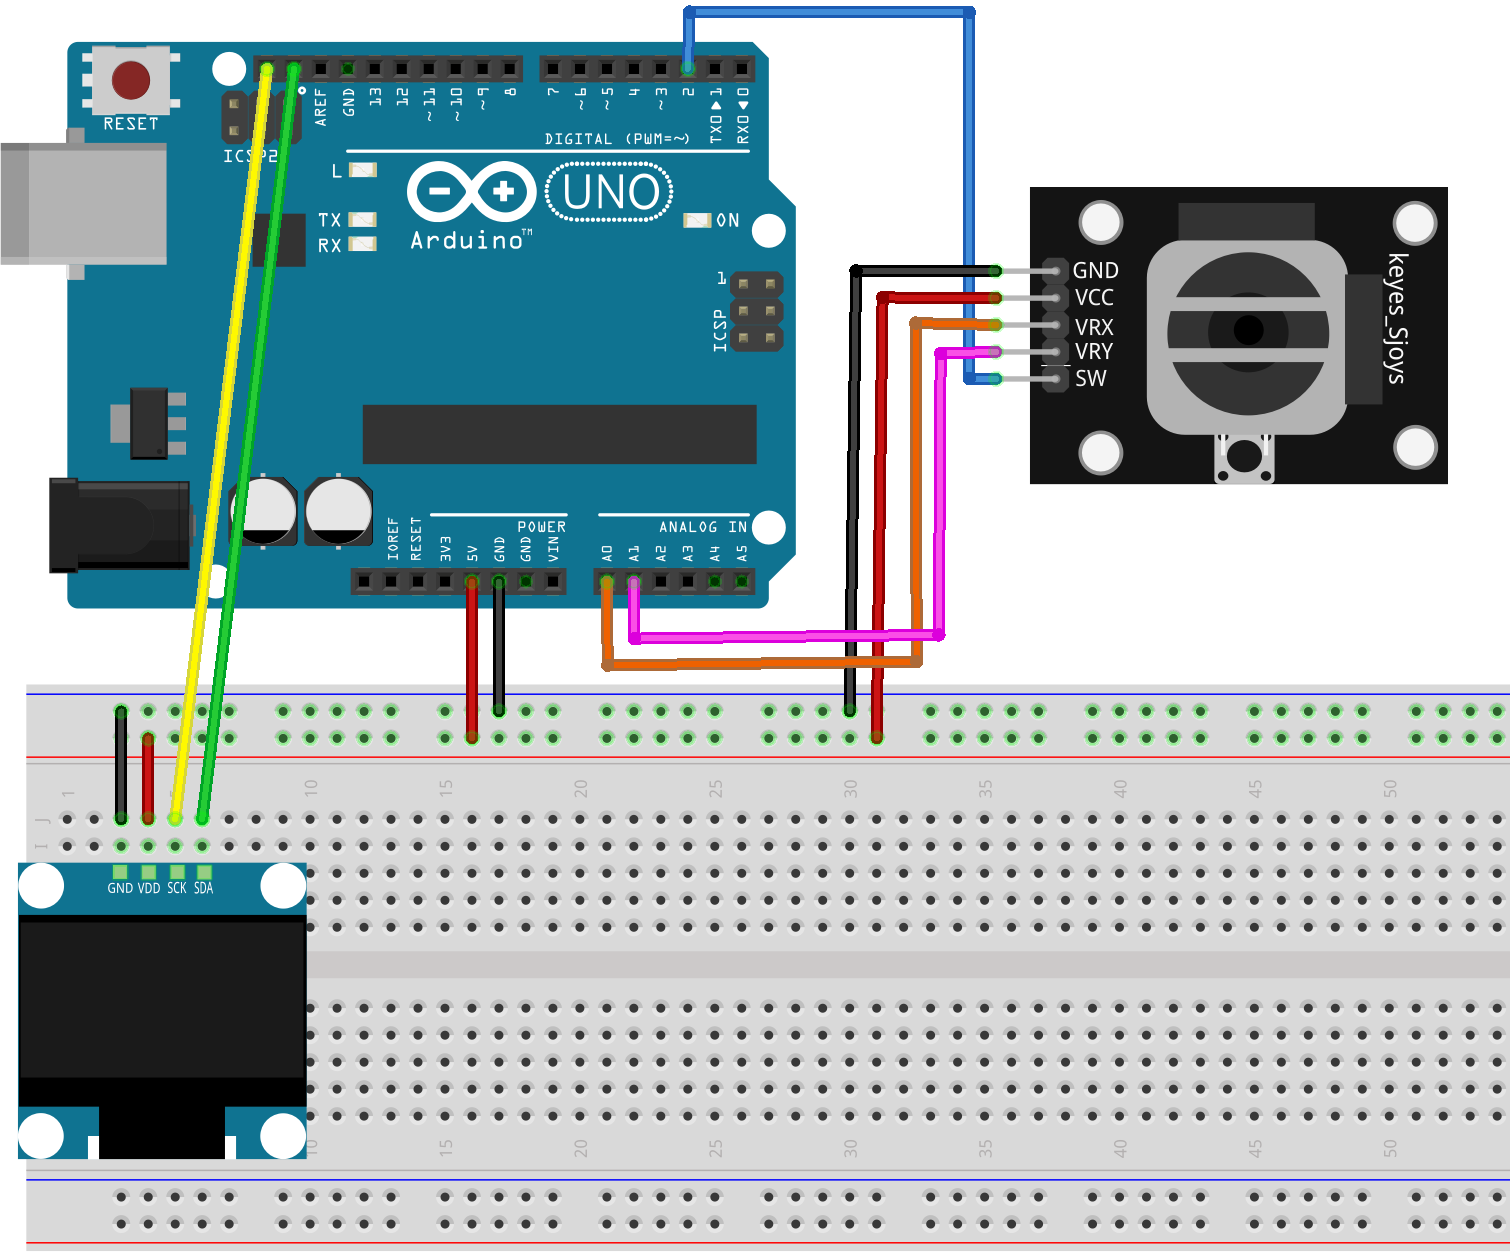
Common Connections:
Joystick Module
VRX: Connect to A0 on the Arduino.
VRY: Connect to A1 on the Arduino.
SW: Connect to 2 on the Arduino.
GND: Connect to breadboard’s negative power bus.
VCC: Connect to breadboard’s red power bus.
OLED Display Module
SDA: Connect to SDA on the Arduino.
SCK: Connect to SCL on the Arduino.
GND: Connect to breadboard’s negative power bus.
VCC: Connect to breadboard’s red power bus.
Writing the Code
Note
You can copy this code into Arduino IDE.
To install the library, use the Arduino Library Manager and search for Adafruit SSD1306 and Adafruit GFX and install it.
Don’t forget to select the board(Arduino UNO R4 Minima) and the correct port before clicking the Upload button.
#include <Wire.h>
#include <Adafruit_GFX.h>
#include <Adafruit_SSD1306.h>

#define SCREEN_WIDTH 128  // OLED display width, in pixels
#define SCREEN_HEIGHT 64  // OLED display height, in pixels
#define OLED_RESET -1     // Reset pin (not used, so set to -1)

Adafruit_SSD1306 display(SCREEN_WIDTH, SCREEN_HEIGHT, &Wire, OLED_RESET);

int eyeAreaRadius = 18;     // Radius of the entire
int pupilRadius = 6;        // Radius of the pupil
int reflectionRadius1 = 2;  // Radius of the first reflection spot
int reflectionRadius2 = 1;  // Radius of the second reflection spot
int eyeMovementMargin = 5;  // Margin to prevent the pupil from touching the eye edges

const int buttonPin = 2;  // Pin number for the joystick button
const int xPin = A0;      // Pin number for X-axis input from joystick
const int yPin = A1;      // Pin number for Y-axis input from joystick

bool isBlinking = false;  // Flag to track if the eyes are blinking

// Left eye parameters
int leftEyeX, leftEyeY;
int leftEyeCenterX = SCREEN_WIDTH / 2 - 20;  // X-coordinate of the left eye's center
int leftEyeCenterY = SCREEN_HEIGHT / 2;      // Y-coordinate of the left eye's center
int leftEyeMaxX = leftEyeCenterX + eyeAreaRadius - pupilRadius - eyeMovementMargin;
int leftEyeMinX = leftEyeCenterX - eyeAreaRadius + pupilRadius + eyeMovementMargin;
int leftEyeMaxY = leftEyeCenterY + eyeAreaRadius - pupilRadius - eyeMovementMargin;
int leftEyeMinY = leftEyeCenterY - eyeAreaRadius + pupilRadius + eyeMovementMargin;

// Right eye parameters
int rightEyeX, rightEyeY;
int rightEyeCenterX = SCREEN_WIDTH / 2 + 20;  // X-coordinate of the right eye's center
int rightEyeCenterY = SCREEN_HEIGHT / 2;      // Y-coordinate of the right eye's center
int rightEyeMaxX = rightEyeCenterX + eyeAreaRadius - pupilRadius - eyeMovementMargin;
int rightEyeMinX = rightEyeCenterX - eyeAreaRadius + pupilRadius + eyeMovementMargin;
int rightEyeMaxY = rightEyeCenterY + eyeAreaRadius - pupilRadius - eyeMovementMargin;
int rightEyeMinY = rightEyeCenterY - eyeAreaRadius + pupilRadius + eyeMovementMargin;

void setup() {
  pinMode(xPin, INPUT);              // Set pin A0 for X-axis input from joystick
  pinMode(yPin, INPUT);              // Set pin A1 for Y-axis input from joystick
  pinMode(buttonPin, INPUT_PULLUP);  // Set button pin as input with internal pull-up resistor

  if (!display.begin(SSD1306_SWITCHCAPVCC, 0x3C)) {
    Serial.println(F("SSD1306 allocation failed"));
    for (;;)
      ;  // Stop if the display initialization fails
  }

  display.clearDisplay();  // Clear the display buffer
  display.display();       // Display the cleared buffer (turn off all pixels)
}

void loop() {
  int xValue = analogRead(xPin);             // Read the X-axis value from the joystick
  int yValue = analogRead(yPin);             // Read the Y-axis value from the joystick
  int buttonState = digitalRead(buttonPin);  // Read the state of the button

  // Map joystick values to left eye's pupil position within its allowed range
  leftEyeX = map(xValue, 0, 1023, leftEyeMinX, leftEyeMaxX);
  leftEyeY = map(yValue, 0, 1023, leftEyeMinY, leftEyeMaxY);

  // Map joystick values to right eye's pupil position within its allowed range
  rightEyeX = map(xValue, 0, 1023, rightEyeMinX, rightEyeMaxX);
  rightEyeY = map(yValue, 0, 1023, rightEyeMinY, rightEyeMaxY);

  // Check if the button is pressed to determine if the eyes should blink
  if (buttonState == LOW) {  // If the button is pressed
    isBlinking = true;
  } else {
    isBlinking = false;
  }

  display.clearDisplay();  // Clear the display buffer before drawing

  // Draw the left eye
  display.fillCircle(leftEyeCenterX, leftEyeCenterY, eyeAreaRadius, SSD1306_WHITE);  // Draw the eye area
  display.fillCircle(leftEyeX, leftEyeY, pupilRadius, SSD1306_BLACK);                // Draw the pupil
  display.fillCircle(leftEyeX - 2, leftEyeY - 2, reflectionRadius1, SSD1306_WHITE);  // Draw the first reflection
  display.fillCircle(leftEyeX + 1, leftEyeY + 1, reflectionRadius2, SSD1306_WHITE);  // Draw the second reflection

  // Draw the right eye
  display.fillCircle(rightEyeCenterX, rightEyeCenterY, eyeAreaRadius, SSD1306_WHITE);  // Draw the eye area
  display.fillCircle(rightEyeX, rightEyeY, pupilRadius, SSD1306_BLACK);                // Draw the pupil
  display.fillCircle(rightEyeX - 2, rightEyeY - 2, reflectionRadius1, SSD1306_WHITE);  // Draw the first reflection
  display.fillCircle(rightEyeX + 1, rightEyeY + 1, reflectionRadius2, SSD1306_WHITE);  // Draw the second reflection

  if (isBlinking) {
    // Draw the blinking effect (top half of the eyes black)
    display.fillRect(leftEyeCenterX - eyeAreaRadius, leftEyeCenterY - eyeAreaRadius, 2.5 * eyeAreaRadius, eyeAreaRadius, SSD1306_BLACK);
    display.fillRect(rightEyeCenterX - eyeAreaRadius, rightEyeCenterY - eyeAreaRadius, 2.5 * eyeAreaRadius, eyeAreaRadius, SSD1306_BLACK);
  }

  display.display();  // Update the display with the new drawings
  delay(50);          // Short delay to reduce flickering
}