RFID Access1.0
Note
🌟 Welcome to the SunFounder Facebook Community! Whether you’re into Raspberry Pi, Arduino, or ESP32, you’ll find inspiration, help ideas here.
✅ Be the first to get free learning resources.
✅ Stay updated on new products & exclusive giveaways.
✅ Share your creations and get real feedback.
Kit purchase
Looking for parts? Check out our all-in-one kits below — packed with components, beginner-friendly guides, and tons of fun.

Name |
Includes Arduino board |
PURCHASE LINK |
|---|---|---|
Elite Explorer Kit |
Arduino Uno R4 WiFi |
|
Inventor Lab Kit |
Arduino Uno R3 |
Course Introduction
In this lesson, we’ll build a 1.0 access-control system using the MFRC522 module, a stepper motor, and an active buzzer.
When a valid card is presented, the motor unlocks the door and plays an “access granted” tone; an invalid card triggers a warning alarm.
Note
If this is your first time working with an Arduino project, we recommend downloading and reviewing the basic materials first.
Required Components
In this project, we need the following components:
SN |
COMPONENT INTRODUCTION |
QUANTITY |
PURCHASE LINK |
|---|---|---|---|
1 |
Arduino UNO R4 Minima/Arduino UNO R4 WIFI |
1 |
|
2 |
USB Type-C cable |
1 |
|
3 |
Breadboard |
1 |
|
4 |
Wires |
Several |
|
5 |
Active Buzzer |
1 |
|
6 |
Stepper Motor 28BYJ-48 ULN2003 Drive Module 5 |
1 |
|
7 |
MFRC522 Module |
1 |
|
8 |
Power Supply Module |
1 |
Wiring
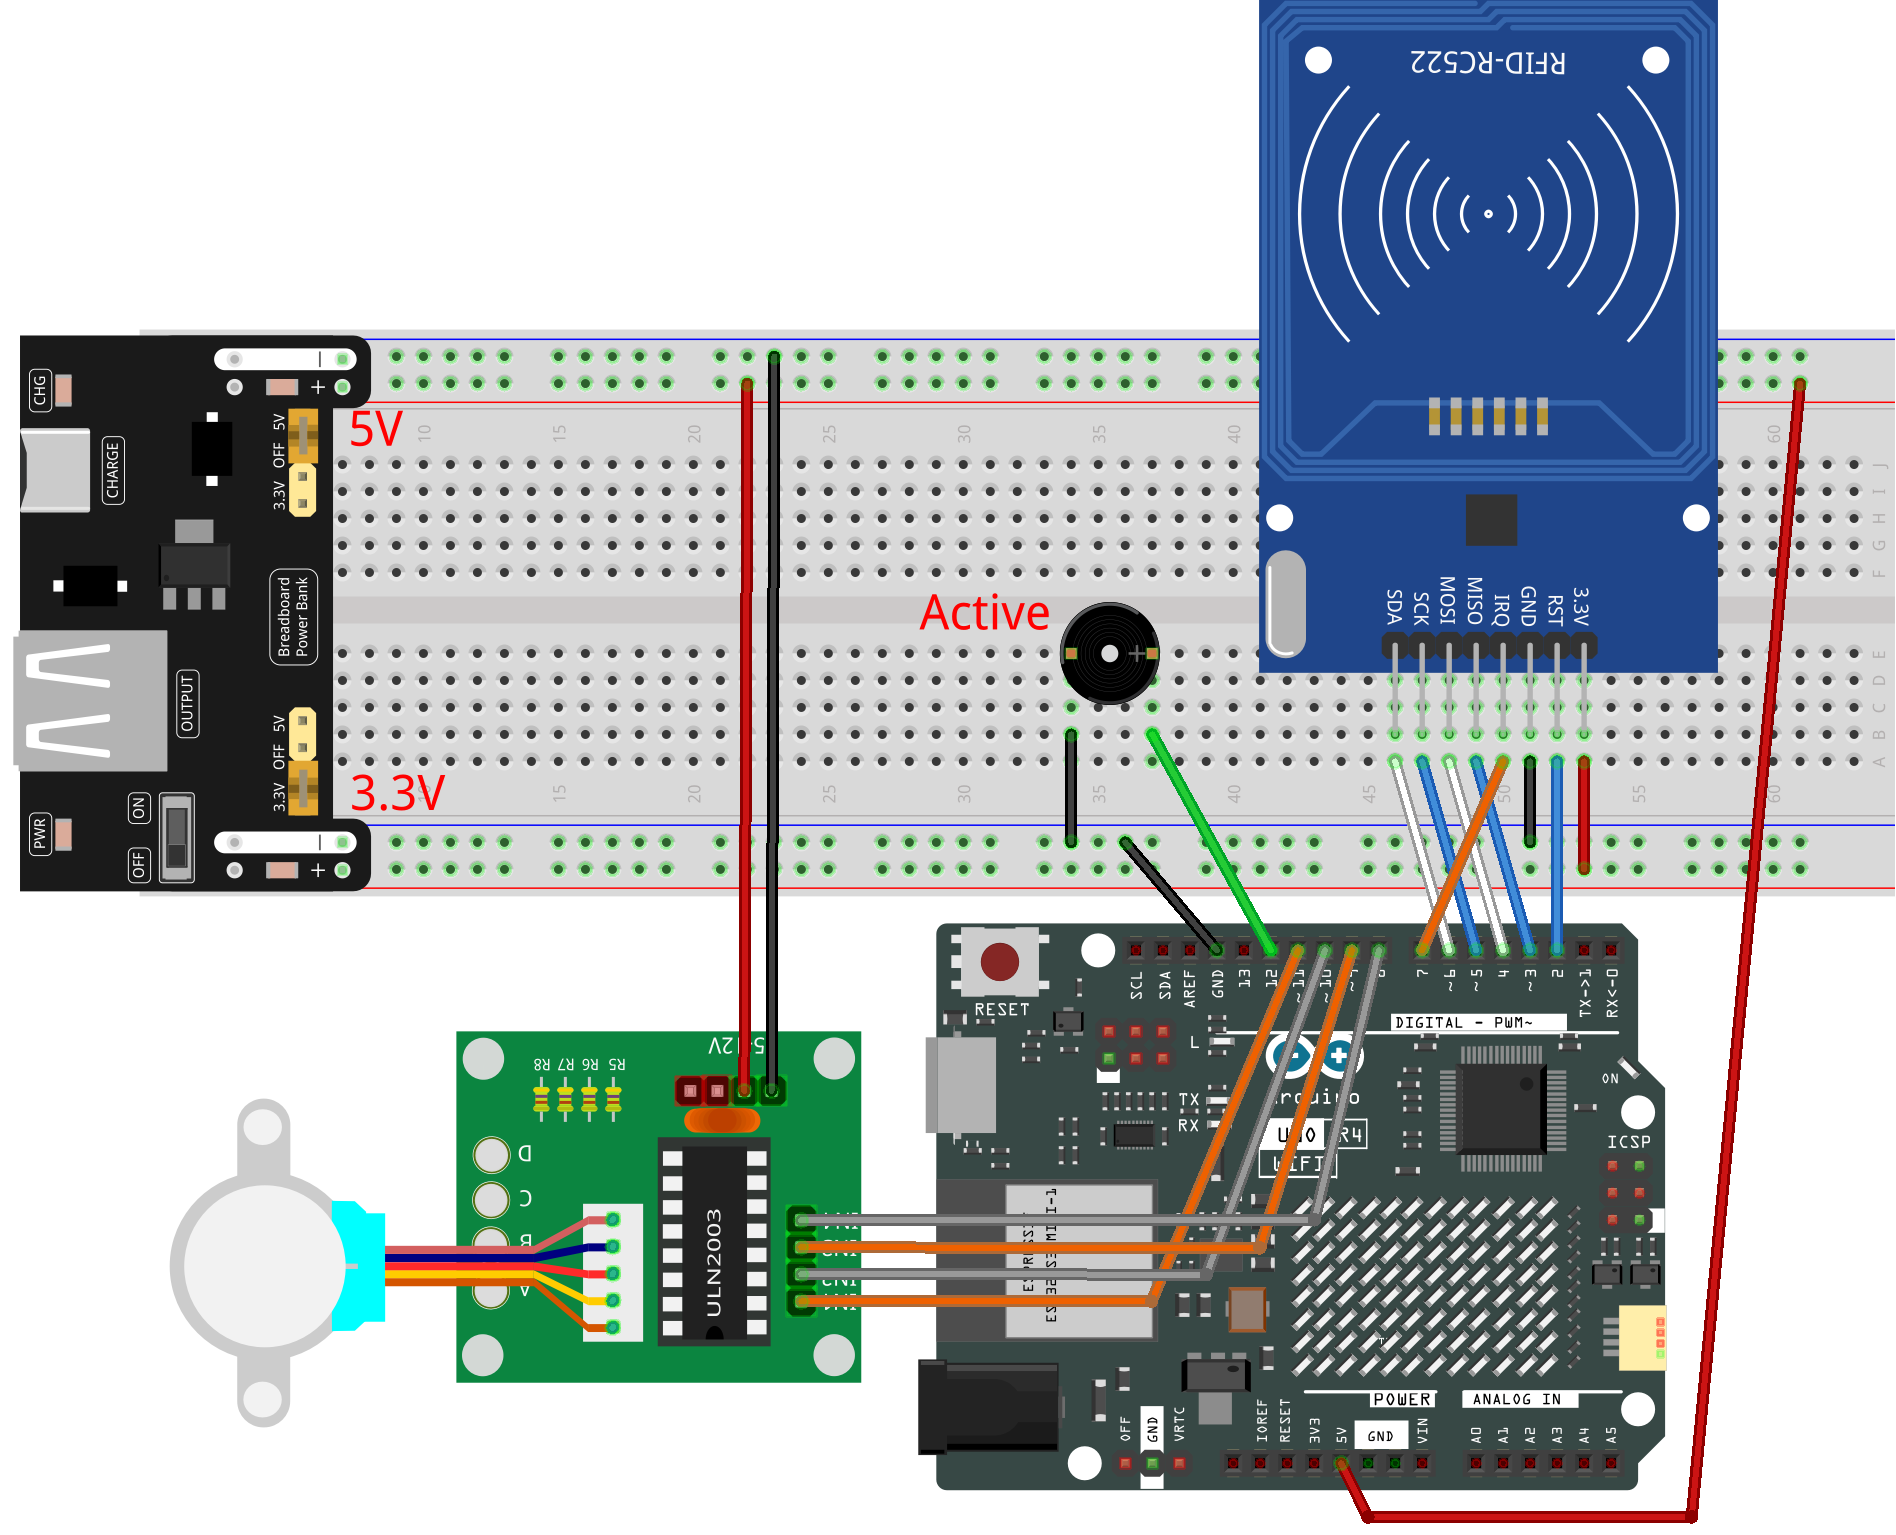
Common Connections:
MFRC522 Module
SDA: Connect to 6 on the Arduino.
SCK: Connect to 5 on the Arduino.
MOSI: Connect to 4 on the Arduino.
MISO: Connect to 3 on the Arduino.
IRQ: Connect to 7 on the Arduino.
GND: Connect to breadboard’s negative power bus.
RST: Connect to 2 on the Arduino.
3.3V: Connect to breadboard’s passive power bus.
Active Buzzer
+: Connect to 12 on the Arduino.
-: Connect to breadboard’s negative power bus.
Stepper Motor 28BYJ-48 ULN2003 Drive Module 5
IN1: Connect to 11 on the Arduino.
IN2: Connect to 10 on the Arduino.
IN3: Connect to 9 on the Arduino.
IN4: Connect to 8 on the Arduino.
Writing the Code
Note
You can copy this code into Arduino IDE.
The
RFID1library is used here. You can click hereRFID1.zipto download it.Don’t forget to select the board(Arduino UNO R4 WIFI) and the correct port before clicking the Upload button.
/*
  The code is designed for an Arduino Uno R4 board and uses an MFRC522 RFID module,
  a stepper motor, and a buzzer. The system serves as an RFID-based door lock. It
  reads an RFID card and matches its ID with a pre-defined authenticated ID. If the
  ID matches, the stepper motor turns to open the door, and a buzzer beeps to indicate
  success. Otherwise, the buzzer beeps differently to indicate failure.

  Board: Arduino Uno R4
  Component: MFRC522 Module, Stepper Motor and Buzzer
*/


#include <rfid1.h>
#include <Stepper.h>
#include <Wire.h>

#define ID_LEN 4

/*Stepper Motor*/
const int stepsPerRevolution = 2048;  // Steps per revolution for stepper motor
const int rolePerMinute = 16;         // Motor speed in RPM
const int IN1 = 11;
const int IN2 = 10;
const int IN3 = 9;
const int IN4 = 8;

/*Buzzer*/
const int buzPin = 12;

/*Authentication Parameters*/
uchar userIdRead[ID_LEN] = { "" };
uchar userId[ID_LEN] = { 0x36, 0xE2, 0xC4, 0xF7 };  // Authenticated ID
bool approved = 0;

RFID1 rfid;  //create a variable type of RFID1
Stepper stepper(stepsPerRevolution, IN1, IN3, IN2, IN4);

void setup() {
  Serial.begin(9600);
  stepper.setSpeed(rolePerMinute);
  pinMode(buzPin, OUTPUT);
  rfid.begin(7, 5, 4, 3, 6, 2);
  rfid.init();  //initialize the RFID
  Serial.println("start");
}

void loop() {
  // If not approved, try to read RFID
  if (approved == 0) {
    approved = rfidRead();
    for (int i = 0; i < ID_LEN; i++) {
      userIdRead[i] = NULL;  // Clear read ID
    }
  }
  // If approved, open the door
  if (approved == 1) {
    openDoor();
    approved = 0;  // Reset approval flag
  }
}

void beep(int duration, int frequency) {
  for (int i = 0; i < frequency; i++) {
    digitalWrite(buzPin, HIGH);
    delay(duration);
    digitalWrite(buzPin, LOW);
    delay(100);
  }
}

void verifyPrint(bool result) {
  if (result == true) {
    beep(100, 3);
    delay(400);
  } else {
    beep(500, 1);
    delay(400);
  }
}

void openDoor() {
  int doorStep = 512;  //This means the door will open to 90 degrees
  stepper.step(doorStep);
  for (int i = 0; i < 5; i++) {
    delay(1000);
  }
  stepper.step(-doorStep);
}

bool rfidRead() {
  getId();
  if (userIdRead[0] != NULL) {
    return idVerify();
  }
  return 0;
}

void getId() {
  uchar status;
  uchar str[MAX_LEN];
  status = rfid.request(PICC_REQIDL, str);
  if (status != MI_OK) {
    return;
  } else {
    status = rfid.anticoll(str);
    Serial.println("");
    Serial.print("Reading Card ID: ");
    if (status == MI_OK) {
      for (int i = 0; i < ID_LEN; i++) {
        userIdRead[i] = str[i];
        Serial.print("0x");
        Serial.print(userIdRead[i], HEX);
        Serial.print(", ");
      }
    }
    delay(500);
    rfid.halt();
    beep(150, 1);
  }
}

bool idVerify() {
  for (int i = 0; i < ID_LEN; i++) {
    if (userIdRead[i] != userId[i]) {
      verifyPrint(0);
      return 0;
    }
  }
  verifyPrint(1);
  return 1;
}