RFID Access3.0
Note
🌟 Welcome to the SunFounder Facebook Community! Whether you’re into Raspberry Pi, Arduino, or ESP32, you’ll find inspiration, help ideas here.
✅ Be the first to get free learning resources.
✅ Stay updated on new products & exclusive giveaways.
✅ Share your creations and get real feedback.
Kit purchase
Looking for parts? Check out our all-in-one kits below — packed with components, beginner-friendly guides, and tons of fun.

Name |
Includes Arduino board |
PURCHASE LINK |
|---|---|---|
Elite Explorer Kit |
Arduino Uno R4 WiFi |
|
Inventor Lab Kit |
Arduino Uno R3 |
Course Introduction
In this lesson, we’ll build a 3.0 access-control system using the MFRC522 module, a 1602 LCD, a digital servo motor, and an active buzzer.
Note
If this is your first time working with an Arduino project, we recommend downloading and reviewing the basic materials first.
Required Components
In this project, we need the following components:
SN |
COMPONENT INTRODUCTION |
QUANTITY |
PURCHASE LINK |
|---|---|---|---|
1 |
Arduino UNO R4 Minima/Arduino UNO R4 WIFI |
1 |
|
2 |
USB Type-C cable |
1 |
|
3 |
Breadboard |
1 |
|
4 |
Wires |
Several |
|
5 |
Active Buzzer |
1 |
|
6 |
I2C LCD 1602 |
1 |
|
7 |
MFRC522 Module |
1 |
|
8 |
Power Supply Module |
1 |
|
9 |
Digital Servo Motor |
1 |
Wiring
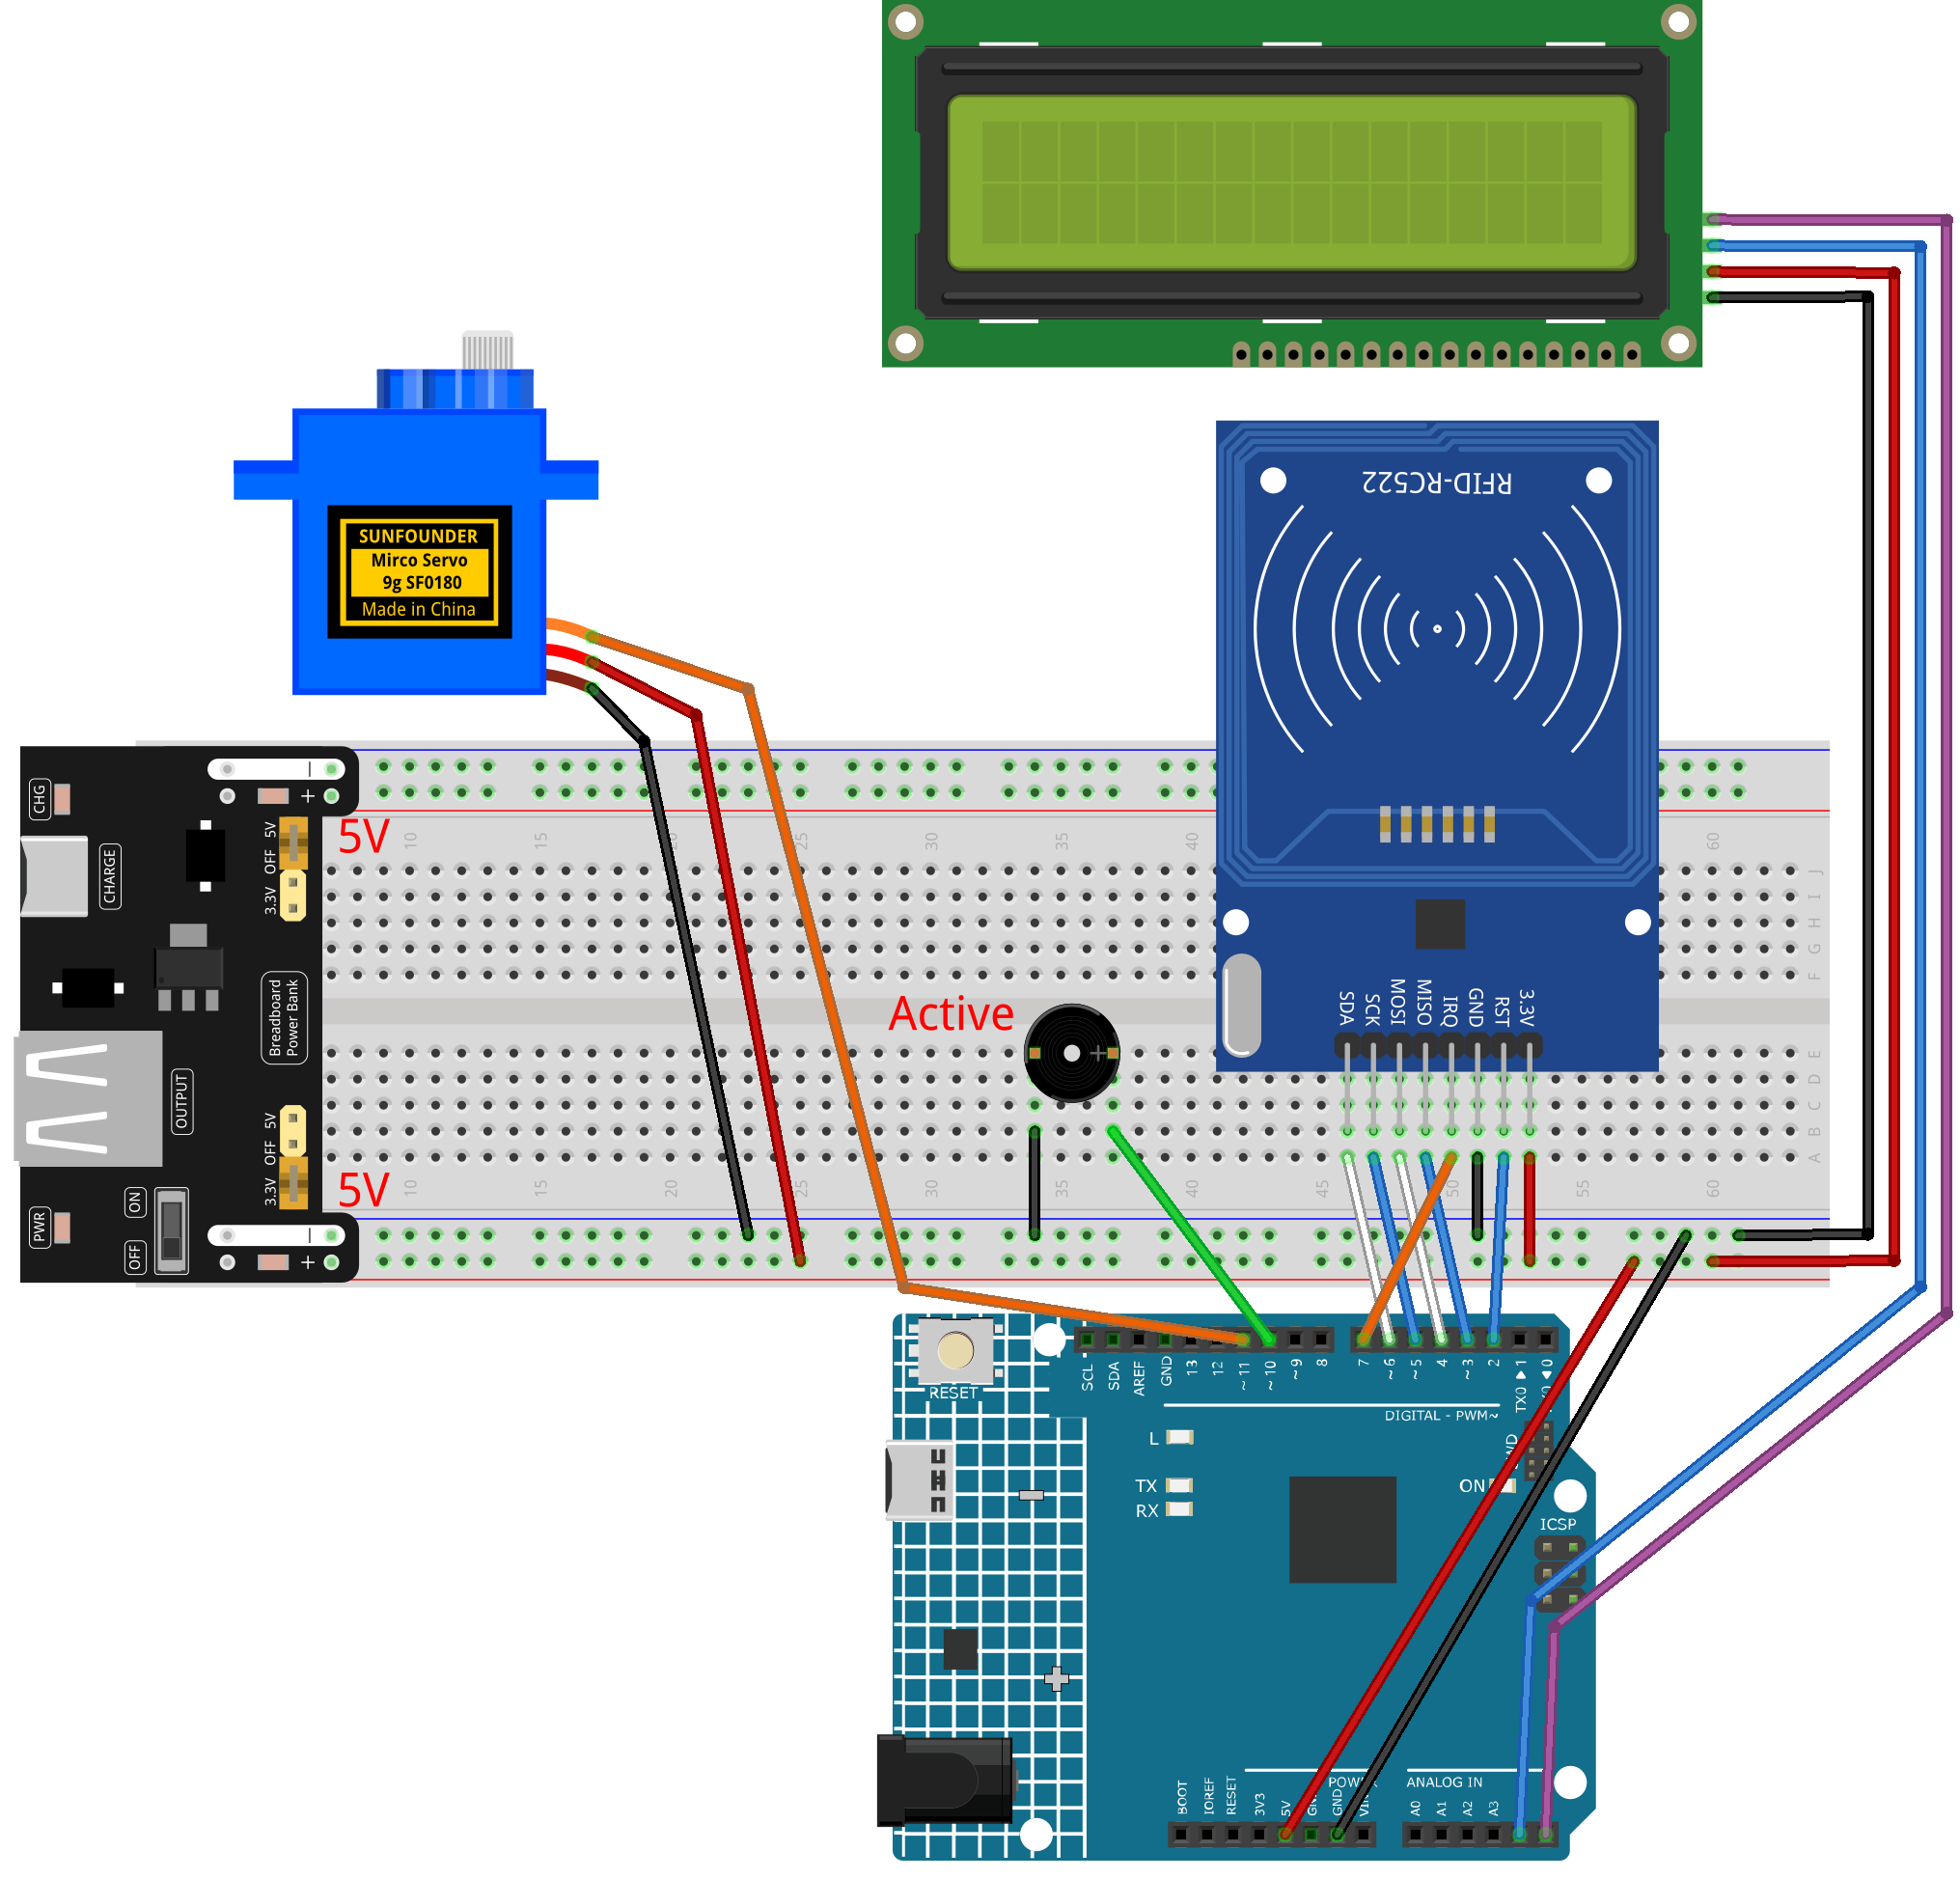
Common Connections:
MFRC522 Module
SDA: Connect to 6 on the Arduino.
SCK: Connect to 5 on the Arduino.
MOSI: Connect to 4 on the Arduino.
MISO: Connect to 3 on the Arduino.
GND: Connect to breadboard’s negative power bus.
RST: Connect to 2 on the Arduino.
3.3V: Connect to breadboard’s passive power bus.
Active Buzzer
+: Connect to 10 on the Arduino.
-: Connect to breadboard’s negative power bus.
I2C LCD 1602
SDA: Connect to A4 on the Arduino.
SCL: Connect to A5 on the Arduino.
GND: Connect to breadboard’s negative power bus.
VCC: Connect to breadboard’s red power bus.
Digital Servo Motor
Connect to breadboard’s positive power bus.
Connect to breadboard’s negative power bus.
Connect to 11 on the Arduino.
Writing the Code
Note
You can copy this code into Arduino IDE.
To install the library, use the Arduino Library Manager and search for LiquidCrystal I2C and install it.
The
RFID1library is used here. You can click hereRFID1.zipto download it.Don’t forget to select the board(Arduino UNO R4 WIFI) and the correct port before clicking the Upload button.
#include <rfid1.h>               // MFRC522 RFID library
#include <Wire.h>                // I2C communication library
#include <LiquidCrystal_I2C.h>   // I2C LCD library
#include <Servo.h>               // Servo motor library

#define ID_LEN 4                 // Length of the RFID UID in bytes

// ———— Global objects & pins ————
RFID1               rfid;                // RFID reader object
LiquidCrystal_I2C  lcd(0x27, 16, 2);     // LCD at I2C address 0x27, 16×2 chars
Servo               myServo;             // Servo motor object

const int buzPin   = 10;   // Buzzer output pin
const int servoPin = 11;   // Servo control pin

// Authorized card UID (change to your card’s UID)
uchar userId[ID_LEN]     = { 0x36, 0xE2, 0xC4, 0xF7 };
// Buffer to store the UID read from a card
uchar userIdRead[ID_LEN];

// ———— Setup runs once ————
void setup() {
  Serial.begin(9600);            // Start serial monitor for debugging

  // Initialize RFID reader (SS, RST, MISO, MOSI, SCK, IRQ)
  rfid.begin(7, 5, 4, 3, 6, 2);
  rfid.init();                   // Power up and reset RFID module

  pinMode(buzPin, OUTPUT);       // Configure buzzer pin as output

  // Attach servo and move it to 90° (door closed)
  myServo.attach(servoPin);
  myServo.write(90);
  delay(500);                    // Wait for servo to reach position

  lcd.init();                    // Initialize the LCD
  lcd.backlight();               // Turn on LCD backlight

  showWelcome();                 // Display the welcome screen
}

// ———— Main loop repeats forever ————
void loop() {
  uchar status, str[MAX_LEN];

  // Ask RFID module if a card is in range
  status = rfid.request(PICC_REQIDL, str);
  if (status == MI_OK) {
    getId();                // Read the card’s UID into buffer
    scanningAnimation();    // Show “Scanning……” with dots

    // Check if the read UID matches authorized UID
    if (idVerify()) {
      handleSuccess();      // If match, open door
    } else {
      handleFailure();      // If no match, show error
    }

    delay(500);             // Short pause before resetting screen
    showWelcome();          // Return to welcome message

    // Clear the UID buffer for next read
    for (int i = 0; i < ID_LEN; i++) {
      userIdRead[i] = 0;
    }
  }
}

// ———— Display initial welcome screen ————
void showWelcome() {
  lcd.clear();
  lcd.setCursor(0, 0);
  lcd.print("Welcome!");         // Top line
  lcd.setCursor(0, 1);
  lcd.print("Place your card");  // Bottom line
}

// ———— Show scanning animation ————
void scanningAnimation() {
  lcd.clear();
  lcd.setCursor(0, 0);
  lcd.print("Scanning");         // Print text
  // Add six dots one by one
  for (int i = 0; i < 6; i++) {
    lcd.print(".");
    delay(500);                  // Wait half a second per dot
  }
}

// ———— Read UID from the card ————
void getId() {
  uchar status, str[MAX_LEN];
  status = rfid.anticoll(str);   // Anti-collision to get full UID
  if (status == MI_OK) {
    Serial.print("Card ID: ");
    // Copy each byte into our buffer and print it for debug
    for (int i = 0; i < ID_LEN; i++) {
      userIdRead[i] = str[i];
      Serial.print("0x");
      Serial.print(str[i], HEX);
      Serial.print(" ");
    }
    Serial.println();
    rfid.halt();                 // Halt further readings until next loop
  }
}

// ———— Compare read UID with authorized UID ————
bool idVerify() {
  for (int i = 0; i < ID_LEN; i++) {
    if (userIdRead[i] != userId[i]) {
      verifyPrint(false);        // Mismatch: indicate failure
      return false;
    }
  }
  verifyPrint(true);             // Match: indicate success
  return true;
}

// ———— Sound buzzer for pass/fail feedback ————
void verifyPrint(bool result) {
  if (result) {
    beep(100, 3);                // Three short beeps for success
    delay(400);                  // Pause before next action
  } else {
    beep(500, 1);                // One long beep for error
    delay(400);
  }
}

// duration: length of one beep in ms; frequency: number of beeps
void beep(int duration, int frequency) {
  for (int i = 0; i < frequency; i++) {
    tone(buzPin, 1000);          // Play 1 kHz tone
    delay(duration);             // Keep tone on
    noTone(buzPin);              // Stop tone
    delay(100);                  // Short gap between beeps
  }
}

// ———— Actions when card is valid ————
void handleSuccess() {
  lcd.clear();
  lcd.setCursor(0, 0);
  lcd.print("Card success!");
  lcd.setCursor(0, 1);
  lcd.print("Welcome home");

  delay(500);                     // Let user read the message
  myServo.write(0);               // Move servo to 0° (open door)
  delay(2000);                    // Door stays open for 2 seconds
  myServo.write(90);              // Return servo to 90° (close door)
}

// ———— Actions when card is invalid ————
void handleFailure() {
  lcd.clear();
  lcd.setCursor(0, 0);
  lcd.print("Card error!");       // Show error message
  delay(1000);                    // Pause so user sees the error
}