Note
Hello, welcome to the SunFounder Raspberry Pi & Arduino & ESP32 Enthusiasts Community on Facebook! Dive deeper into Raspberry Pi, Arduino, and ESP32 with fellow enthusiasts.
Why Join?
Expert Support: Solve post-sale issues and technical challenges with help from our community and team.
Learn & Share: Exchange tips and tutorials to enhance your skills.
Exclusive Previews: Get early access to new product announcements and sneak peeks.
Special Discounts: Enjoy exclusive discounts on our newest products.
Festive Promotions and Giveaways: Take part in giveaways and holiday promotions.
👉 Ready to explore and create with us? Click [here] and join today!
5.12 Measuring Distance
The ultrasonic module is used for distance measurement or object detection. In this project, we will program the module to obtain obstacle distances. By sending ultrasonic pulses and measuring the time it takes for them to bounce back, we can calculate distances. This enables us to implement distance-based actions or obstacle avoidance behaviors.
Required Components
In this project, we need the following components.
It’s definitely convenient to buy a whole kit, here’s the link:
Name |
ITEMS IN THIS KIT |
LINK |
|---|---|---|
ESP32 Starter Kit |
320+ |
You can also buy them separately from the links below.
COMPONENT INTRODUCTION |
PURCHASE LINK |
|---|---|
Available Pins
Available Pins
Here is a list of available pins on the ESP32 board for this project.
For Input
IO13, IO14, IO27, IO26, IO25, IO33, IO32, I35, I34, I39, I36, IO4, IO18, IO19, IO21, IO22, IO23
For Output
IO13, IO12, IO14, IO27, IO26, IO25, IO33, IO32, IO15, IO2, IO0, IO4, IO5, IO18, IO19, IO21, IO22, IO23
Schematic
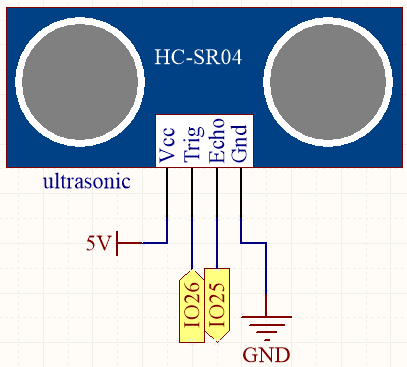
The ESP32 sends a set of square wave signals to the Trig pin of the ultrasonic sensor every 10 seconds. This prompts the ultrasonic sensor to emit a 40kHz ultrasound signal outward. If there is an obstacle in front, the ultrasound waves will be reflected back.
By recording the time it takes from sending to receiving the signal, dividing it by 2, and multiplying it by the speed of light, you can determine the distance to the obstacle.
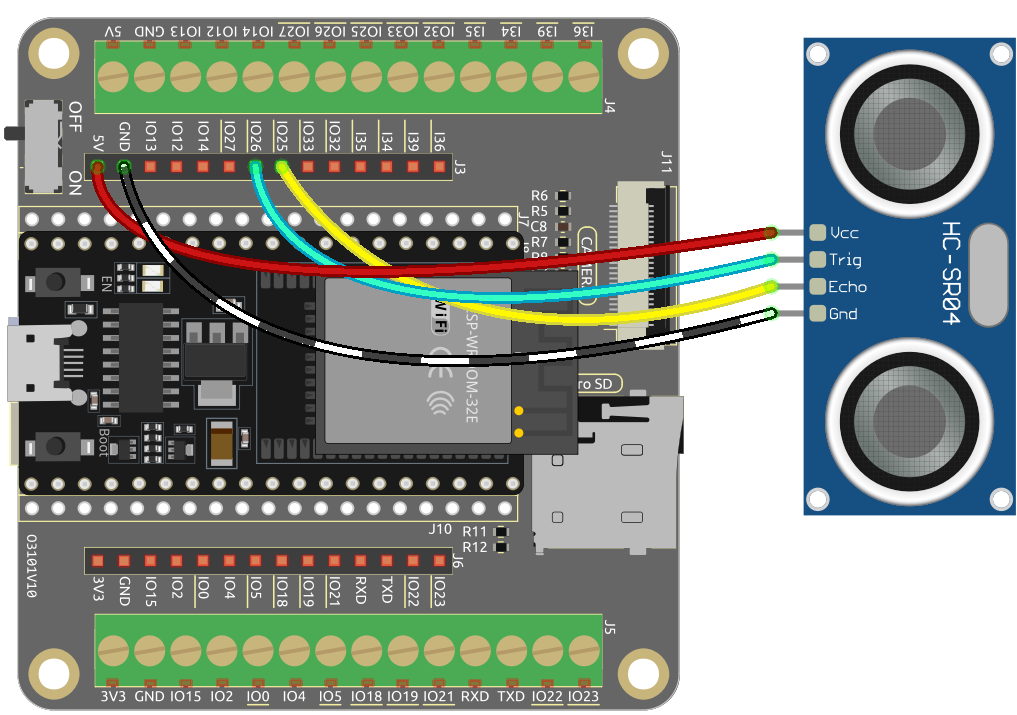
Wiring
Code
Note
Open the
5.12_ultrasonic.inofile under the path ofesp32-starter-kit-main\c\codes\5.12_ultrasonic.After selecting the board (ESP32 Dev Module) and the appropriate port, click the Upload button.
Remember to Set the serial communication baud rate to 115200.
After the code is successfully uploaded, the serial monitor will print out the distance between the ultrasonic sensor and the obstacle ahead.
How it works?
About the application of ultrasonic sensor, we can directly check the subfunction.
float readSensorData(){// ...}
The
trigPinof the ultrasonic module transmits a 10us square wave signal every 2us.// Trigger a low signal before sending a high signal digitalWrite(trigPin, LOW); delayMicroseconds(2); // Send a 10-microsecond high signal to the trigPin digitalWrite(trigPin, HIGH); delayMicroseconds(10); // Return to low signal digitalWrite(trigPin, LOW);
The
echoPinreceives a high level signal if there is an obstacle within the range and use thepulseIn()function to record the time from sending to receiving.unsigned long microsecond = pulseIn(echoPin, HIGH);
The speed of sound is 340 meters per second, which is equivalent to 29 microseconds per centimeter. By measuring the time it takes for a square wave to travel to an obstacle and return, we can calculate the distance traveled by dividing the total time by 2. This gives us the distance of the obstacle from the source of the sound wave.
float distance = microsecond / 29.00 / 2;
Note that the ultrasonic sensor will pause the program when it is working, which may cause some lagging when writing complex projects.