Note
Hello, welcome to the SunFounder Raspberry Pi & Arduino & ESP32 Enthusiasts Community on Facebook! Dive deeper into Raspberry Pi, Arduino, and ESP32 with fellow enthusiasts.
Why Join?
Expert Support: Solve post-sale issues and technical challenges with help from our community and team.
Learn & Share: Exchange tips and tutorials to enhance your skills.
Exclusive Previews: Get early access to new product announcements and sneak peeks.
Special Discounts: Enjoy exclusive discounts on our newest products.
Festive Promotions and Giveaways: Take part in giveaways and holiday promotions.
👉 Ready to explore and create with us? Click [here] and join today!
6.1 Fruit Piano
Have you ever wanted to play the piano but couldn’t afford one? Or maybe you just want to have some fun with diy a fruit piano? Well, this project is for you!
With just a few touch sensors on the ESP32 board, you can now play your favorite tunes and enjoy the experience of playing the piano without breaking the bank.
Required Components
In this project, we need the following components.
It’s definitely convenient to buy a whole kit, here’s the link:
Name |
ITEMS IN THIS KIT |
LINK |
|---|---|---|
ESP32 Starter Kit |
320+ |
You can also buy them separately from the links below.
COMPONENT INTRODUCTION |
PURCHASE LINK |
|---|---|
About the Touch Pins
The ESP32 microcontroller has built-in touch sensor functionality, which allows you to use certain pins on the board as touch-sensitive inputs. The touch sensor works by measuring changes in capacitance on the touch pins, which are caused by the electrical properties of the human body.
Here are some key features of the touch sensor on the ESP32:
Number of touch pins
The ESP32 has up to 10 touch pins, depending on the specific board. The touch pins are typically labeled with a “T” followed by a number.
GPIO4: TOUCH0
GPIO0:TOUCH1
GPIO2: TOUCH2
GPIO15: TOUCH3
GPIO13: TOUCH4
GPIO12: TOUCH5
GPIO14: TOUCH6
GPIO27: TOUCH7
GPIO33: TOUCH8
GPIO32: TOUCH9
Note
The GPIO0 and GPIO2 pins are used for bootstrapping and flashing firmware to the ESP32, respectively. These pins are also connected to the onboard LED and button. Therefore, it is generally not recommended to use these pins for other purposes, as it could interfere with the normal operation of the board.
Sensitivity
The touch sensor on the ESP32 is very sensitive and can detect even small changes in capacitance. The sensitivity can be adjusted using software settings.
ESD Protection
The touch pins on the ESP32 have built-in ESD (Electrostatic Discharge) protection, which helps to prevent damage to the board from static electricity.
Multitouch
The touch sensor on the ESP32 supports multitouch, which means that you can detect multiple touch events simultaneously.
Schematic
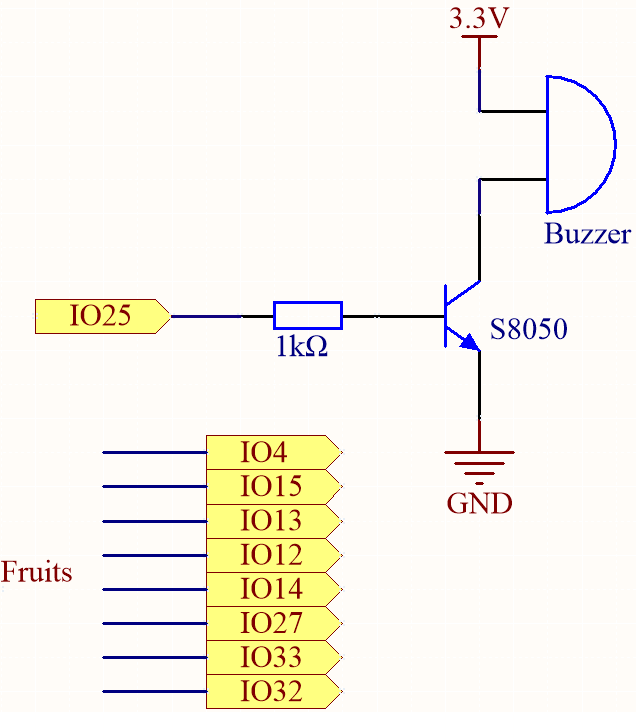
The idea behind this project is to use touch sensors to detect when a user touches a specific pin. Each touch pin is associated with a specific note, and when the user touches a pin, the corresponding note is played on the passive buzzer. The result is a simple and affordable way to enjoy the experience of playing the piano.
Wiring
In this project, you need to remove the ESP32 board from the expansion board and then insert it into the breadboard. This is because some pins on the expansion board are connected to resistors, which will affect the capacitance of the pins.
Code
Note
You can open the file
6.1_fruit_piano.inounder the path ofesp32-starter-kit-main\c\codes\6.1_fruit_pianodirectly.Or copy this code into Arduino IDE.
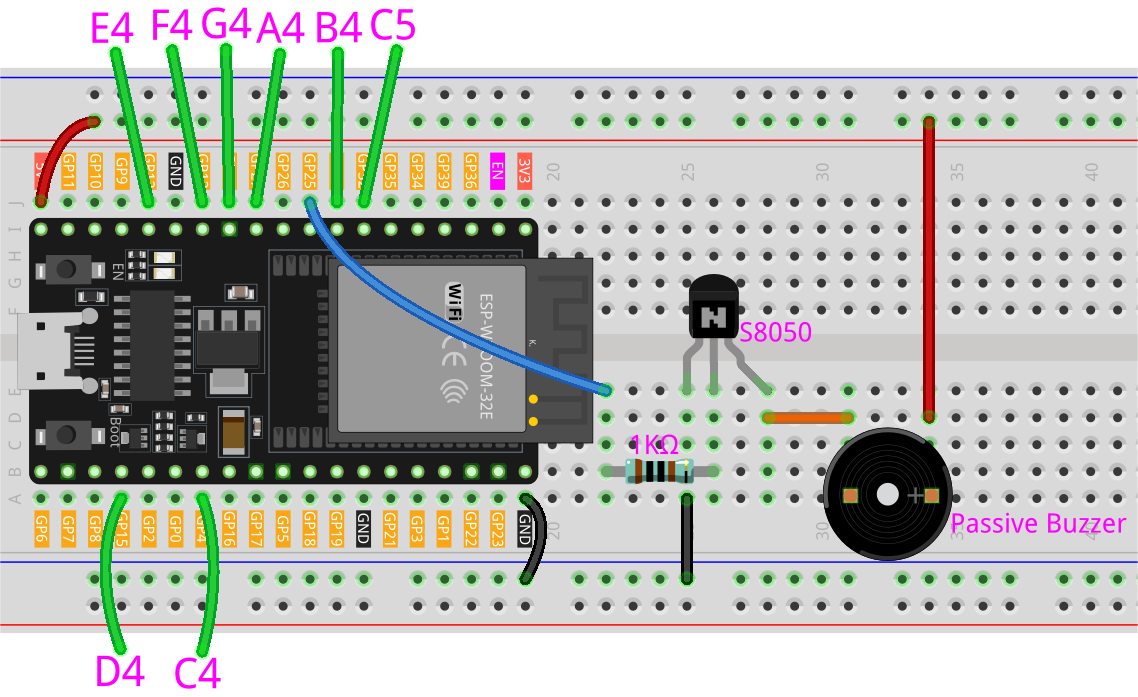
You can connect fruits to these ESP32 pins: 4, 15, 13, 12, 14, 27, 33, 32.
When the script runs, touching these fruits will play the notes C, D, E, F, G, A, B and C5.
How it works?
touchRead(uint8_t pin);This function gets the touch sensor data. Each touch sensor has a counter to count the number of charge/discharge cycles. When the pad is touched, the value in the counter will change because of the larger equivalent capacitance. The change of the data determines if the pad has been touched or not.
pinGPIO pin to read TOUCH value
This function returns a value between 0 and 4095, with a lower value indicating a stronger touch input.
Note
threshold needs to be adjusted based on the conductivity of different fruits.
You can run the script first to see the values printed by the shell.
0: 60
1: 62
2: 71
3: 74
4: 73
5: 78
6: 80
7: 82
After touching the fruits on pins 12, 14, and 27, the printed values are as follows. Therefore, I set the threshold to 30, which means that when a value less than 30 is detected, it is considered to be touched, and the buzzer will emit different notes.
0: 60
1: 62
2: 71
3: 9
4: 12
5: 14
6: 75
7: 78