Note
Hello, welcome to the SunFounder Raspberry Pi & Arduino & ESP32 Enthusiasts Community on Facebook! Dive deeper into Raspberry Pi, Arduino, and ESP32 with fellow enthusiasts.
Why Join?
Expert Support: Solve post-sale issues and technical challenges with help from our community and team.
Learn & Share: Exchange tips and tutorials to enhance your skills.
Exclusive Previews: Get early access to new product announcements and sneak peeks.
Special Discounts: Enjoy exclusive discounts on our newest products.
Festive Promotions and Giveaways: Take part in giveaways and holiday promotions.
👉 Ready to explore and create with us? Click [here] and join today!
2.6 Display Characters
Now, we will explore the fascinating world of character display using the I2C LCD1602 module.
Through this project, we will learn how to initialize the LCD module, set the desired display parameters, and send character data to be displayed on the screen. We can showcase custom messages, display sensor readings, or create interactive menus. The possibilities are endless!
By mastering the art of character display on the I2C LCD1602, we will unlock new avenues for communication and information display in our projects. Let’s dive into this exciting journey and bring our characters to life on the LCD screen
Required Components
In this project, we need the following components.
It’s definitely convenient to buy a whole kit, here’s the link:
Name |
ITEMS IN THIS KIT |
LINK |
|---|---|---|
ESP32 Starter Kit |
320+ |
You can also buy them separately from the links below.
COMPONENT INTRODUCTION |
PURCHASE LINK |
|---|---|
Available Pins
Here is a list of available pins on the ESP32 board for this project.
Available Pins |
Usage Description |
|---|---|
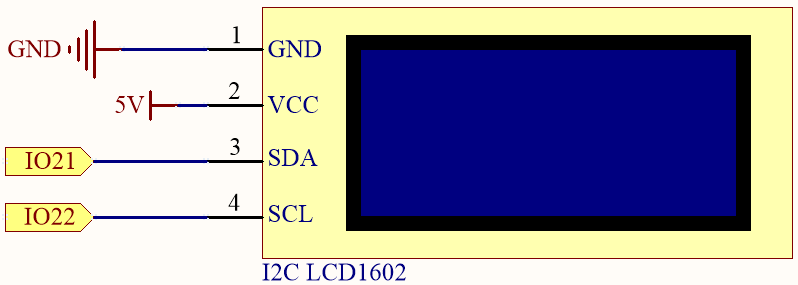
IO21 |
SDA |
IO22 |
SCL |
Schematic
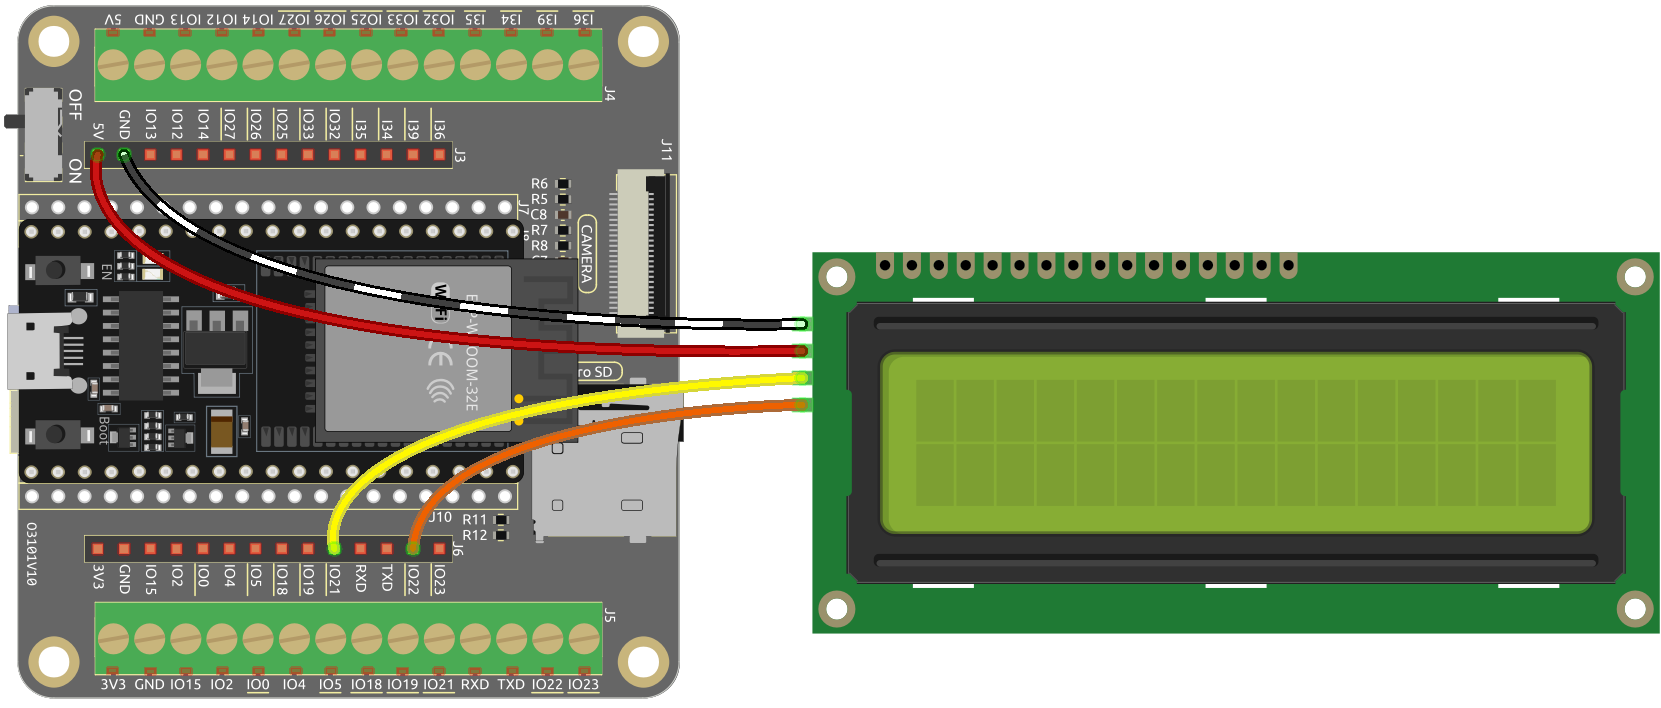
Wiring
Code
Note
Open the
2.6_lcd1602.inofile under the path ofesp32-starter-kit-main\c\codes\2.6_lcd1602.After selecting the board (ESP32 Dev Module) and the appropriate port, click the Upload button.
The
LiquidCrystal I2Clibrary is used here, you can install it from the Library Manager.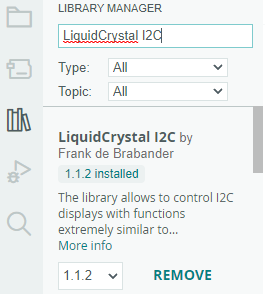
When this program is uploaded, the I2C LCD1602 will display the welcome message, “Hello, Sunfounder!”, for 3 seconds. After that, the screen will show a “COUNT:” label and the count value, which increments every second.
Note
If the code and wiring are correct, but the LCD still fails to display any content, you can adjust the potentiometer on the back to increase the contrast.
How it works?
By calling the library LiquidCrystal_I2C.h, you can easily drive the LCD.
#include <LiquidCrystal_I2C.h>
Library Functions:
Creates a new instance of the
LiquidCrystal_I2Cclass that represents a particular LCD attached to your Arduino board.LiquidCrystal_I2C(uint8_t lcd_Addr,uint8_t lcd_cols,uint8_t lcd_rows)
lcd_AddR: The address of the LCD defaults to 0x27.lcd_cols: The LCD1602 has 16 columns.lcd_rows: The LCD1602 has 2 rows.
Initialize the lcd.
void init()
Turn the (optional) backlight on.
void backlight()
Turn the (optional) backlight off.
void nobacklight()
Turn the LCD display on.
void display()
Turn the LCD display off quickly.
void nodisplay()
Clear display, set cursor position to zero.
void clear()
Set the cursor position to col,row.
void setCursor(uint8_t col,uint8_t row)
Prints text to the LCD.
void print(data,BASE)
data: The data to print (char, byte, int, long, or string).BASE (optional): The base in which to print numbers.BINfor binary (base 2)DECfor decimal (base 10)OCTfor octal (base 8)HEXfor hexadecimal (base 16).