6.3 Reversing Aid
Imagine this: You’re in your car, about to reverse into a tight parking spot. With our project, you will have an ultrasonic module mounted on the rear of your vehicle, acting as a digital eye. As you engage the reverse gear, the module springs to life, emitting ultrasonic pulses that bounce off obstacles behind you.
The magic happens when these pulses return to the module. It swiftly calculates the distance between your car and the objects, transforming this data into real-time visual feedback displayed on a vibrant LCD screen. You’ll witness dynamic, color-coded indicators depicting the proximity of obstacles, ensuring you have a crystal-clear understanding of the surrounding environment.
But we didn’t stop there. To immerse you further into this driving experience, we incorporated a lively buzzer. As your car inches closer to an obstacle, the buzzer’s tempo intensifies, creating an auditory symphony of warnings. It’s like having a personal orchestra guiding you through the complexities of reverse parking.
This innovative project combines cutting-edge technology with an interactive user interface, making your reversing experience safe and stress-free. With the ultrasonic module, LCD display, and lively buzzer working harmoniously, you’ll feel empowered and confident while maneuvering in tight spaces, leaving you free to focus on the joy of driving.
Required Components
In this project, we need the following components.
It’s definitely convenient to buy a whole kit, here’s the link:
Name |
ITEMS IN THIS KIT |
LINK |
|---|---|---|
ESP32 Starter Kit |
320+ |
You can also buy them separately from the links below.
COMPONENT INTRODUCTION |
PURCHASE LINK |
|---|---|
- |
|
- |
|
Schematic

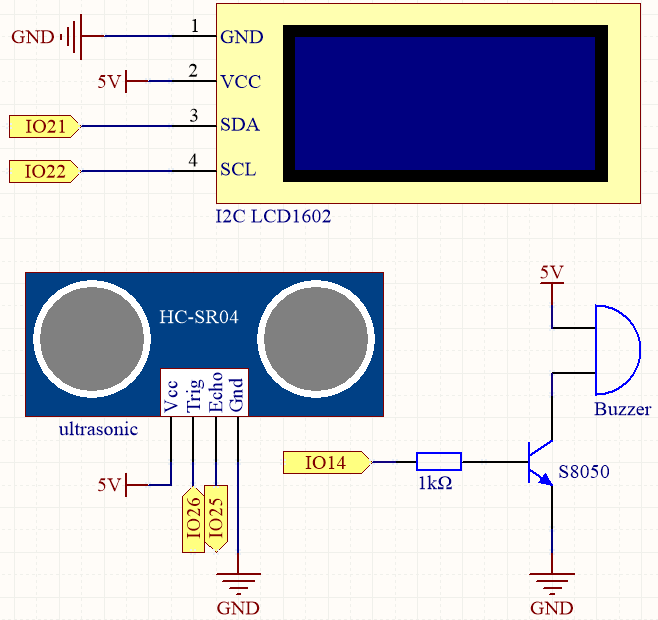
The ultrasonic sensor in the project emits high-frequency sound waves and measures the time it takes for the waves to bounce back after hitting an object. By analyzing this data, the distance between the sensor and the object can be calculated. To provide a warning when the object is too close, a buzzer is used to produce an audible signal. Additionally, the measured distance is displayed on an LCD screen for easy visualization.
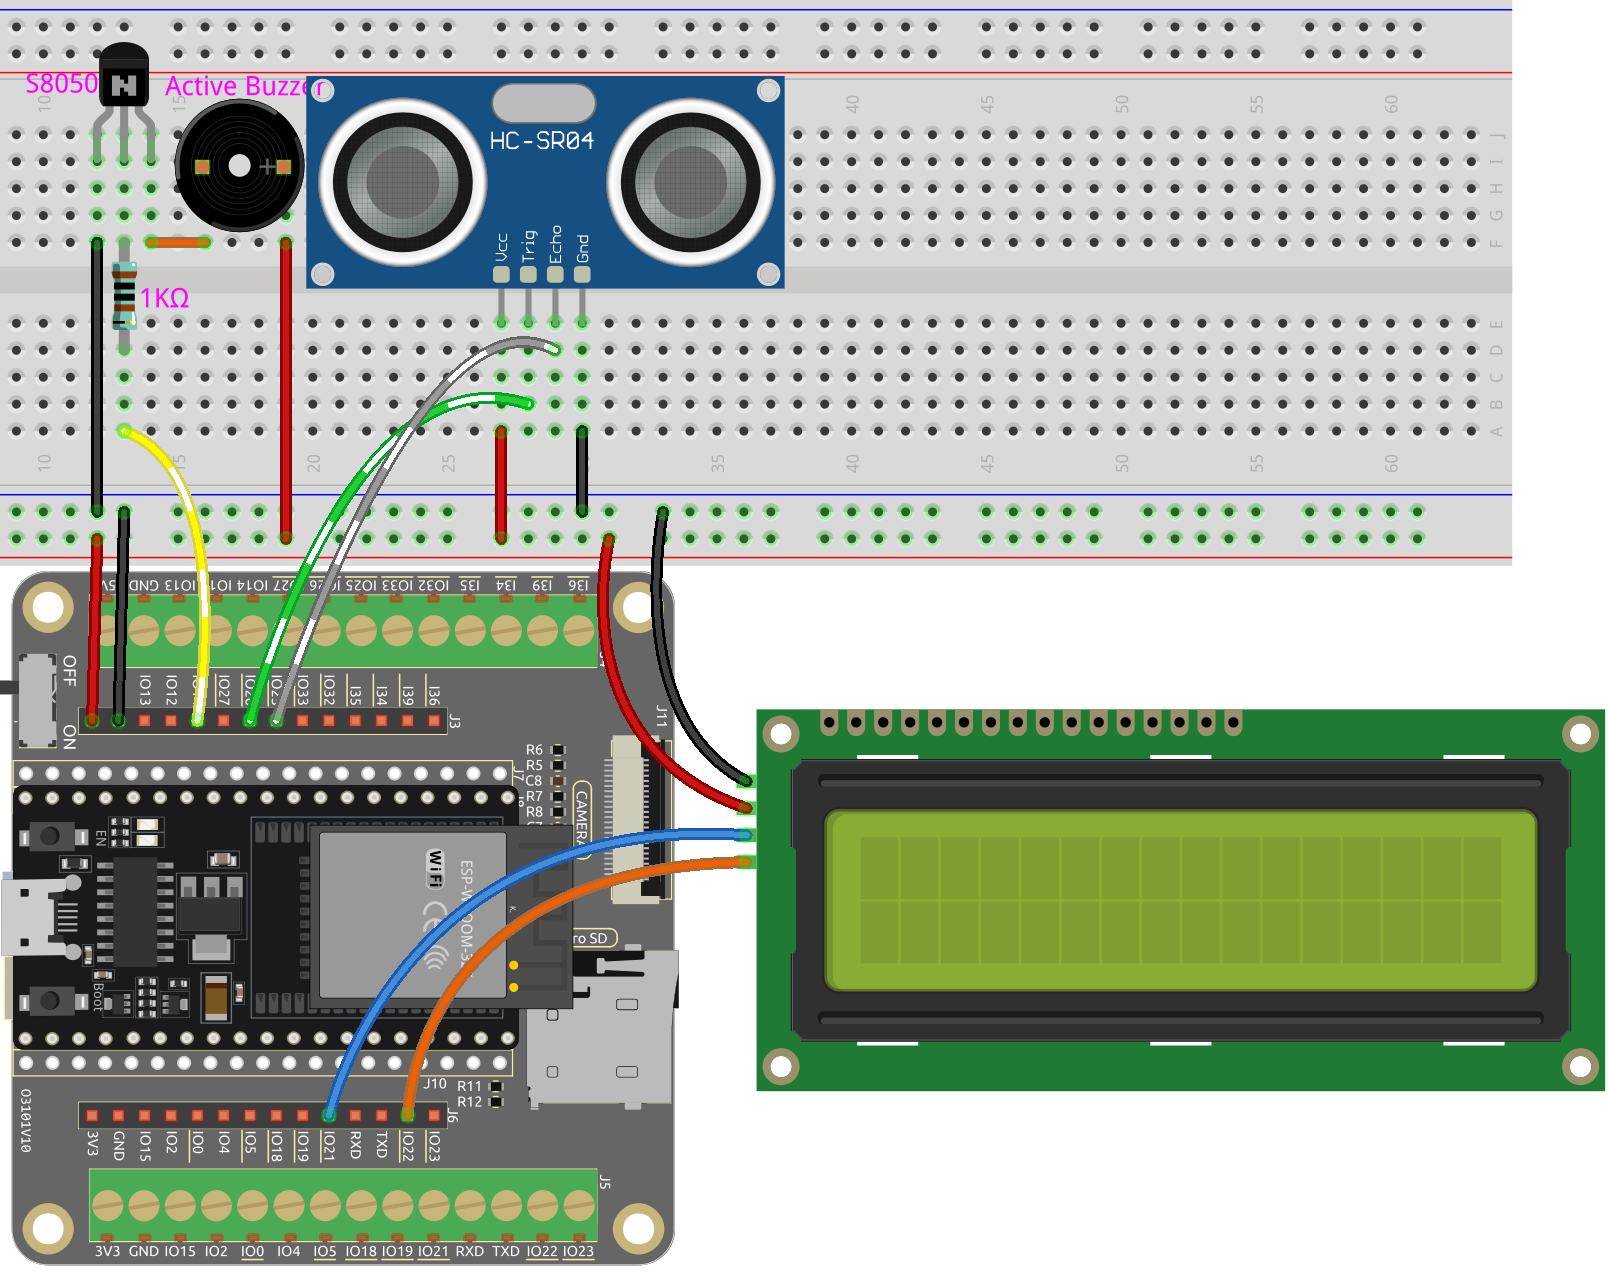
Wiring

Code
Note
You can open the file
6.3_reversing_aid.inounder the path ofesp32-starter-kit-main\c\codes\6.3_reversing_aiddirectly.After selecting the board (ESP32 Dev Module) and the appropriate port, click the Upload button.
The
LiquidCrystal I2Clibrary is used here, you can install it from the Library Manager.
After the code is successfully uploaded, the current detected distance will be displayed on the LCD. Then the buzzer will change the sounding frequency according to different distances.
Note
If the code and wiring are correct, but the LCD still fails to display any content, you can adjust the potentiometer on the back to increase the contrast.
How it works?
This code helps us create a simple distance measuring device that can measure the distance between objects and provide feedback through an LCD display and a buzzer.
The loop() function contains the main logic of the program and runs continuously. Let’s take a closer look at the loop() function.
Loop to read distance and update parameters
In the
loop, the code first reads the distance measured by the ultrasonic module and updates the interval parameter based on the distance.// Update the distance distance = readDistance(); // Update intervals based on distance if (distance <= 10) { intervals = 300; } else if (distance <= 20) { intervals = 500; } else if (distance <= 50) { intervals = 1000; } else { intervals = 2000; }
Check if it’s time to beep
The code calculates the difference between the current time and the previous beep time, and if the difference is greater than or equal to the interval time, it triggers the buzzer and updates the previous beep time.
unsigned long currentMillis = millis();
if (currentMillis - previousMillis >= intervals) {
    Serial.println("Beeping!");
    beep();
    previousMillis = currentMillis;
}
Update LCD display
The code clears the LCD display and then displays “Dis:” and the current distance in centimeters on the first line.
lcd.clear();
lcd.setCursor(0, 0);
lcd.print("Dis: ");
lcd.print(distance);
lcd.print(" cm");

delay(100);