Note
Hello, welcome to the SunFounder Raspberry Pi & Arduino & ESP32 Enthusiasts Community on Facebook! Dive deeper into Raspberry Pi, Arduino, and ESP32 with fellow enthusiasts.
Why Join?
Expert Support: Solve post-sale issues and technical challenges with help from our community and team.
Learn & Share: Exchange tips and tutorials to enhance your skills.
Exclusive Previews: Get early access to new product announcements and sneak peeks.
Special Discounts: Enjoy exclusive discounts on our newest products.
Festive Promotions and Giveaways: Take part in giveaways and holiday promotions.
👉 Ready to explore and create with us? Click [here] and join today!
6.7 Guess Number
Are you feeling lucky? Want to test your intuition and see if you can guess the right number? Then look no further than the Guess Number game!
With this project, you can play a fun and exciting game of chance.
Using an IR remote control, players input numbers between 0 and 99 to try and guess the randomly generated lucky point number. The system displays the player’s input number on an LCD screen, along with upper and lower limit tips to help guide the player towards the right answer. With every guess, players get closer to the lucky point number, until finally, someone hits the jackpot and wins the game!
Required Components
In this project, we need the following components.
It’s definitely convenient to buy a whole kit, here’s the link:
Name |
ITEMS IN THIS KIT |
LINK |
|---|---|---|
ESP32 Starter Kit |
320+ |
You can also buy them separately from the links below.
COMPONENT INTRODUCTION |
PURCHASE LINK |
|---|---|
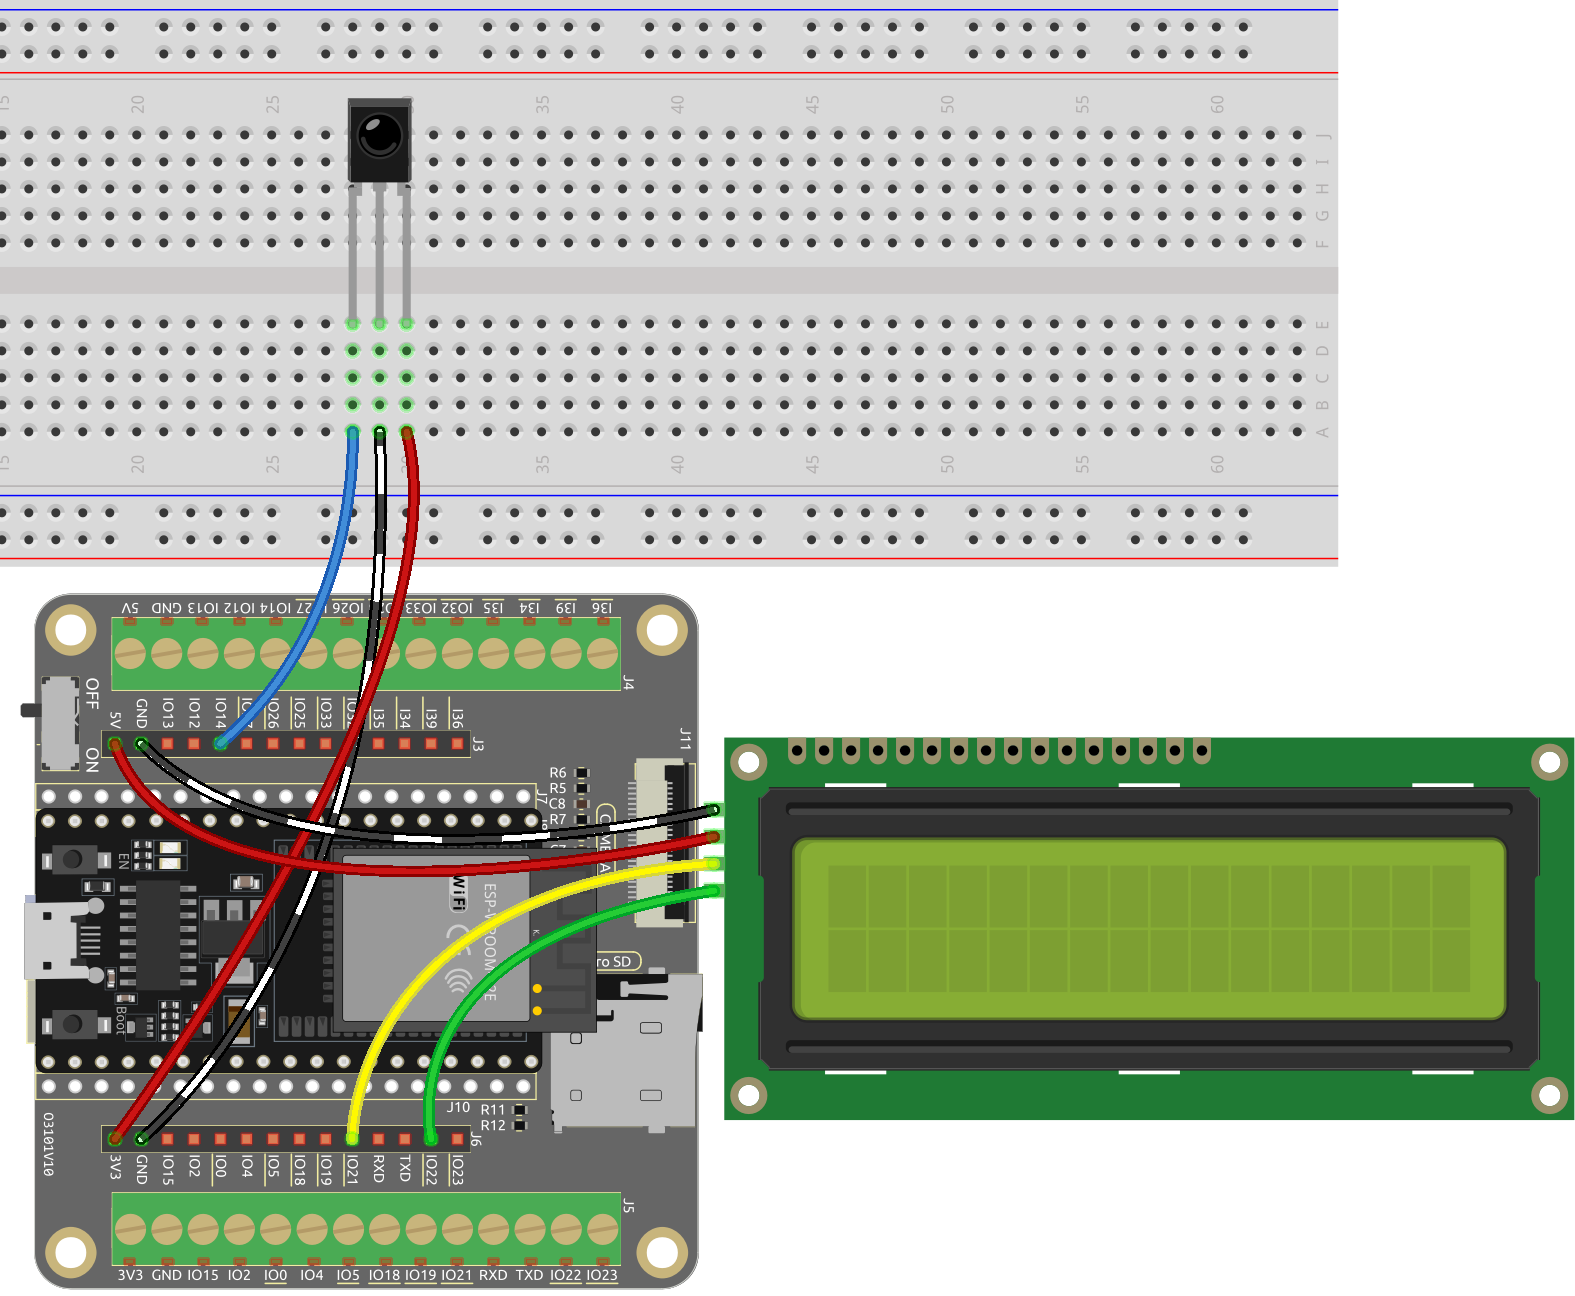
Schematic
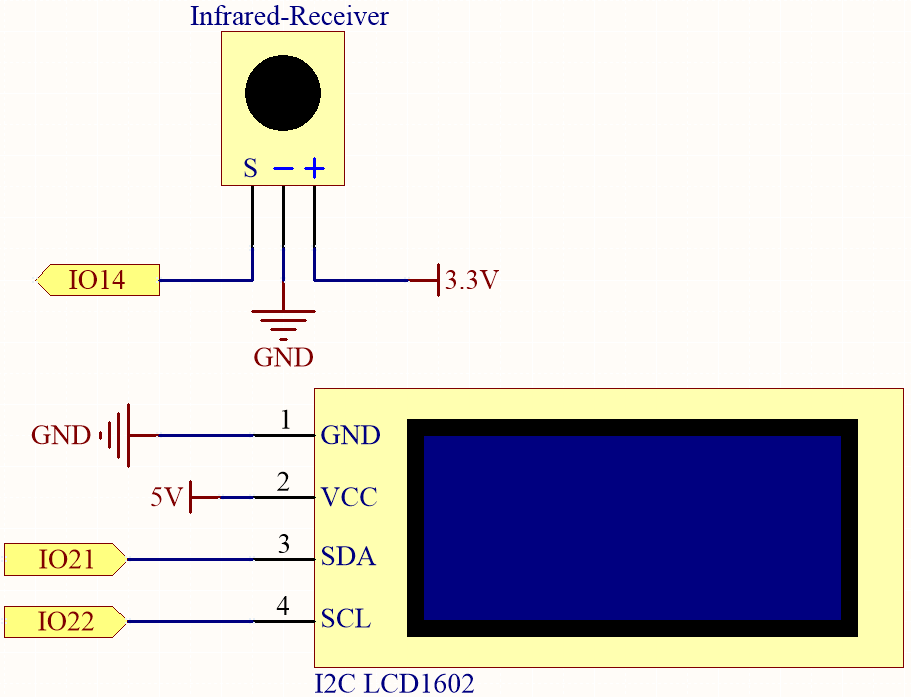
Wiring
Code
Note
You can open the file
6.7_guess_number.inounder the path ofesp32-starter-kit-main\c\codes\6.7_guess_numberdirectly.The
LiquidCrystal_I2CandIRremoteESP8266libraries are used here, refer to Manual Installation for a tutorial to install.
Warning
If you are using an ESP32 development board version 3.0.0 or higher, you may encounter errors during the compilation process.
This issue is usually because the newer versions of the board no longer support the IRremoteESP8266 library.
To properly run this example, it is recommended to downgrade your ESP32 board’s firmware version to 2.0.17.
After completing this example, upgrade back to the latest version.

After the code is successfully uploaded, press any number button on the remote control to start the game.
Input a number using the number buttons on the remote control. To input a single digit, you need to press the cycle key to confirm.
The system will show the input number and the upper and lower limit tips on the LCD screen.
Keep guessing until you correctly guess the lucky point number.
After a successful guess, the system will show a success message and generate a new lucky point number.
Note
If the code and wiring are correct, but the LCD still fails to display any content, you can adjust the potentiometer on the back to increase the contrast.
How it works?
In the
setup()function, the I2C LCD screen and IR receiver are initialized. Then call theinitNewValue()function to generate a new random lucky number, and a welcome message is displayed on the LCD screen.void setup() { // Initialize the LCD screen lcd.init(); lcd.backlight(); // Start the serial communication Serial.begin(9600); // Enable the IR receiver irrecv.enableIRIn(); // Initialize a new lucky point value initNewValue(); }
In the
loopfunction, the code waits for a signal from the IR receiver. When a signal is received, thedecodeKeyValuefunction is called to decode the signal and get the corresponding button value.void loop() { // If a signal is received from the IR receiver if (irrecv.decode(&results)) { bool result = 0; String num = decodeKeyValue(results.value); // If the POWER button is pressed if (num == "POWER") { initNewValue(); // Initialize a new lucky point value } // If the CYCLE button is pressed else if (num == "CYCLE") { result = detectPoint(); // Detect the input number lcdShowInput(result); // Show the result on the LCD screen } // If a number button (0-9) is pressed, //add the digit to the input number //and detect the number if it is greater than or equal to 10 else if (num >= "0" && num <= "9") { count = count * 10; count += num.toInt(); if (count >= 10) { result = detectPoint(); } lcdShowInput(result); } irrecv.resume(); } }
Depending on the button value, the appropriate function is called. If a number button is pressed, the
countvariable is updated, and thedetectPointfunction is called to detect if the input number is correct. ThelcdShowInputfunction is called to show the input number and the upper and lower limit tips on the LCD screen.If the
POWERbutton is pressed, theinitNewValuefunction is called to generate a new lucky point number and show the welcome message on the LCD screen.If the
CYCLEbutton is pressed, thedetectPointfunction is called to detect if the input number is correct. ThelcdShowInputfunction is called to show the input number and the upper and lower limit tips on the LCD screen.