Note
Hello, welcome to the SunFounder Raspberry Pi & Arduino & ESP32 Enthusiasts Community on Facebook! Dive deeper into Raspberry Pi, Arduino, and ESP32 with fellow enthusiasts.
Why Join?
Expert Support: Solve post-sale issues and technical challenges with help from our community and team.
Learn & Share: Exchange tips and tutorials to enhance your skills.
Exclusive Previews: Get early access to new product announcements and sneak peeks.
Special Discounts: Enjoy exclusive discounts on our newest products.
Festive Promotions and Giveaways: Take part in giveaways and holiday promotions.
👉 Ready to explore and create with us? Click [here] and join today!
7.4 SD Card Write and Read
This project demonstrates the core capabilities of using an SD card with the ESP32 microcontroller. It showcases essential operations such as mounting the SD card, creating a file, writing data to the file, and listing all files within the root directory. These operations form the basis of many data logging and storage applications, making this project a crucial stepping stone in understanding and utilizing the ESP32’s built-in SDMMC host peripheral.
Required Components
In this project, we need the following components.
It’s definitely convenient to buy a whole kit, here’s the link:
Name |
ITEMS IN THIS KIT |
LINK |
|---|---|---|
ESP32 Starter Kit |
320+ |
You can also buy them separately from the links below.
COMPONENT INTRODUCTION |
PURCHASE LINK |
|---|---|
Operating Steps
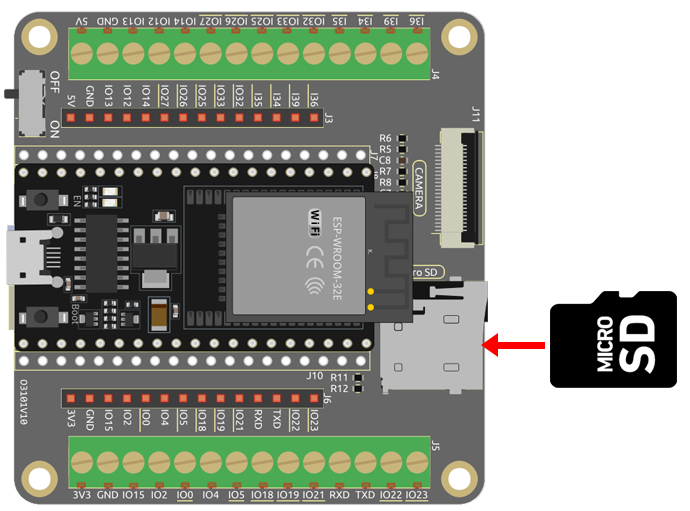
Before connecting the USB cable, insert the SD card into the SD card slot of the extension board.
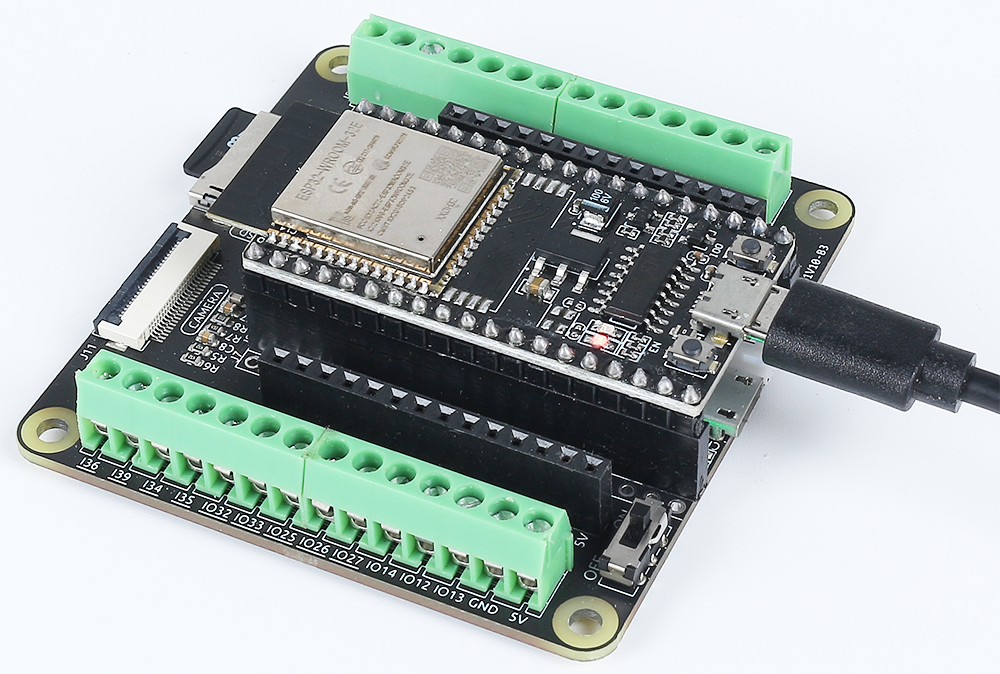
Connect ESP32 board to the computer using the USB cable.
Select the appropriate port and board in the Arduino IDE and upload the code to your ESP32.
Note
Open the
7.4_sd_read_write.inofile under the path ofesp32-starter-kit-main\c\codes\7.4_sd_read_write.After selecting the board (ESP32 Dev Module) and the appropriate port, click the Upload button.
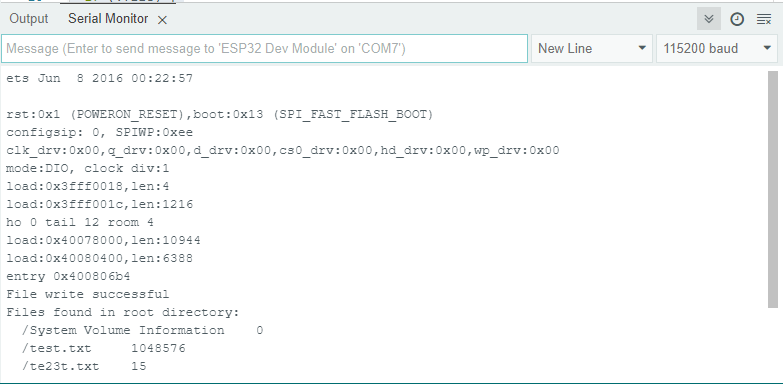
After the code is uploaded successfully, you will see a prompt indicating the successful file write, along with a list of all the filenames and sizes on the SD card. If you don’t see any printout after opening the serial monitor, you need to press the EN (RST) button to rerun the code.
Note
If you see the following information.
E (528) vfs_fat_sdmmc: mount_to_vfs failed (0xffffffff).
Failed to mount SD card
First, check if your SD card is properly inserted into the expansion board.
If it is inserted correctly, there might be an issue with your SD card. You can try using an eraser to clean the metal contacts.
If the problem persists, it is recommended to format the SD card, please refer to How to format the SD card?.
How it works?
The purpose of this project is to demonstrate the usage of the SD card with the ESP32 board. The ESP32’s built-in SDMMC host peripheral is used to connect with the SD card.
The project begins by initializing the serial communication and then attempts to mount the SD card. If the SD card fails to mount successfully, the program will print an error message and exit the setup function.
Once the SD card is mounted successfully, the program proceeds to create a file named “test.txt” in the root directory of the SD card. If the file is successfully opened in write mode, the program writes a line of text - “Hello, world!” to the file. The program will print a success message if the write operation is successful, otherwise, an error message will be printed.
After the writing operation is complete, the program closes the file and then opens the root directory of the SD card. It then begins to loop through all the files in the root directory, printing the filename and filesize of each file found.
In the main loop function, there are no operations. This project focuses on SD card operations such as mounting the card, creating a file, writing to a file, and reading the file directory, all of which are executed in the setup function.
This project serves as a useful introduction to handling SD cards with the ESP32, which can be crucial in applications that require data logging or storage.
Here’s an analysis of the code:
Include the
SD_MMClibrary, which is needed to work with SD cards using ESP32’s built-in SDMMC host peripheral.#include "SD_MMC.h"
Inside the
setup()function, the following tasks are performed.Initialize the SD card
Initialize and mount the SD card. If the SD card fails to mount, it will print “Failed to mount SD card” to the serial monitor and stop the execution.
if(!SD_MMC.begin()) { // Attempt to mount the SD card
    Serial.println("Failed to mount card"); // If mount fails, print to serial and exit setup
    return;
}
Open the file
Open a file named
"test.txt"located in the root directory of the SD card in write mode. If the file fails to open, it prints “Failed to open file for writing” and returns.File file = SD_MMC.open("/test.txt", FILE_WRITE); if (!file) { Serial.println("Failed to open file for writing"); // Print error message if file failed to open return; }
Write data to the file
Write the text “Test file write” to the file. If the write operation is successful, it prints “File write successful”; otherwise, it prints “File write failed”.
if(file.print("Test file write")) { // Write the message to the file
    Serial.println("File write success"); // If write succeeds, print to serial
} else {
    Serial.println("File write failed"); // If write fails, print to serial
}
Close the file
Close the opened file. This ensures that any buffered data is written to the file and the file is properly closed.
file.close(); // Close the file
Open the root directory
Open the root directory of the SD card. If the directory fails to open, it prints “Failed to open directory” and returns.
File root = SD_MMC.open("/"); // Open the root directory of SD card
if (!root) {
    Serial.println("Failed to open directory"); // Print error message if directory failed to open
    return;
}
Print each file’s name and size
The loop starting with while (
File file = root.openNextFile()) iterates over all the files in the root directory, printing each file’s name and size to the serial monitor.Serial.println("Files found in root directory:"); // Print the list of files found in the root directory while (File file = root.openNextFile()) { // Loop through all the files in the root directory Serial.print(" "); Serial.print(file.name()); // Print the filename Serial.print("\t"); Serial.println(file.size()); // Print the filesize file.close(); // Close the file }
This
loop()function is an empty loop and does nothing in the current program. However, in a typical Arduino program, this function would continuously loop over and execute the code within it. In this case, since all the required tasks have been performed in the setup function, the loop function is not needed.void loop() {} // Empty loop function, does nothing