注釈
こんにちは、SunFounderのRaspberry Pi & Arduino & ESP32愛好家コミュニティへようこそ!Facebook上でRaspberry Pi、Arduino、ESP32についてもっと深く掘り下げ、他の愛好家と交流しましょう。
参加する理由は?
エキスパートサポート:コミュニティやチームの助けを借りて、販売後の問題や技術的な課題を解決します。
学び&共有:ヒントやチュートリアルを交換してスキルを向上させましょう。
独占的なプレビュー:新製品の発表や先行プレビューに早期アクセスしましょう。
特別割引:最新製品の独占割引をお楽しみください。
祭りのプロモーションとギフト:ギフトや祝日のプロモーションに参加しましょう。
👉 私たちと一緒に探索し、創造する準備はできていますか?[ここ]をクリックして今すぐ参加しましょう!
7.10 バックアップ支援
このプロジェクトでは、LED、ブザー、および超音波モジュールを使用して、バックアップ支援システムを作成します。 これをリモートコントロールカーに取り付けて、ガレージに車をバックして入れる実際のプロセスをシミュレーションすることができます。
必要なコンポーネント
このプロジェクトには、以下のコンポーネントが必要です。
便利なのは、一式をまとめて購入することです。リンクはこちらです:
名前 |
このキットに含まれるアイテム |
リンク |
|---|---|---|
ケプラーキット |
450以上 |
以下のリンクからそれぞれ個別に購入することも可能です。
SN |
コンポーネント |
数量 |
リンク |
|---|---|---|---|
1 |
1 |
||
2 |
マイクロUSBケーブル |
1 |
|
3 |
1 |
||
4 |
数本 |
||
5 |
1(S8050) |
||
6 |
2(1KΩ、220Ω) |
||
7 |
アクティブ ブザー |
1 |
|
8 |
1 |
||
9 |
1 |
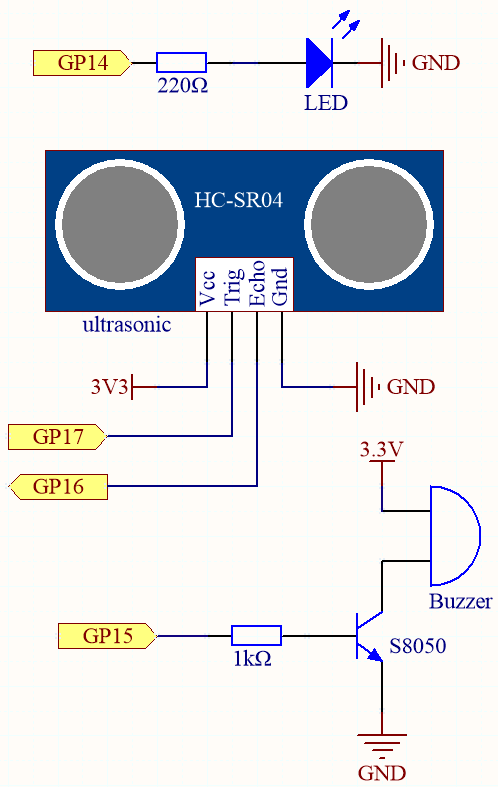
回路図
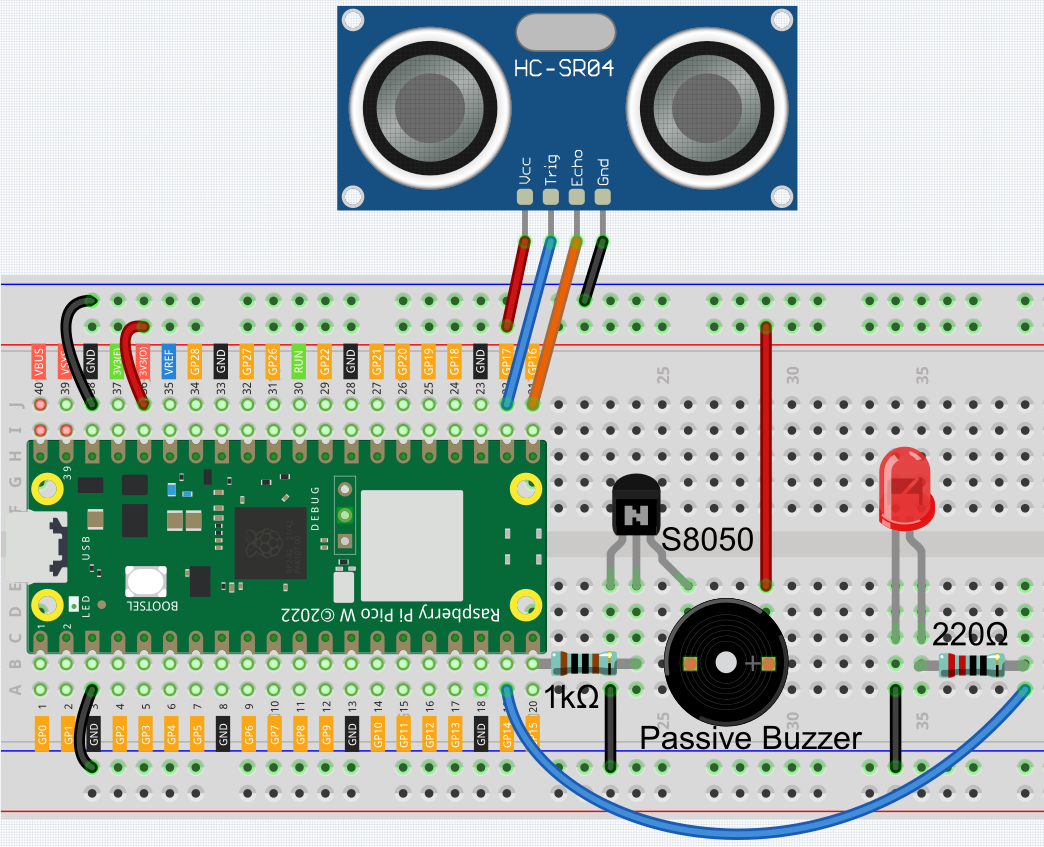
配線
コード
注釈
kepler-kit-main/micropythonのパスの下で7.10_reversing_aid.pyファイルを開くか、このコードをThonnyにコピーして、"Run Current Script"をクリックするか、単にF5キーを押して実行してください。右下隅の"MicroPython(Raspberry Pi Pico)"インタープリターをクリックするのを忘れないでください。
詳細なチュートリアルについては、 コードを直接開いて実行する を参照してください。
import machine
import time

# Initialize pins for the buzzer and LED
buzzer = machine.Pin(15, machine.Pin.OUT)  # Buzzer on pin 15
led = machine.Pin(14, machine.Pin.OUT)  # LED on pin 14

# Initialize pins for the ultrasonic sensor (HC-SR04)
TRIG = machine.Pin(17, machine.Pin.OUT)  # Trigger pin for the ultrasonic sensor
ECHO = machine.Pin(16, machine.Pin.IN)  # Echo pin for the ultrasonic sensor

dis = 100  # Global variable to store the distance

# Function to measure distance using the ultrasonic sensor
def distance():
    TRIG.low()
    time.sleep_us(2)
    TRIG.high()
    time.sleep_us(10)
    TRIG.low()

    timeout_start = time.ticks_us()  # Use microseconds for more precision

    # Wait for ECHO pin to go high (start of echo pulse)
    while not ECHO.value():
        if time.ticks_diff(time.ticks_us(), timeout_start) > 30000:  # 30ms timeout
            return -1  # Timeout, return -1 if no pulse is detected

    time1 = time.ticks_us()  # Start time for pulse width calculation

    # Wait for ECHO pin to go low (end of echo pulse)
    while ECHO.value():
        if time.ticks_diff(time.ticks_us(), time1) > 30000:  # 30ms timeout
            return -1  # Timeout, return -1 if pulse is too long

    time2 = time.ticks_us()  # End time for pulse width calculation

    # Calculate the distance based on the duration of the echo pulse
    during = time.ticks_diff(time2, time1)
    distance_cm = during * 340 / 2 / 10000  # Convert time to distance in cm
    return distance_cm

# Function to beep the buzzer and light up the LED
def beep():
    buzzer.value(1)  # Turn on the buzzer
    led.value(1)  # Turn on the LED
    time.sleep(0.1)  # Beep duration
    buzzer.value(0)  # Turn off the buzzer
    led.value(0)  # Turn off the LED
    time.sleep(0.1)  # Short pause between beeps

# Initialize variables for controlling beep intervals
intervals = 2000  # Default long initial interval
previousMillis = time.ticks_ms()  # Store the previous time to track beep intervals

# Main loop to handle distance-based beeping intervals
while True:
    dis = distance()  # Measure the distance directly in the main loop

    # Adjust beep intervals based on the distance
    if dis > 0:  # Ensure valid distance is measured
        if dis <= 10:
            intervals = 300  # Close distance, faster beeps
        elif dis <= 20:
            intervals = 500  # Medium-close distance, moderate beeps
        elif dis <= 50:
            intervals = 1000  # Medium distance, slower beeps
        else:
            intervals = 2000  # Far distance, much slower beeps

        # Print the measured distance
        print(f'Distance: {dis:.2f} cm')

        # Check if it's time to beep again based on the interval
        currentMillis = time.ticks_ms()  # Get the current time
        if time.ticks_diff(currentMillis, previousMillis) >= intervals:
            beep()  # Beep the buzzer and blink the LED
            previousMillis = currentMillis  # Update the time of the last beep

    time.sleep_ms(100)  # Small delay to avoid too frequent readings
プログラムが動作するとすぐに、超音波センサーは前方の障害物までの距離を連続して読み取ります。シェル上で正確な距離値を確認できます。
LEDとブザーは、距離値に応じて点滅とビープの頻度が変わり、障害物が近づいていることを示します。
6.1 距離の測定 の記事で、超音波センサーが動作すると、プログラムが一時停止すると言及されています。
この例でLEDやブザーのタイミングに干渉しないように、測定用に別のスレッドを作成しました。