注釈
こんにちは、SunFounderのRaspberry Pi & Arduino & ESP32愛好家コミュニティへようこそ!Facebook上でRaspberry Pi、Arduino、ESP32についてもっと深く掘り下げ、他の愛好家と交流しましょう。
参加する理由は?
エキスパートサポート:コミュニティやチームの助けを借りて、販売後の問題や技術的な課題を解決します。
学び&共有:ヒントやチュートリアルを交換してスキルを向上させましょう。
独占的なプレビュー:新製品の発表や先行プレビューに早期アクセスしましょう。
特別割引:最新製品の独占割引をお楽しみください。
祭りのプロモーションとギフト:ギフトや祝日のプロモーションに参加しましょう。
👉 私たちと一緒に探索し、創造する準備はできていますか?[ここ]をクリックして今すぐ参加しましょう!
7.4 乗客カウンター
大型ショッピングモール、ショッピングセンター、チェーンストア、空港、駅、美術館、展示会場などの公共の場所で、乗客の流れは欠かせないデータです。
例えば、空港や駅では、人々の数を厳密に制御して、安全と円滑な流れを確保する必要があります。 また、ショッピングセンターやチェーンストアでは、より多くの訪問者がいる時間帯や、各ユーザーが生成できる注文数などを把握することが可能です。 その結果、人々の消費習慣を分析し、売上を向上させることができます。
乗客カウンターは、これらの公共の場所の運営を理解し、効率的に運営を整えるのに役立ちます。
このプロジェクトでは、PIRセンサーと4桁の7セグメントディスプレイを使用して、シンプルな乗客カウンターを作成します。
必要なコンポーネント
このプロジェクトでは、以下のコンポーネントが必要です。
全体のキットを購入するのが確かに便利です、リンクはこちらです:
名前 |
キット内容 |
リンク |
|---|---|---|
ケプラーキット |
450+ |
以下のリンクから個別に購入することもできます。
SN |
コンポーネント |
数量 |
リンク |
|---|---|---|---|
1 |
1 |
||
2 |
Micro USBケーブル |
1 |
|
3 |
1 |
||
4 |
数本 |
||
5 |
4(220Ω) |
||
6 |
1 |
||
7 |
1 |
||
8 |
1 |
回路図
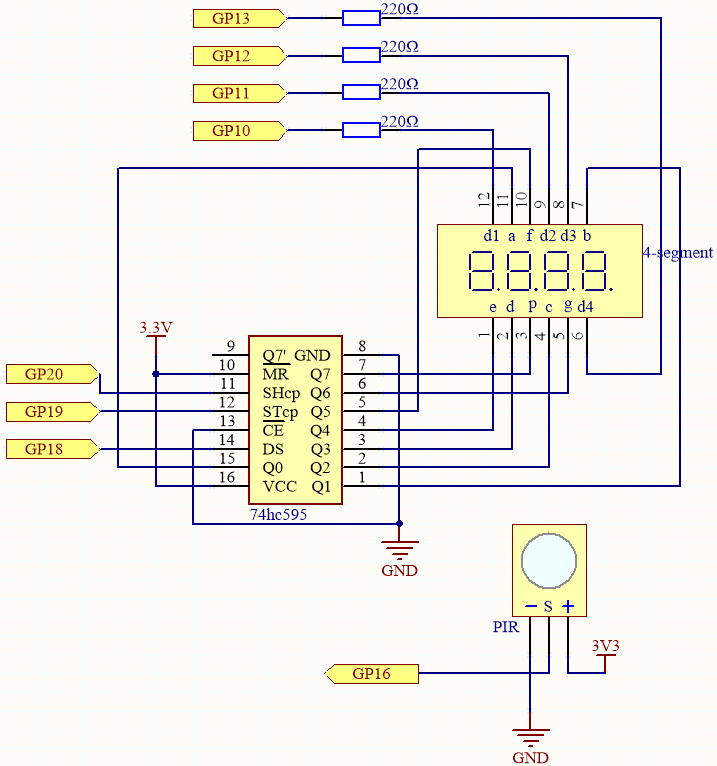
この回路は、 5.3 時間カウンター を基にして、PIRモジュールが追加されています。
誰かが通過すると、PIRは約2.8秒間の高い信号を送ります。
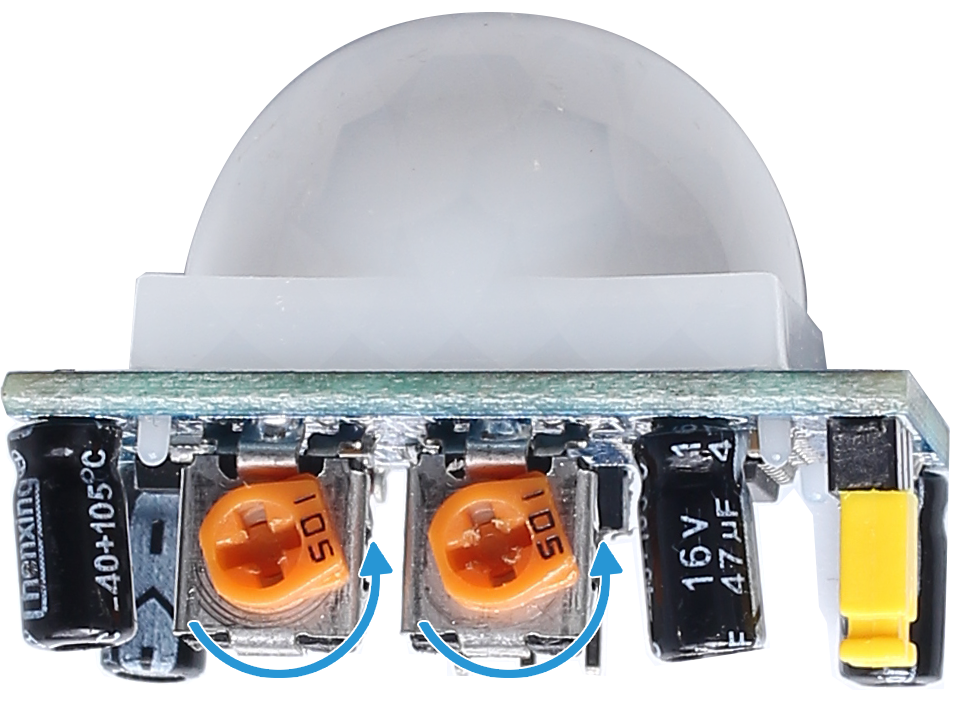
PIRモジュールには二つの可変抵抗があります:一つは感度を調整し、もう一つは検出距離を調整します。PIRモジュールをより効果的に動作させるためには、これらの両方を反時計回りに最後まで回す必要があります。
配線

コード
注釈
kepler-kit-main/micropythonパスの下にある7.4_passenger_counter.pyファイルを開くか、このコードをThonnyにコピーしてから、「Run Current Script」をクリックするか、単にF5キーを押して実行してください。画面の右下隅にある「MicroPython(Raspberry Pi Pico)」インタープリターをクリックすることを忘れないでください。
詳細なチュートリアルは、 コードを直接開いて実行する を参照してください。
import machine
import time

# Initialize PIR sensor on pin 16, configured as an input
pir_sensor = machine.Pin(16, machine.Pin.IN)

# 7-segment display codes for digits 0-9, using hexadecimal to represent LED segments
SEGCODE = [0x3f,0x06,0x5b,0x4f,0x66,0x6d,0x7d,0x07,0x7f,0x6f]

# Define pins for shift register communication (74HC595)
sdi = machine.Pin(18, machine.Pin.OUT)   # Serial Data Input
rclk = machine.Pin(19, machine.Pin.OUT)  # Register Clock (Latch)
srclk = machine.Pin(20, machine.Pin.OUT) # Shift Register Clock

# Initialize list to store 4 digit control pins
placePin = []

# Define control pins for each of the four digits (common anodes)
pin = [10,13,12,11] # Pin numbers for the 4-digit display
for i in range(4):
    placePin.append(None)  # Reserve space in list
    placePin[i] = machine.Pin(pin[i], machine.Pin.OUT)  # Initialize pin as output

# Initialize counter to keep track of detected motion events
count = 0

# Function to select which digit (0-3) to display by controlling the common anode pins
def pickDigit(digit):
    for i in range(4):
        placePin[i].value(1)  # Turn off all digits
    placePin[digit].value(0)  # Turn on the selected digit

# Function to clear the display by sending '0x00' to the shift register
def clearDisplay():
    hc595_shift(0x00)

# Function to send data to the shift register (74HC595)
def hc595_shift(dat):
    rclk.low()  # Pull latch low to prepare for data shifting
    time.sleep_us(200)  # Small delay for timing stability
    for bit in range(7, -1, -1):  # Loop through each bit (MSB first)
        srclk.low()  # Prepare to send the next bit
        time.sleep_us(200)
        value = 1 & (dat >> bit)  # Extract the current bit from the data
        sdi.value(value)  # Set the data line to the current bit value
        time.sleep_us(200)
        srclk.high()  # Pulse the shift clock to store the bit in the register
        time.sleep_us(200)
    time.sleep_us(200)
    rclk.high()  # Pulse the register clock to move the data to the output

# Interrupt handler for PIR sensor, triggered on motion detection (rising edge)
# Increments the motion count each time the sensor is triggered
def motion_detected(pin):
    global count
    count = count + 1  # Increment the count when motion is detected

# Set up an interrupt to detect motion using the PIR sensor
pir_sensor.irq(trigger=machine.Pin.IRQ_RISING, handler=motion_detected)

# Main loop to continuously update the 7-segment display with the current count
while True:
    # Update the first digit (units place)
    pickDigit(0)
    hc595_shift(SEGCODE[count % 10])

    # Update the second digit (tens place)
    pickDigit(1)
    hc595_shift(SEGCODE[count % 100 // 10])

    # Update the third digit (hundreds place)
    pickDigit(2)
    hc595_shift(SEGCODE[count % 1000 // 100])

    # Update the fourth digit (thousands place)
    pickDigit(3)
    hc595_shift(SEGCODE[count % 10000 // 1000])
コードが実行されたとき、PIRモジュールの前を誰かが通過すると、4桁の7セグメントディスプレイ上の数字が1つ増加します。