注釈
こんにちは、SunFounderのRaspberry Pi & Arduino & ESP32愛好家コミュニティへようこそ!Facebook上でRaspberry Pi、Arduino、ESP32についてもっと深く掘り下げ、他の愛好家と交流しましょう。
参加する理由は?
エキスパートサポート:コミュニティやチームの助けを借りて、販売後の問題や技術的な課題を解決します。
学び&共有:ヒントやチュートリアルを交換してスキルを向上させましょう。
独占的なプレビュー:新製品の発表や先行プレビューに早期アクセスしましょう。
特別割引:最新製品の独占割引をお楽しみください。
祭りのプロモーションとギフト:ギフトや祝日のプロモーションに参加しましょう。
👉 私たちと一緒に探索し、創造する準備はできていますか?[ここ]をクリックして今すぐ参加しましょう!
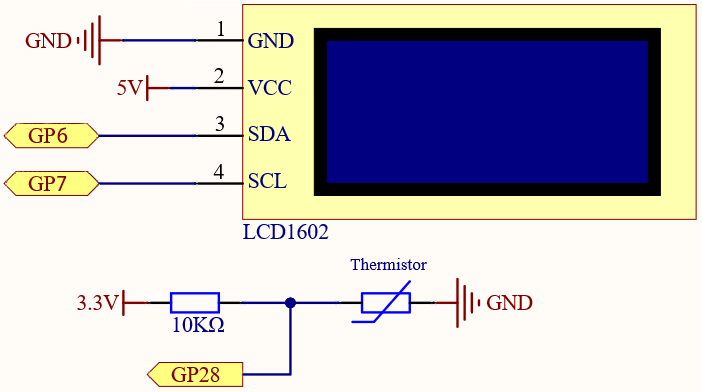
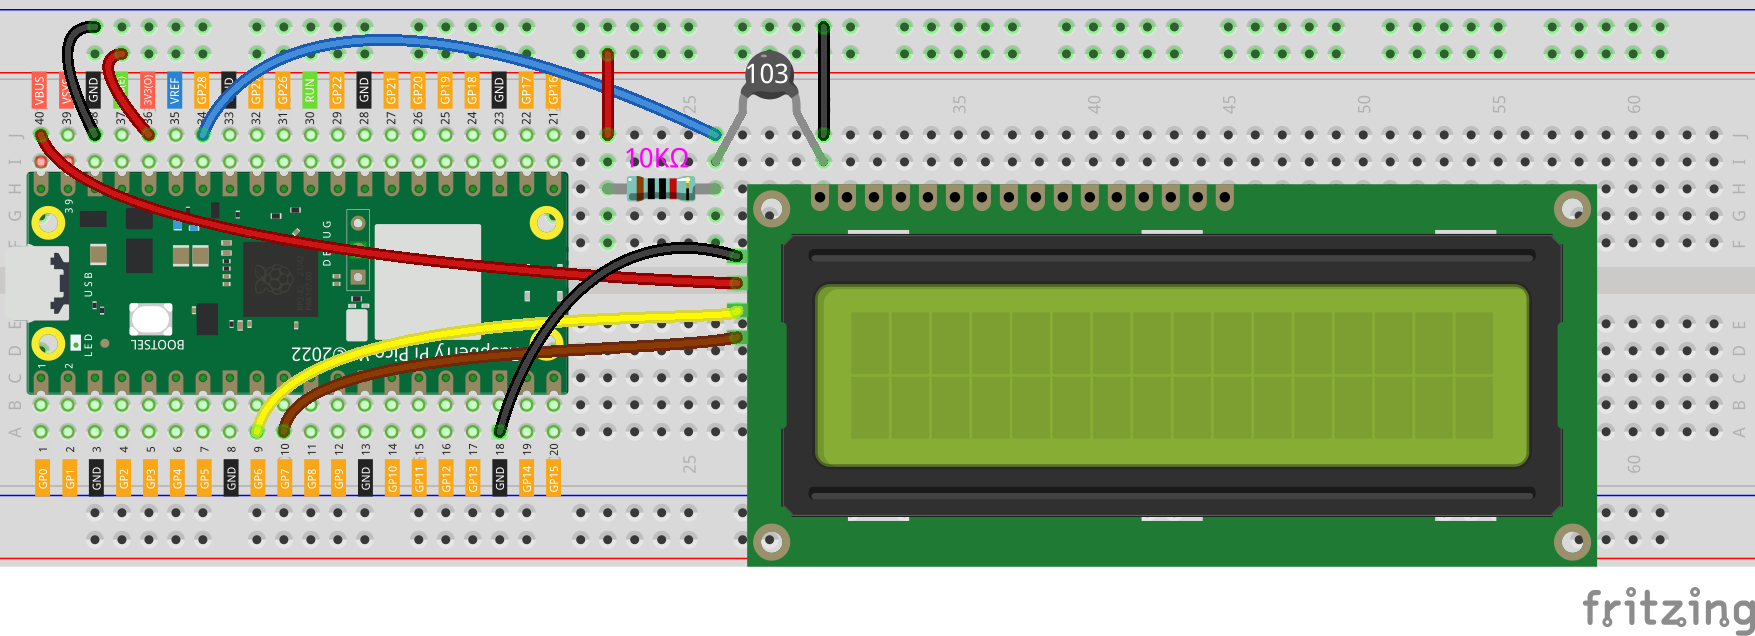
7.2 室温計
サーミスターとI2C LCD1602を使って、室温計を作成できます。
このプロジェクトは非常にシンプルで、 2.13 温度計 に基づきI2C LCD1602で温度を表示します。
必要なコンポーネント
このプロジェクトには以下のコンポーネントが必要です。
一式をまとめて購入するのは非常に便利です。リンクはこちら:
名称 |
このキットに含まれるアイテム |
リンク |
|---|---|---|
ケプラーキット |
450+ |
以下のリンクから個別に購入することもできます。
SN |
コンポーネント |
個数 |
リンク |
|---|---|---|---|
1 |
1 |
||
2 |
Micro USBケーブル |
1 |
|
3 |
1 |
||
4 |
数本 |
||
5 |
1(10KΩ) |
||
6 |
1 |
||
7 |
1 |
回路図
配線
コード
注釈
kepler-kit-main/micropythonのパス下にある7.2_room_temperature_meter.pyファイルを開くか、このコードをThonnyにコピペして、「Run Current Script」をクリックまたはF5キーを押して実行します。右下角にある「MicroPython(Raspberry Pi Pico)」インタープリターをクリックして選択してください。
詳細なチュートリアルは、 コードを直接開いて実行する を参照してください。
from lcd1602 import LCD
from machine import I2C, Pin
import utime
import math

# Initialize the thermistor (ADC on pin 28) and LCD display
thermistor = machine.ADC(28)  # Analog input from the thermistor

# Initialize I2C communication for the LCD1602 display
i2c = I2C(1, sda=Pin(6), scl=Pin(7), freq=400000)

# Create an LCD object for controlling the LCD1602 display
lcd = LCD(i2c)

# Main loop to continuously read temperature and display it
while True:
    # Read raw ADC value from the thermistor
    temperature_value = thermistor.read_u16()

    # Convert the raw ADC value to a voltage (0-3.3V range)
    Vr = 3.3 * float(temperature_value) / 65535  # ADC value to voltage conversion

    # Calculate the thermistor resistance (using a voltage divider with a 10kOhm resistor)
    Rt = 10000 * Vr / (3.3 - Vr)  # Rt = thermistor resistance

    # Use the Steinhart-Hart equation to calculate the temperature in Kelvin
    # The values used are specific to the thermistor (3950 is the beta coefficient)
    temp = 1 / (((math.log(Rt / 10000)) / 3950) + (1 / (273.15 + 25)))  # Temperature in Kelvin

    # Convert temperature from Kelvin to Celsius
    Cel = temp - 273.15

    # Display the temperature on the LCD in Celsius
    string = " Temperature is \n    " + str('{:.2f}'.format(Cel)) + " C"  # Format string for the LCD
    lcd.message(string)  # Display the string on the LCD

    utime.sleep(1)  # Wait for 1 second
    lcd.clear()  # Clear the LCD for the next reading
プログラムが実行された後、LCDには現在の環境の温度値が表示されます。
注釈
コードと配線が正しいのにもかかわらず、LCDが何も表示しない場合は、裏面のポテンショメーターを回してコントラストを調整できます。