注釈
こんにちは、SunFounderのRaspberry Pi & Arduino & ESP32愛好家コミュニティへようこそ!Facebook上でRaspberry Pi、Arduino、ESP32についてもっと深く掘り下げ、他の愛好家と交流しましょう。
参加する理由は?
エキスパートサポート:コミュニティやチームの助けを借りて、販売後の問題や技術的な課題を解決します。
学び&共有:ヒントやチュートリアルを交換してスキルを向上させましょう。
独占的なプレビュー:新製品の発表や先行プレビューに早期アクセスしましょう。
特別割引:最新製品の独占割引をお楽しみください。
祭りのプロモーションとギフト:ギフトや祝日のプロモーションに参加しましょう。
👉 私たちと一緒に探索し、創造する準備はできていますか?[ここ]をクリックして今すぐ参加しましょう!
7.1 光センサー・テルミン
テルミンは物理的な接触を必要としない電子楽器です。プレイヤーの手の位置に応じて、異なる音階を出力します。
通常、制御部分は、テルミニスト(テルミン奏者)の手の位置を感知し、一方の手で発振器を、もう一方の手で音量を制御する二つの金属アンテナで構成されています。テルミンからの電気信号は増幅され、スピーカーに送られます。
Pico Wを使って同じ楽器を再現することはできませんが、フォトレジスタとパッシブブザーを使用して、類似したゲームプレイを実現できます。
必要な部品
このプロジェクトでは、以下の部品が必要です。
一式を購入することは非常に便利です。リンクはこちら:
名前 |
このキットに含まれるアイテム |
リンク |
|---|---|---|
ケプラーキット |
450以上 |
以下のリンクから個々の部品も購入できます。
SN |
コンポーネント |
数量 |
リンク |
|---|---|---|---|
1 |
1 |
||
2 |
マイクロUSBケーブル |
1 |
|
3 |
1 |
||
4 |
数本 |
||
5 |
1 |
||
6 |
1(S8050) |
||
7 |
3(1KΩ, 220Ω, 10KΩ) |
||
8 |
アクティブ ブザー |
1 |
|
9 |
1 |
回路図
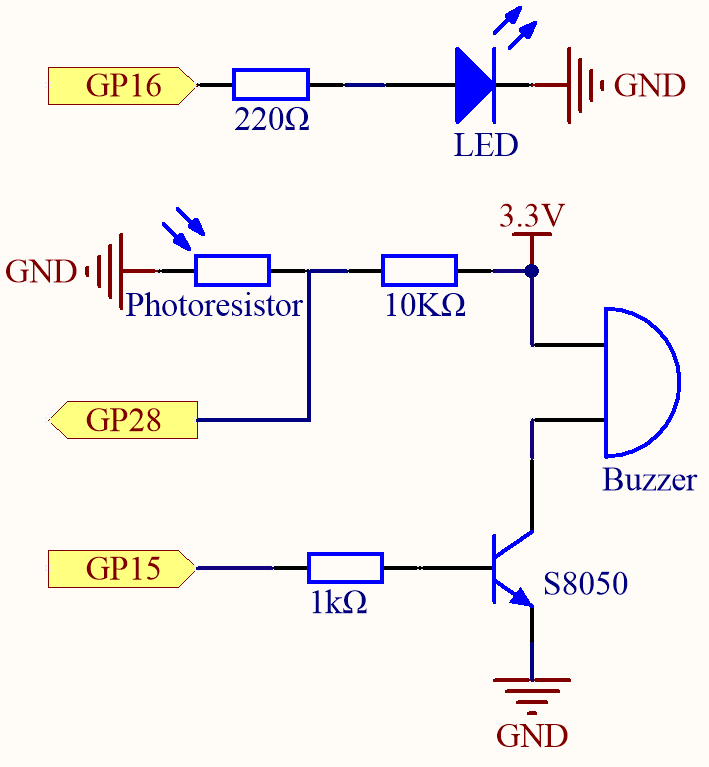
プロジェクトを開始する前に、光の強度の範囲を調整するために、フォトレジスタの上で手を上下に振ってください。GP16に接続されたLEDは、デバッグ時間を示すために使用され、LEDが点灯しているとデバッグが開始され、消灯しているとデバッグが終了したことを示します。
GP15が高レベルを出力すると、S8050(NPNトランジスタ)が導通し、パッシブブザーが鳴り始めます。
光が強いと、GP28の値は小さくなります。逆に、光が弱いと、値は大きくなります。 フォトレジスタの値をプログラムしてパッシブブザーの周波数に影響を与えることで、感光デバイスをシミュレートできます。
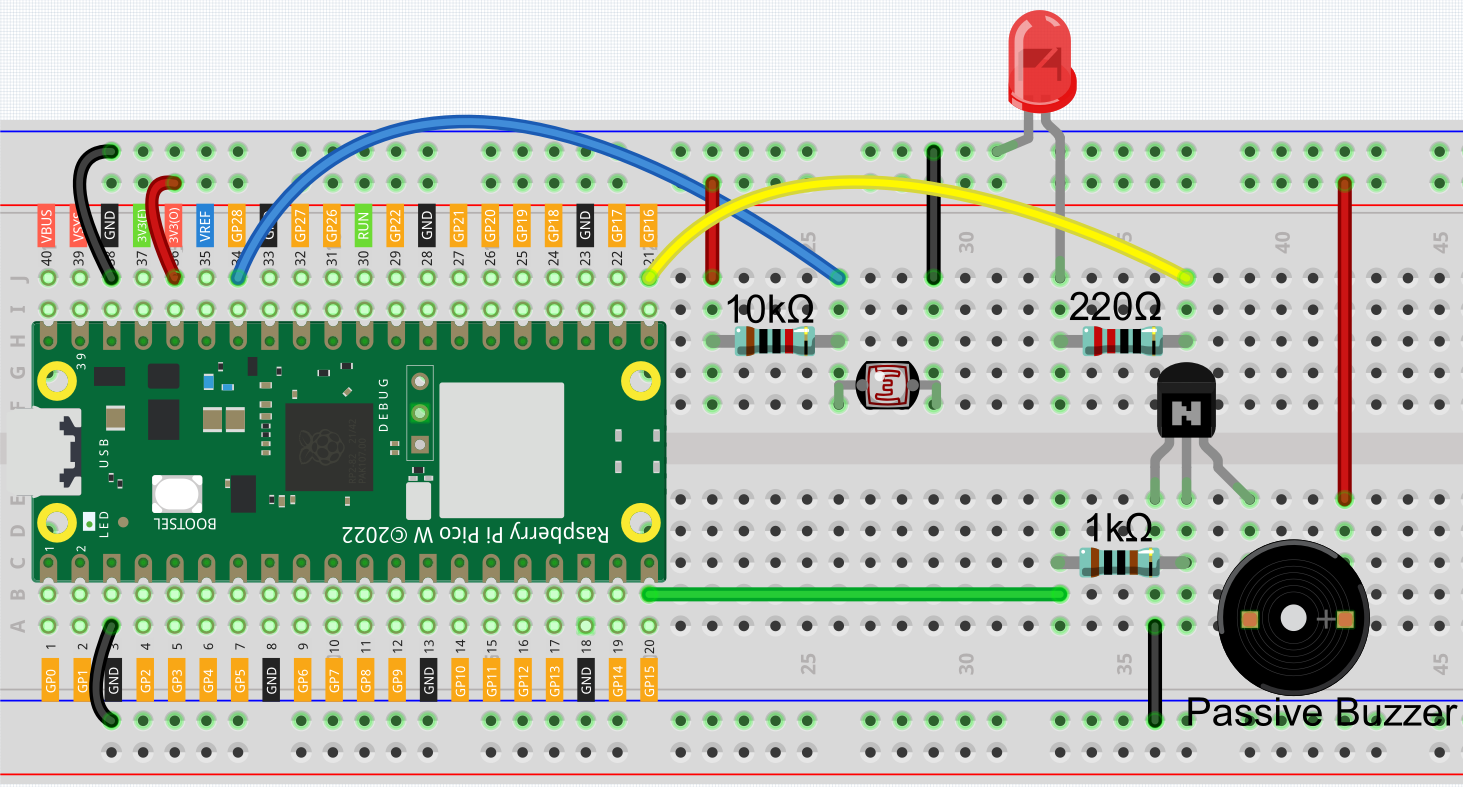
配線
コード
注釈
kepler-kit-main/micropythonパス下の7.1_light_theremin.pyファイルを開くか、このコードをThonnyにコピーして、「Run Current Script」をクリックするか、単にF5キーを押して実行してください。画面の右下隅にある "MicroPython (Raspberry Pi Pico)" インタープリタをクリックするのを忘れないでください。
詳細なチュートリアルは、 コードを直接開いて実行する を参照してください。
import machine
import utime

# Initialize LED, photoresistor, and buzzer
led = machine.Pin(16, machine.Pin.OUT)  # LED on pin 16
photoresistor = machine.ADC(28)  # Photoresistor on ADC pin 28
buzzer = machine.PWM(machine.Pin(15))  # Buzzer on pin 15 with PWM

# Variables to store the highest and lowest light readings for calibration
light_low = 65535
light_high = 0

# Function to map one range of values to another
def interval_mapping(x, in_min, in_max, out_min, out_max):
    return (x - in_min) * (out_max - out_min) / (in_max - in_min) + out_min

# Function to play a tone on the buzzer at a specified frequency for a set duration
def tone(pin, frequency, duration):
    pin.freq(frequency)  # Set buzzer frequency
    pin.duty_u16(30000)  # Set duty cycle to around 50%
    utime.sleep_ms(duration)  # Play the tone for the specified duration
    pin.duty_u16(0)  # Turn off the tone by setting duty cycle to 0

# Calibrate the photoresistor by finding the highest and lowest light values over 5 seconds
timer_init_start = utime.ticks_ms()  # Get the current time (start time)
led.value(1)  # Turn on LED to indicate calibration is in progress
while utime.ticks_diff(utime.ticks_ms(), timer_init_start) < 5000:  # Run calibration for 5 seconds
    light_value = photoresistor.read_u16()  # Read the light value from the photoresistor
    if light_value > light_high:  # Track the maximum light value
        light_high = light_value
    if light_value < light_low:  # Track the minimum light value
        light_low = light_value
led.value(0)  # Turn off the LED after calibration

# Main loop to read light levels and play corresponding tones
while True:
    light_value = photoresistor.read_u16()  # Read the current light value from the photoresistor
    pitch = int(interval_mapping(light_value, light_low, light_high, 50, 6000))  # Map light value to a pitch range
    if pitch > 50:  # Only play tones if the pitch is above a minimum threshold
        tone(buzzer, pitch, 20)  # Play the corresponding pitch for 20ms
    utime.sleep_ms(10)  # Small delay between readings
プログラムが実行されると、LEDが点灯し、フォトレジスタの検出範囲をキャリブレーションするために5秒間の時間が与えられます。
これは、使用する際に違う光環境(例えば、正午と夕暮れでの光の強度が異なる)や、フォトレジスタ上で手を動かす高さが異なるためです。楽器を演奏する際に手をどれだけ高く持ち上げるか、つまり手の最大・最小の高さを設定する必要があります。
5秒後、LEDは消灯し、その時点でフォトレジスタ上で手を振って演奏できます。