注釈
こんにちは、SunFounderのRaspberry Pi & Arduino & ESP32愛好家コミュニティへようこそ!Facebook上でRaspberry Pi、Arduino、ESP32についてもっと深く掘り下げ、他の愛好家と交流しましょう。
参加する理由は?
エキスパートサポート:コミュニティやチームの助けを借りて、販売後の問題や技術的な課題を解決します。
学び&共有:ヒントやチュートリアルを交換してスキルを向上させましょう。
独占的なプレビュー:新製品の発表や先行プレビューに早期アクセスしましょう。
特別割引:最新製品の独占割引をお楽しみください。
祭りのプロモーションとギフト:ギフトや祝日のプロモーションに参加しましょう。
👉 私たちと一緒に探索し、創造する準備はできていますか?[ここ]をクリックして今すぐ参加しましょう!
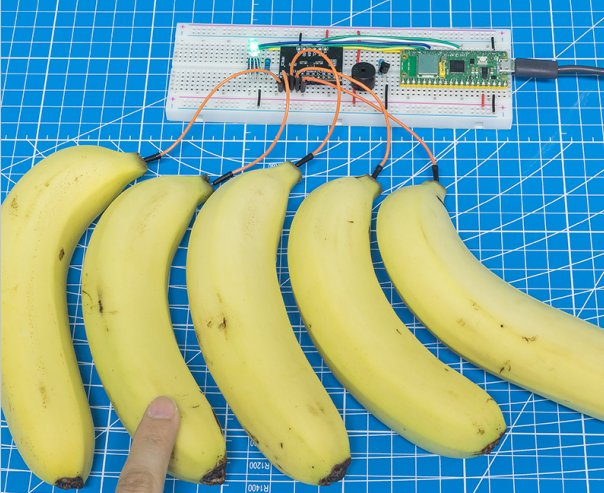
7.9 フルーツピアノ
電気伝導性は多くの金属物体や人体、さらには果物にも存在します。 この性質を使って、ちょっとした楽しいプロジェクト、すなわちフルーツピアノを作成することができます。 言い換えれば、私たちは触れるだけで音楽を演奏できるキーボードに果物を変えます。
必要なコンポーネント
このプロジェクトには、以下のコンポーネントが必要です。
一式をまとめて買う方が便利です、こちらがそのリンクです:
名前 |
このキットに含まれるアイテム |
リンク |
|---|---|---|
Kepler Kit |
450+ |
以下のリンクから個別にも購入できます。
品番 |
コンポーネント |
数量 |
リンク |
|---|---|---|---|
1 |
1 |
||
2 |
Micro USBケーブル |
1 |
|
3 |
1 |
||
4 |
数本 |
||
5 |
1(S8050) |
||
6 |
4(1-1KΩ, 1-330Ω, 2-220Ω) |
||
7 |
パッシブ ブザー |
1 |
|
8 |
1 |
||
9 |
1 |
回路図
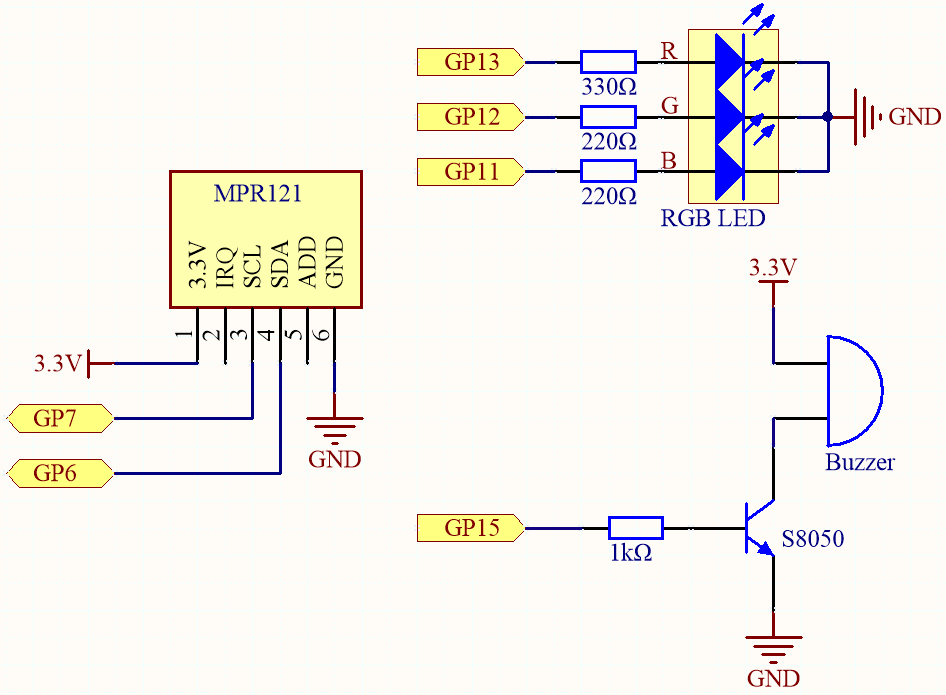
フルーツをピアノのキーに変えるには、MPR121上の電極をフルーツ(例:バナナのハンドル)に接続する必要があります。
最初に、MPR121は初期化され、各電極は現在の電荷に基づいて値を取得します。導体(人体など)が電極に触れると、電荷が移動して再調整されます。 その結果、電極の値は初期値とは異なり、メインコントロールボードに触れられたことを知らせます。 このプロセス中に、各電極の配線が安定していることを確認し、初期化時にその電荷がバランスするようにしてください。
配線図

コード
注釈
kepler-kit-main/micropythonのパスの下で7.9_fruit_piano.pyファイルを開くか、Thonnyにこのコードをコピーして、「Run Current Script」をクリックするか、F5キーを押して実行してください。右下隅の「MicroPython(Raspberry Pi Pico)」インタプリタをクリックするのを忘れないでください。
詳しいチュートリアルは、 コードを直接開いて実行する を参照してください。
ここでは、
mpr121.pyというライブラリを使用する必要があります。Pico Wにアップロードされたかどうか確認してください。詳細なチュートリアルは、 1.4 Picoにライブラリをアップロード を参照してください。
from mpr121 import MPR121
from machine import Pin, I2C
import time
import urandom

# Initialize I2C connection for MPR121 capacitive touch sensor
i2c = I2C(1, sda=Pin(6), scl=Pin(7))  # Set up I2C bus with SDA on pin 6 and SCL on pin 7
mpr = MPR121(i2c)  # Create an instance of the MPR121 touch sensor

# Buzzer notes frequencies (in Hertz) for different musical notes
NOTE_A3 = 220
NOTE_B3 = 247
NOTE_C4 = 262
NOTE_D4 = 294
NOTE_E4 = 330
NOTE_F4 = 349
NOTE_G4 = 392
NOTE_A4 = 440
NOTE_B4 = 494
NOTE_C5 = 523
NOTE_D5 = 587
NOTE_E5 = 659

# Initialize PWM for buzzer on pin 15
buzzer = machine.PWM(machine.Pin(15))

# List of note frequencies to be played by the buzzer
note = [NOTE_A3, NOTE_B3, NOTE_C4, NOTE_D4, NOTE_E4, NOTE_F4, NOTE_G4, NOTE_A4, NOTE_B4, NOTE_C5, NOTE_D5, NOTE_E5]

# Function to play a tone on the buzzer at a specified frequency
def tone(pin, frequency):
    pin.freq(frequency)  # Set buzzer frequency
    pin.duty_u16(30000)  # Set duty cycle to 50% (approx)

# Function to stop playing the tone (mute the buzzer)
def noTone(pin):
    pin.duty_u16(0)  # Set duty cycle to 0% (mute)

# RGB LED initialization using PWM on pins 13, 12, and 11 (for red, green, blue)
red = machine.PWM(machine.Pin(13))
green = machine.PWM(machine.Pin(12))
blue = machine.PWM(machine.Pin(11))

# Set the PWM frequency for each color (1kHz)
red.freq(1000)
green.freq(1000)
blue.freq(1000)

# Function to map a value `x` from one range to another
def interval_mapping(x, in_min, in_max, out_min, out_max):
    return (x - in_min) * (out_max - out_min) / (in_max - in_min) + out_min

# Function to randomly light up the RGB LED with random color values
def lightup():
    red.duty_u16(int(urandom.uniform(0, 65535)))  # Set random intensity for red
    green.duty_u16(int(urandom.uniform(0, 65535)))  # Set random intensity for green
    blue.duty_u16(int(urandom.uniform(0, 65535)))  # Set random intensity for blue

# Function to turn off all RGB LED colors (set all to 0)
def dark():
    red.duty_u16(0)  # Turn off red LED
    green.duty_u16(0)  # Turn off green LED
    blue.duty_u16(0)  # Turn off blue LED

# Main project loop
lastState = mpr.get_all_states()  # Get initial state of all touch inputs
touchMills = time.ticks_ms()  # Record the time of the last touch event
beat = 500  # Set the duration of sound and light effect (500ms)

# Main loop to handle touch detection and effects
while True:
    currentState = mpr.get_all_states()  # Get current state of all touch inputs

    # Check if there's a change in the touch input state (touch started or ended)
    if currentState != lastState:
        for i in range(12):  # Iterate over 12 possible touch inputs
            # Check if a touch has started (touched in current state but not in the last state)
            if i in list(currentState) and not i in list(lastState):
                tone(buzzer, note[i])  # Play corresponding note for the touched input
                lightup()  # Light up the RGB LED with random colors
                touchMills = time.ticks_ms()  # Record the time of the touch event

    # Check if the beat duration has passed or if no touch inputs are active
    if time.ticks_diff(time.ticks_ms(), touchMills) >= beat or len(currentState) == 0:
        noTone(buzzer)  # Stop playing the buzzer
        dark()  # Turn off the RGB LED

    # Update the last state to the current state for the next iteration
    lastState = currentState
プログラムが動作する前に果物に触れないでください。初期化中に正確でない参照値を取得する可能性があります。 プログラムが動作した後、果物に優しく触れると、ブザーが対応する音を鳴らし、RGBライトがランダムに一回点滅します。