注釈
こんにちは、SunFounderのRaspberry Pi & Arduino & ESP32愛好家コミュニティへようこそ!Facebook上でRaspberry Pi、Arduino、ESP32についてもっと深く掘り下げ、他の愛好家と交流しましょう。
参加する理由は?
エキスパートサポート:コミュニティやチームの助けを借りて、販売後の問題や技術的な課題を解決します。
学び&共有:ヒントやチュートリアルを交換してスキルを向上させましょう。
独占的なプレビュー:新製品の発表や先行プレビューに早期アクセスしましょう。
特別割引:最新製品の独占割引をお楽しみください。
祭りのプロモーションとギフト:ギフトや祝日のプロモーションに参加しましょう。
👉 私たちと一緒に探索し、創造する準備はできていますか?[ここ]をクリックして今すぐ参加しましょう!
7.11 体感コントローラー
ロボット映画をよく観ているなら、このような光景を見たことがあるでしょう。 主人公が手首をひねると、巨大なロボットがそれに応じて動き、主人公が拳を振ると、ロボットもそれに続く。非常にクールです。
この技術の使用は、すでに大学や研究機関で一般的であり、5Gの到来によってその応用範囲は大いに拡大しています。 「外科ロボットダ・ヴィンチ」の遠隔手術は典型的な例です。
この種のロボットシステムは、通常、人間の動きをキャプチャするモジュールとロボットアームを駆動するモジュール(一部の応用シナリオにはデータ通信モジュールも含まれる)の2つのモジュールで構成されています。
ここでは、MPU6050を用いて人間の動きをキャプチャ(グローブに取り付ける)し、サーボを用いてロボットアームの動きを表現しています。
必要なコンポーネント
このプロジェクトでは、以下のコンポーネントが必要です。
一式をまとめて購入するのは便利です。リンクはこちら:
名称 |
このキットに含まれるアイテム |
リンク |
|---|---|---|
ケプラーキット |
450+ |
以下のリンクから個別に購入することもできます。
SN |
コンポーネント |
個数 |
リンク |
|---|---|---|---|
1 |
1 |
||
2 |
Micro USBケーブル |
1 |
|
3 |
1 |
||
4 |
数本 |
||
5 |
1 |
||
6 |
1 |
回路図
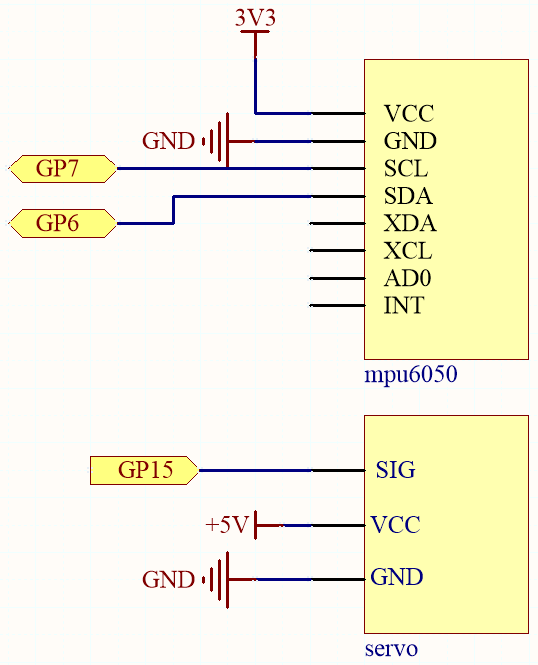
MPU6050は各方向の加速度値に基づいて姿勢角を計算します。
プログラムは、姿勢角が変わるにつれて、サーボを対応する偏角で制御します。
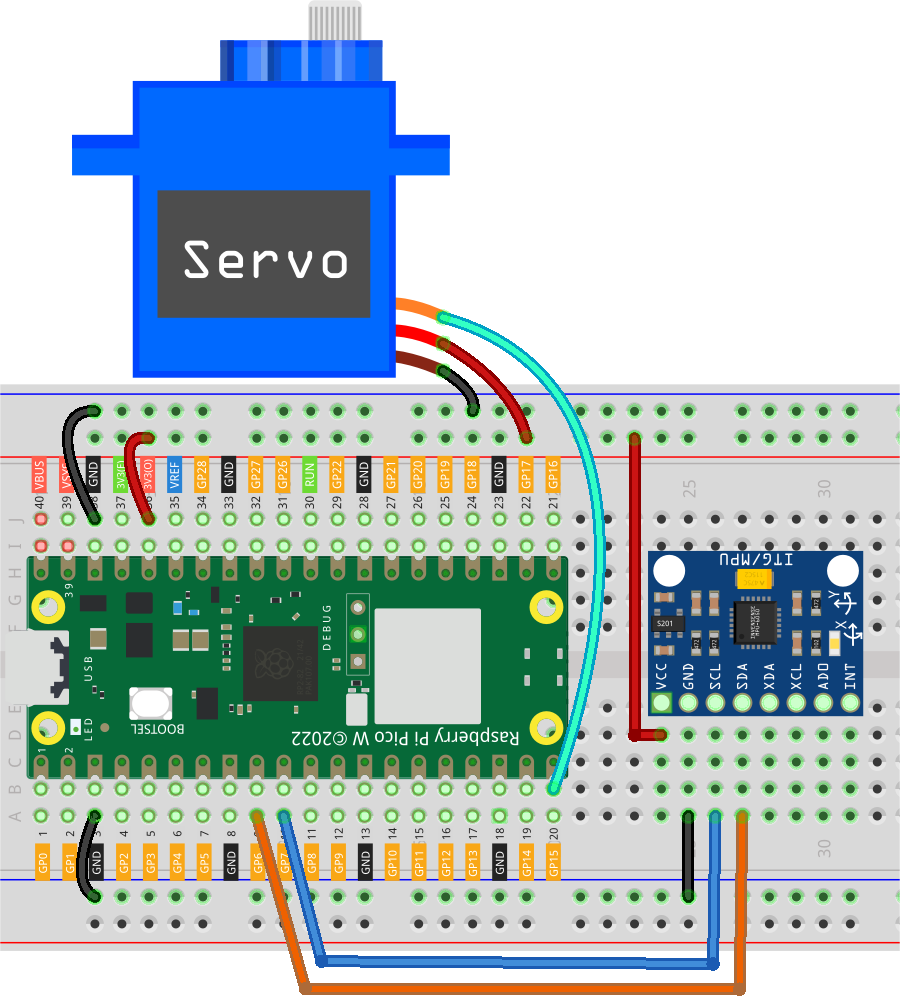
配線
コード
注釈
kepler-kit-main/micropythonのパス下にある7.11_somatosensory_controller.pyファイルを開くか、このコードをThonnyにコピペして、"Run Current Script"をクリックまたはF5キーを押して実行します。右下の「MicroPython(Raspberry Pi Pico)」インタープリターをクリックして選択してください。
詳細なチュートリアルは、 コードを直接開いて実行する を参照してください。
こちらでは
imu.pyとvector3d.pyが必要です。Pico Wにアップロードされているか確認してください。詳細なチュートリアルは 1.4 Picoにライブラリをアップロード を参照してください。
from imu import MPU6050
from machine import I2C, Pin
import time
import math

# Initialize I2C communication for MPU6050 accelerometer
i2c = I2C(1, sda=Pin(6), scl=Pin(7), freq=400000)
mpu = MPU6050(i2c)

# Initialize PWM for the servo on pin 15 with a frequency of 50Hz
servo = machine.PWM(machine.Pin(15))
servo.freq(50)

# Function to map a value from one range to another
def interval_mapping(x, in_min, in_max, out_min, out_max):
    return (x - in_min) * (out_max - out_min) / (in_max - in_min) + out_min

# Function to calculate the Euclidean distance between two points
def dist(a, b):
    return math.sqrt((a * a) + (b * b))

# Function to calculate the rotation along the y-axis
def get_y_rotation(x, y, z):
    radians = math.atan2(x, dist(y, z))
    return -math.degrees(radians)

# Function to calculate the rotation along the x-axis
def get_x_rotation(x, y, z):
    radians = math.atan2(y, dist(x, z))
    return math.degrees(radians)

# Function to control the servo based on the angle
# Maps the angle (0-180) to the PWM duty cycle for servo control
def servo_write(pin, angle):
    pulse_width = interval_mapping(angle, 0, 180, 0.5, 2.5)  # Map angle to pulse width in ms (0.5ms to 2.5ms)
    duty = int(interval_mapping(pulse_width, 0, 20, 0, 65535))  # Convert pulse width to PWM duty cycle (0-65535)
    pin.duty_u16(duty)  # Set the duty cycle for the servo PWM

# Define the number of readings to average for smoother motion
times = 25

# Main loop
while True:
    total = 0
    # Take multiple readings to average the angle for smoothness
    for i in range(times):
        angle = get_y_rotation(mpu.accel.x, mpu.accel.y, mpu.accel.z)  # Get the y-axis rotation value from the accelerometer
        total += angle  # Accumulate the readings

    average_angle = int(total / times)  # Calculate the average angle
    # Map the average angle (-90 to 90) to the servo's movement range (0 to 180 degrees)
    servo_write(servo, interval_mapping(average_angle, -90, 90, 0, 180))

    time.sleep(0.1)  # Add a small delay to reduce jitter in the servo movement
プログラムが動作すると、MPU6050を傾ける(またはグローブに取り付けた場合は手首を回す)と、サーボが左右に回転します。