注釈
こんにちは、SunFounderのRaspberry Pi & Arduino & ESP32愛好家コミュニティへようこそ!Facebook上でRaspberry Pi、Arduino、ESP32についてもっと深く掘り下げ、他の愛好家と交流しましょう。
参加する理由は?
エキスパートサポート:コミュニティやチームの助けを借りて、販売後の問題や技術的な課題を解決します。
学び&共有:ヒントやチュートリアルを交換してスキルを向上させましょう。
独占的なプレビュー:新製品の発表や先行プレビューに早期アクセスしましょう。
特別割引:最新製品の独占割引をお楽しみください。
祭りのプロモーションとギフト:ギフトや祝日のプロモーションに参加しましょう。
👉 私たちと一緒に探索し、創造する準備はできていますか?[ここ]をクリックして今すぐ参加しましょう!
7.3 警報サイレンランプ
警察の灯りは、実際の生活(または映画)でよく見かけます。通常、交通を整理するため、警告装置として、そして警察官、緊急車両、消防車、作業車の重要な安全装置として使用されます。その灯りや音を見聞きした場合、注意が必要です。それは、あなた(または周囲の人々)が危険にさらされている可能性があるからです。
ここでは、LEDとブザーを用いて小型の警告灯を作成し、スライドスイッチで起動します。
必要なコンポーネント
このプロジェクトでは、以下のコンポーネントが必要です。
全てを一つのキットで購入すると便利です。リンクはこちら:
名前 |
キットの内容 |
リンク |
|---|---|---|
ケプラーキット |
450+点 |
以下のリンクから個別にも購入できます。
SN |
コンポーネント |
個数 |
リンク |
|---|---|---|---|
1 |
1 |
||
2 |
Micro USBケーブル |
1 |
|
3 |
1 |
||
4 |
数本 |
||
5 |
1 |
||
6 |
1(S8050) |
||
7 |
3(1KΩ, 220Ω, 10KΩ) |
||
8 |
パッシブ ブザー |
1 |
|
9 |
1(104) |
||
10 |
1 |
回路図
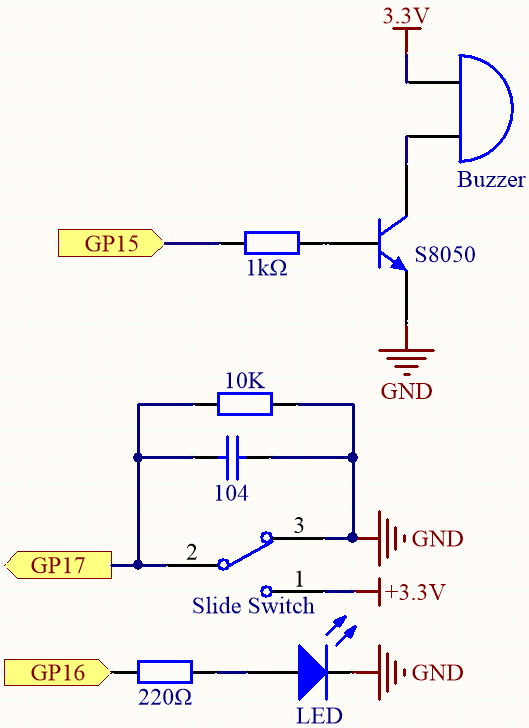
GP17はスライダーの中央ピンに接続されており、10Kの抵抗と一緒にキャパシタ(フィルタ)がGNDに並列接続されています。これにより、スライダーは左右に切り替えられたときに安定した高いまたは低いレベルを出力します。
GP15が高いとすぐに、NPNトランジスタが導通し、パッシブブザーが鳴り始めます。このパッシブブザーは、サイレン音を出すように周波数が徐々に増加するようにプログラムされています。
LEDはGP16に接続されており、サイレンを模倣するように定期的に明るさを変えるようにプログラムされています。
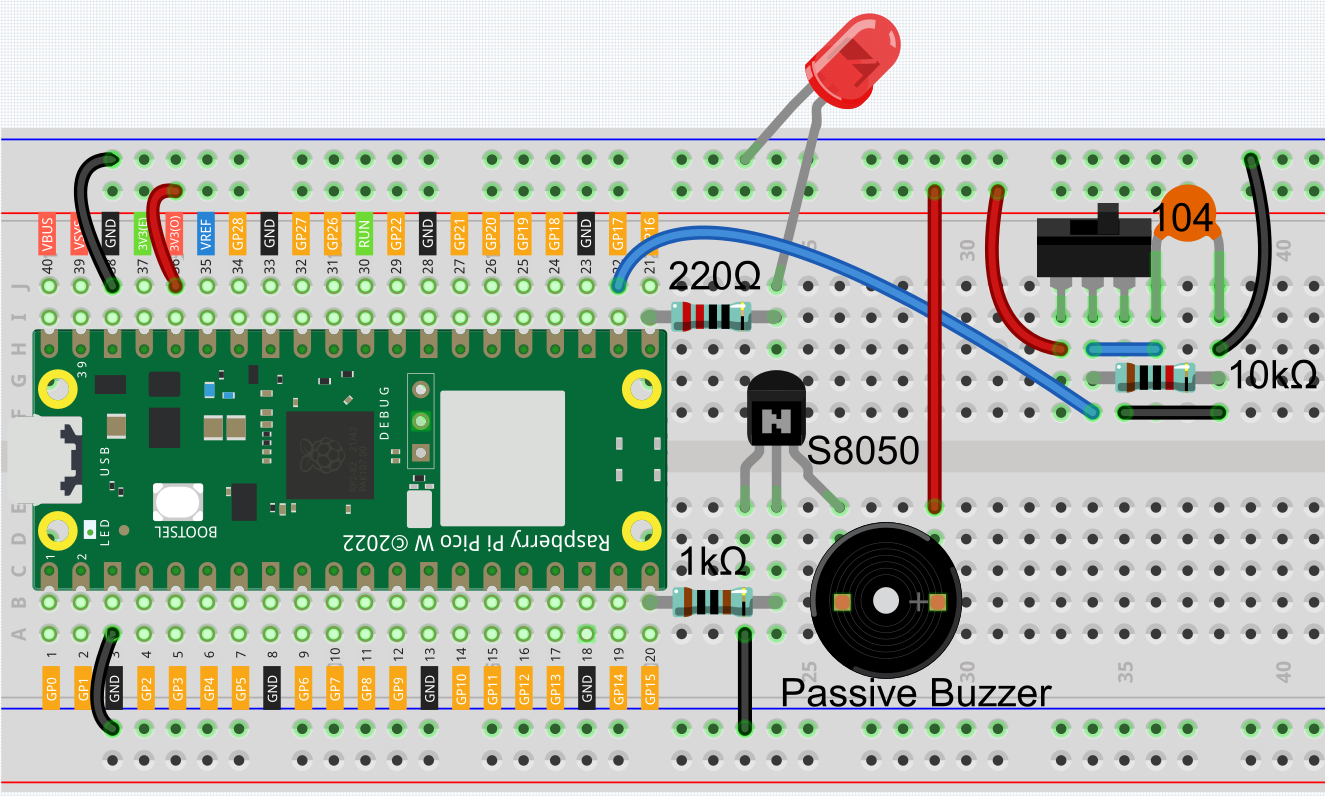
配線
コード
注釈
kepler-kit-main/micropythonフォルダ下の7.3_alarm_siren_lamp.pyファイルを開くか、このコードをThonnyにコピーしてから、「Run Current Script」をクリックするか、F5キーを押して実行してください。右下隅の「MicroPython(Raspberry Pi Pico)」インタープリタを選択することを忘れずに。
詳細なチュートリアルについては、 コードを直接開いて実行する を参照してください。
import machine
import time

# Initialize the PWM for the buzzer (on pin 15) and LED (on pin 16)
buzzer = machine.PWM(machine.Pin(15))  # PWM for buzzer
led = machine.PWM(machine.Pin(16))  # PWM for LED
led.freq(1000)  # Set the frequency of the LED PWM to 1kHz

# Initialize the switch (on pin 17) as an input pin
switch = machine.Pin(17, machine.Pin.IN)

# Function to stop the buzzer by setting the duty cycle to 0%
def noTone(pin):
    pin.duty_u16(0)  # Set the PWM duty cycle to 0, stopping the sound

# Function to play a tone on the buzzer with a specified frequency
def tone(pin, frequency):
    pin.freq(frequency)  # Set the frequency for the buzzer
    pin.duty_u16(30000)  # Set duty cycle to around 50% (30000 out of 65535)

# Function to map a value from one range to another
def interval_mapping(x, in_min, in_max, out_min, out_max):
    return (x - in_min) * (out_max - out_min) / (in_max - in_min) + out_min

# Interrupt handler function to toggle the bell_flag when the switch is pressed
def toggle(pin):
    global bell_flag
    bell_flag = not bell_flag  # Toggle the bell_flag value
    print(bell_flag)  # Print the current state of bell_flag for debugging

    # Change the switch interrupt depending on the state of the bell_flag
    if bell_flag:
        # If bell_flag is True, listen for a falling edge (when switch is released)
        switch.irq(trigger=machine.Pin.IRQ_FALLING, handler=toggle)
    else:
        # If bell_flag is False, listen for a rising edge (when switch is pressed)
        switch.irq(trigger=machine.Pin.IRQ_RISING, handler=toggle)

# Initialize bell_flag to False (buzzer and LED off by default)
bell_flag = False

# Set up an interrupt to detect when the switch is pressed (rising edge)
switch.irq(trigger=machine.Pin.IRQ_RISING, handler=toggle)

# Main loop to control the buzzer and LED based on the bell_flag
while True:
    if bell_flag == True:
        # If bell_flag is True, gradually increase the brightness of the LED
        # and change the buzzer frequency to simulate a bell ringing effect
        for i in range(0, 100, 2):  # Loop from 0 to 100 in steps of 2
            led.duty_u16(int(interval_mapping(i, 0, 100, 0, 65535)))  # Map i to LED brightness
            tone(buzzer, int(interval_mapping(i, 0, 100, 130, 800)))  # Map i to buzzer frequency
            time.sleep_ms(10)  # Short delay to create a smooth ramp
    else:
        # If bell_flag is False, stop the buzzer and turn off the LED
        noTone(buzzer)  # Stop the buzzer
        led.duty_u16(0)  # Turn off the LED (set duty cycle to 0)
プログラムが動作している状態で、スライドスイッチを左に切り替えると(あなたのスライドスイッチの配線によっては右かもしれません)、ブザーが段階的に警告音を発し、LEDの明るさもそれに応じて変わります。スライドスイッチを右に切り替えると、ブザーとLEDは動作を停止します。