MPR121
概述
在本课中,您将学习如何使用 MPR121。当您想在项目中添加大量触摸开关时,它是一个很好的选择。MPR121 的电极可以通过导体进行扩展。如果您将一根电线连接到香蕉上,就可以将香蕉变成一个触摸开关,从而实现水果钢琴等项目。
所需元件
本项目中,我们需要以下元件。
购买整套套件会更加方便,以下是链接:
名称 |
套件所含项目 |
链接 |
|---|---|---|
Elite Explorer 套件 |
300+ |
您也可以从以下链接单独购买。
元件介绍 |
购买链接 |
|---|---|
- |
|
- |
接线
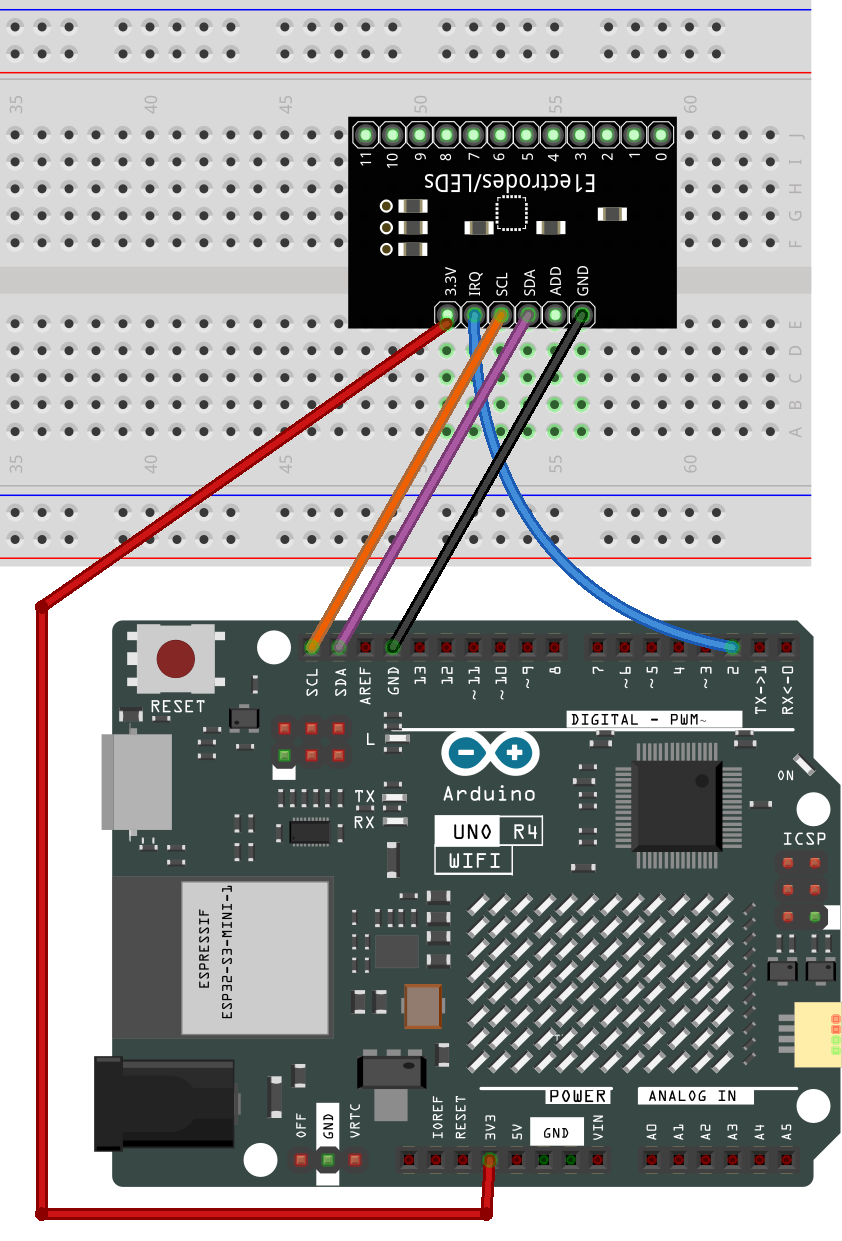
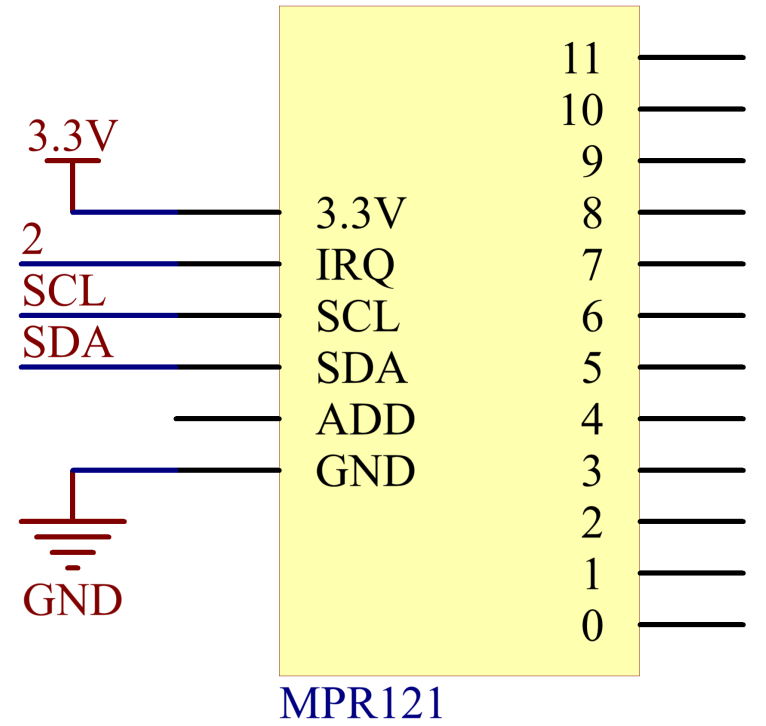
在本示例中,我们将 MPR121 插入面包板。将 MPR121 的 GND 连接到 GND,3.3V 连接到 3V3,IRQ 连接到数字引脚 2,SCL 连接到引脚 SCL(A5),SDA 连接到引脚 SDA(A4)。共有 12 个电极用于触摸感应。
备注
MPR121 使用 3.3V 供电,而非 5V。
原理图
代码
备注
您可以直接打开路径
elite-explorer-kit-main\basic_project\23-mpr121下的23-mpr121.ino文件。这里使用
Adafruit MPR121库,您可以从 库管理器 安装它。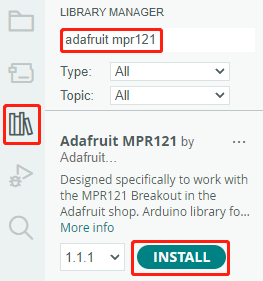
将代码上传到 UNO 板后,MPR121 引脚”1”和”0”的触摸状态将记录在一个 12 位布尔数组中。然后该数组将打印在串口监视器上。
代码分析
此代码实现了 MPR121 触摸传感器的通信和操作。它可以检测触摸电极的状态,并在串行接口上打印有关触摸或释放电极的信息。如果需要详细的传感器数据,可以取消注释相关代码。
以下是代码分析:
导入库:
#include <Wire.h>
#include "Adafruit_MPR121.h"
Wire.h:用于 I2C 通信。Adafruit_MPR121.h:Adafruit 的 MPR121 库,用于操作 MPR121 触摸传感器。
定义
_BV宏:#ifndef _BV #define _BV(bit) (1 << (bit)) #endif
_BV(bit)定义了一个宏,将给定的位转换为相应的二进制值,类似于 1 << bit。初始化
Adafruit_MPR121类实例:Adafruit_MPR121 cap = Adafruit_MPR121();
创建一个名为
cap的Adafruit_MPR121类实例。cap对象将用于与 MPR121 触摸传感器通信和操作。setup()函数:以 9600 波特率初始化串口通信。然后使用默认 I2C 地址 0x5A 初始化 MPR121 触摸传感器。如果初始化失败,打印错误消息并进入无限循环。
void setup() {
    Serial.begin(9600);

    while (!Serial) { // 需要保持 leonardo/micro 不会启动过快!
        delay(10);
    }

    Serial.println("Adafruit MPR121 Capacitive Touch sensor test");

    // 默认地址为 0x5A,如果连接到 3.3V 则为 0x5B
    // 如果连接到 SDA 则为 0x5C,如果连接到 SCL 则为 0x5D
    if (!cap.begin(0x5A)) {
        Serial.println("MPR121 not found, check wiring?");
        while (1);
    }
    Serial.println("MPR121 found!");
}
loop()函数:获取当前触摸状态,返回为 16 位整数。
currtouched = cap.touched();
遍历 12 个电极(编号从 0 到 11)的状态。
for (uint8_t i=0; i<12; i++) {
    // 如果 *现在* 被触摸且 *之前* 没有被触摸,则发出提示!
    if ((currtouched & _BV(i)) && !(lasttouched & _BV(i)) ) {
        Serial.print(i); Serial.println(" touched");
    }
    // 如果 *之前* 被触摸而现在 *没有* 被触摸,则发出提示!
    if (!(currtouched & _BV(i)) && (lasttouched & _BV(i)) ) {
        Serial.print(i); Serial.println(" released");
    }
}
如果某个电极被触摸且之前未被触摸,则打印 “x touched”,其中 x 为电极编号。
如果某个电极之前被触摸但现在未被触摸,则打印 “x released”。
更新
lasttouched以存储当前触摸状态,用于下一次迭代的比较。lasttouched = currtouched;
调试信息(可选部分):
// 调试信息
Serial.print("\t\t\t\t\t\t\t\t\t\t\t\t\t 0x"); Serial.println(cap.touched(), HEX);
Serial.print("Filt: ");
for (uint8_t i=0; i<12; i++) {
    Serial.print(cap.filteredData(i)); Serial.print("\t");
}
Serial.println();
Serial.print("Base: ");
for (uint8_t i=0; i<12; i++) {
    Serial.print(cap.baselineData(i)); Serial.print("\t");
}
Serial.println();

// 添加延迟以防止数据过多
delay(100);