Lesson 23 IR Remote Control
Introduction
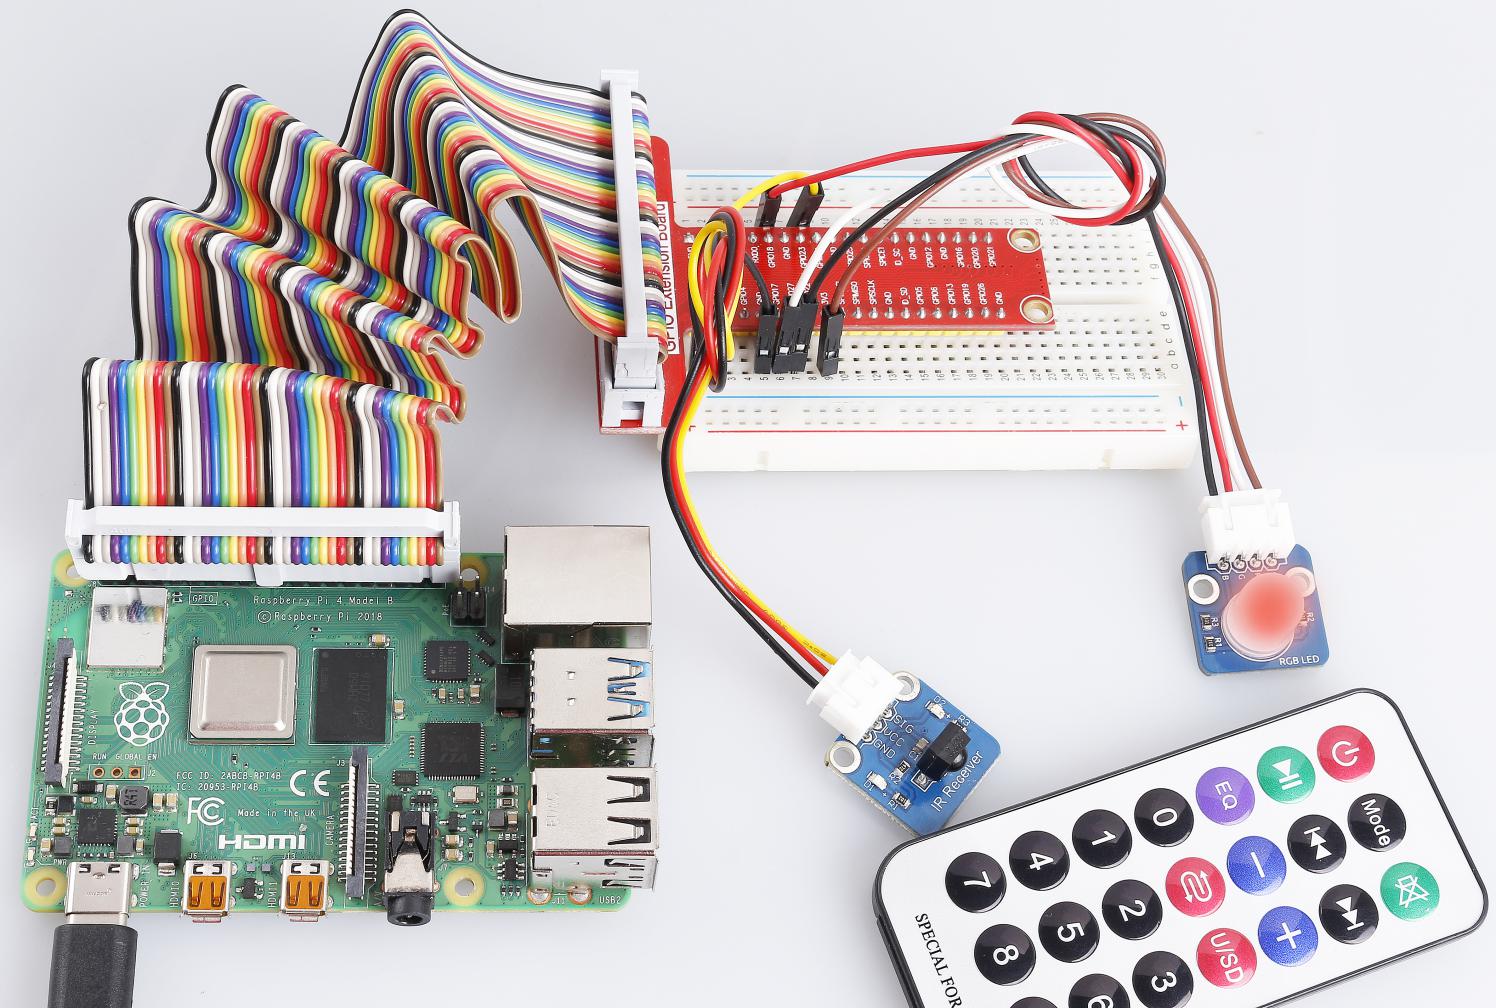
Each button of an IR remote control (as shown below) has a string of specific encoding. When a button is pressed, the IR transmitter in the remote control will send out the corresponding IR encoding signals. On the other side, when the IR receiver receives certain encoding signals, it will decode them to identify which button is pressed.
Required Components
1 * Raspberry Pi
1 * Breadboard
1 * IR Receiver
1 * RGB LED module
1 * IR Remote Control
1 * 3-Pin anti-reverse cable
1 * 4-Pin anti-reverse cable
Experimental Principle
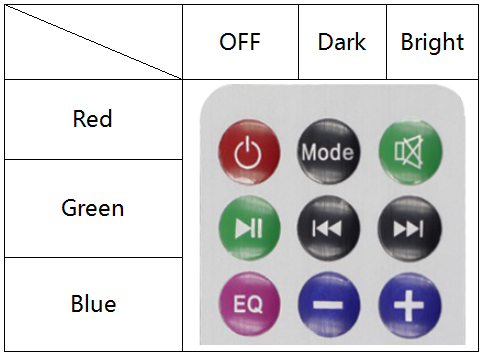
In this experiment, we use the lirc library to read infrared signals returned by buttons of the remote control and translate them to button values. Then use liblircclient-dev (C) and pylirc (Python) to simplify the process for reading values from the remote control. In this experiment use 9 buttons on the top of the remote to control the color of the RGB LED module. Each row represents one color, and each column represents the brightness.
Experimental Procedures
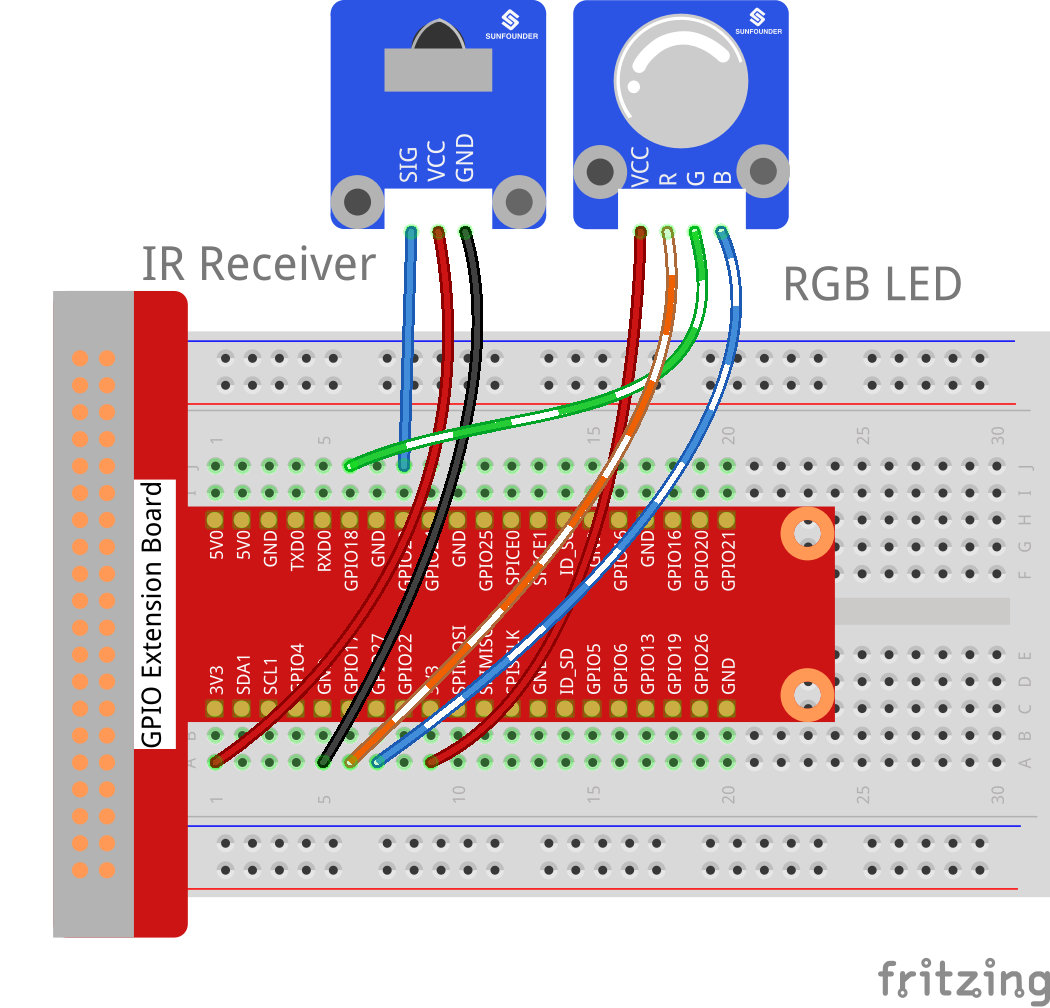
Step 1: Build the circuit.
Raspberry Pi |
GPIO Extension Board |
IR Receiver Module |
GPIO4 |
GPIO23 |
SIG |
3.3V |
3V3 |
VCC |
GND |
GND |
GND |
Raspberry Pi |
GPIO Extension Board |
RGB LED Module |
3.3V |
3V3 |
VCC |
GPIO0 |
GPIO17 |
R |
GPIO1 |
GPIO18 |
G |
GPIO2 |
GPIO27 |
B |
Step 2: Install the lirc:
sudo apt-get update
sudo apt install lirc
Step 3: Set up lirc.
Open your /boot/config.txt file:
sudo nano /boot/config.txt
Add this to the file:
# Uncomment this to enable the infrared communication
dtoverlay=gpio-ir,gpio_pin=23
dtoverlay=gpio-ir-tx,gpio_pin=22
Press Ctrl +O and Ctrl +X, save and exit .
Step 4: edit /etc/lirc/lirc_options.conf.
Open the /etc/lirc/lirc_options.conf
sudo nano /etc/lirc/lirc_options.conf
Modify the file as below:
driver = default
device = /dev/lirc1
Step 5: Copy the configuration file to /home/pi and /etc/lirc:
cd /home/pi/SunFounder_SensorKit_for_RPi2
cp lircd.conf /home/pi
sudo cp lircd.conf /etc/lirc/
Step 6: Reboot the Raspberry Pi after the change.
sudo reboot
Step 7: Test the IR receiver.
Check if lirc module is loaded:
ls /dev/li*
You should see this:
/dev/lirc0 /dev/lirc1
Step 8: Run the command to start outputting raw data from the IR receiver:
irw
When you press a button on the remote, you can see the button name printed on the screen.
pi@raspberrypi:~ $ irw
0000000000000001 00 KEY_CHANNELDOWN ./lircd.conf
0000000000000003 00 KEY_CHANNELUP ./lircd.conf
0000000000000002 00 KEY_CHANNEL ./lircd.conf
0000000000000004 00 KEY_PREVIOUS ./lircd.conf
0000000000000005 00 KEY_NEXT ./lircd.conf
0000000000000006 00 KEY_PLAYPAUSE ./lircd.conf
0000000000000008 00 KEY_VOLUMEDOWN ./lircd.conf
0000000000000007 00 KEY_VOLUMEUP ./lircd.conf
0000000000000009 00 KEY_EQUAL ./lircd.conf
0000000000000015 00 BTN_1 ./lircd.conf
0000000000000014 00 BTN_0 ./lircd.conf
000000000000000a 00 KEY_NUMERIC_0 ./lircd.conf
000000000000000b 00 KEY_NUMERIC_1 ./lircd.conf
If it does not appear, somewhere may be incorrectly configured. Check again that you’ve connected everything and haven’t crossed any wires.
For C Users:
Step 9: Download LIRC client library:
sudo apt-get install liblircclient-dev
Step 10: Change directory.
cd /home/pi/SunFounder_SensorKit_for_RPi2/C/23_ircontrol/
Step 11: Copy the lircrc file to /etc/lirc/lirc/:
sudo cp lircrc /etc/lirc/
Step 12: Compile.
gcc ircontrol.c -lwiringPi -llirc_client
Note
If it does not work after running, or there is an error prompt wiringPi.h: No such file or directory, please refer to WiringPi to install it.
Step 13: Run.
sudo ./a.out
Code
#include <wiringPi.h>
#include <softPwm.h>
#include <stdio.h>
#include <errno.h>
#include <stdlib.h>
#include <string.h>
#include <lirc/lirc_client.h>
#include <time.h>

#define uchar unsigned char

#define LedPinRed    0
#define LedPinGreen  1
#define LedPinBlue   2

uchar color[3] = {0xff, 0xff, 0xff};
uchar Lv[3]    = {0xff, 0x44, 0x00};

char *keymap[21] ={
    " KEY_CHANNELDOWN ",
    " KEY_CHANNEL ",
    " KEY_CHANNELUP ",
    " KEY_PREVIOUS ",
    " KEY_NEXT ",
    " KEY_PLAYPAUSE ",
    " KEY_VOLUMEDOWN ",
    " KEY_VOLUMEUP ",
    " KEY_EQUAL ",
    " KEY_NUMERIC_0 ",
    " BTN_0 ",
    " BTN_1 ",
    " KEY_NUMERIC_1 ",
    " KEY_NUMERIC_2 ",
    " KEY_NUMERIC_3 ",
    " KEY_NUMERIC_4 ",
    " KEY_NUMERIC_5 ",
    " KEY_NUMERIC_6 ",
    " KEY_NUMERIC_7 ",
    " KEY_NUMERIC_8 ",
    " KEY_NUMERIC_9 "};

void ledInit(void)
{
    softPwmCreate(LedPinRed,  0, 100);
    softPwmCreate(LedPinGreen,0, 100);
    softPwmCreate(LedPinBlue, 0, 100);
}

void ledColorSet()
{
    softPwmWrite(LedPinRed,   color[0]);
    softPwmWrite(LedPinGreen, color[1]);
    softPwmWrite(LedPinBlue,  color[2]);
}

int key(char *code){
    int i;
    int num;
    for (i=0; i<21; i++){
        if (strstr(code, keymap[i])){
            num = i;
        }
    }
    return num + 1;
}

int RGB(int i){
    switch(i){
        case 1: color[0] = Lv[0]; printf("Red OFF\n"); break;
        case 2: color[0] = Lv[1]; printf("Light Red\n"); break;
        case 3: color[0] = Lv[2]; printf("Dark Red\n"); break;
        case 4: color[1] = Lv[0]; printf("Green OFF\n"); break;
        case 5: color[1] = Lv[1]; printf("Light Green\n"); break;
        case 6: color[1] = Lv[2]; printf("Dark Green\n"); break;
        case 7: color[2] = Lv[0]; printf("Blue OFF\n"); break;
        case 8: color[2] = Lv[1]; printf("Light Blue\n"); break;
        case 9: color[2] = Lv[2]; printf("Dark Green\n"); break;
    }
}

int main(void)
{
    struct lirc_config *config;
    int buttonTimer = millis();
    char *code;
    char *c;
    if(wiringPiSetup() == -1){
        printf("setup wiringPi failed !");
        return 1;
    }

    if(lirc_init("lirc",1)==-1)
        exit(EXIT_FAILURE);

    ledInit();
    ledColorSet();

    if(lirc_readconfig(NULL,&config,NULL)==0)
    {
        while(lirc_nextcode(&code)==0)
        {
            if(code==NULL) continue;{
                if (millis() - buttonTimer  > 400){
                    RGB(key(code));
                    ledColorSet(color);
                }
            }
            free(code);
        }
        lirc_freeconfig(config);
    }
    lirc_deinit();
    exit(EXIT_SUCCESS);
    return 0;
}
For Python Users:
Step 9: Install lirc Python packages:
sudo pip3 install lirc
Step 10: Change directory:
cd /home/pi/SunFounder_SensorKit_for_RPi2/Python/
Step 11: Run.
sudo python3 23_ircontrol.py
Code
import lirc
import time
import RPi.GPIO as GPIO

# client = lirc.Client()
# print(client.version())

''' RGB config'''
Rpin = 17
Gpin = 18
Bpin = 27

Lv = [0, 20, 90] # Light Level
color = [0, 0, 0]

p_R = None
p_G = None
p_B = None


def setColor(color):
    # global p_R, p_G, p_B
    p_R.ChangeDutyCycle(100 - color[0])     # Change duty cycle
    p_G.ChangeDutyCycle(100 - color[1])
    p_B.ChangeDutyCycle(100 - color[2])

def x():
    setColor(color)

def setup():
    global p_R, p_G, p_B
    GPIO.setmode(GPIO.BCM)
    GPIO.setup(Rpin, GPIO.OUT)
    GPIO.setup(Gpin, GPIO.OUT)
    GPIO.setup(Bpin, GPIO.OUT)

    p_R = GPIO.PWM(Rpin, 2000) # Set Frequece to 2KHz
    p_G = GPIO.PWM(Gpin, 2000)
    p_B = GPIO.PWM(Bpin, 2000)

    p_R.start(100)
    p_G.start(100)
    p_B.start(100)

def map(x, in_min, in_max, out_min, out_max):
    return (x - in_min) * (out_max - out_min) / (in_max - in_min) + out_min

def key_handler(key:str):
    global color

    if key == 'KEY_CHANNELDOWN':
        color[0] = Lv[0]
        print ('Red OFF')

    elif key == 'KEY_CHANNEL':
        color[0] = Lv[1]
        print ('Dark Red')

    elif key == 'KEY_CHANNELUP':
        color[0] = Lv[2]
        print ('Bright Red')

    elif key == 'KEY_PREVIOUS':
        color[1] = Lv[0]
        print ('Green OFF')

    elif key == 'KEY_NEXT':
        color[1] = Lv[1]
        print ('Dark Green')

    elif key == 'KEY_PLAYPAUSE':
        color[1] = Lv[2]
        print ('Bright Green')

    elif key == 'KEY_VOLUMEDOWN':
        color[2] = Lv[0]
        print ('Blue OFF')

    elif key == 'KEY_VOLUMEUP':
        color[2] = Lv[1]
        print ('Dark Blue')

    elif key == 'KEY_EQUAL':
        color[2] = Lv[2]
        print ('Bright BLUE')

    setColor(color)


def loop():
    with lirc.LircdConnection(timeout=5.0) as conn:
        conn.connect()
        while True:
            try:
                # print(conn.readline()) # 0000000000000001 00 KEY_CHANNELDOWN ./lircd.conf
                key = conn.readline().split(' ')[2] #KEY_CHANNELDOWN
                # print(key)
                key_handler(key)
            except TimeoutError:
                # print('Timeout')
                pass

def destroy():
    p_R.stop()
    p_G.stop()
    p_B.stop()
    GPIO.output(Rpin, GPIO.HIGH)    # Turn off all leds
    GPIO.output(Gpin, GPIO.HIGH)
    GPIO.output(Bpin, GPIO.HIGH)
    GPIO.cleanup()


if __name__ == "__main__":
    try:
        setup()
        loop()
    except KeyboardInterrupt:
        destroy()
Each of the top three rows of buttons on the remote control represents a kind of color, i.e. red, green, and blue, top to bottom. Each column represents off, light, and dark. For example, press the second button (light) on the first row (red), and the LED will flash light red. You can use the remote to generate 27 colors in total (including all the LEDs off). Try to change the color of the RGB LED with the 9 buttons!