Lesson 10 Buzzer Module
Introduction
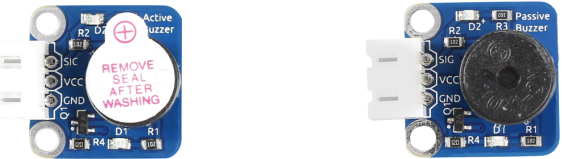
Buzzers can be categorized as active and passive ones (See the following picture).
Required Components
1 * Raspberry Pi
1 * Breadboard
1 * Passive buzzer module
1 * Active buzzer module
1 * 3-Pin anti-reverse cable
Experimental Principle
Place the pins of two buzzers face up and you can see the one with a green circuit board is a passive buzzer, while the other with a black tape, instead of a board, is an active buzzer.
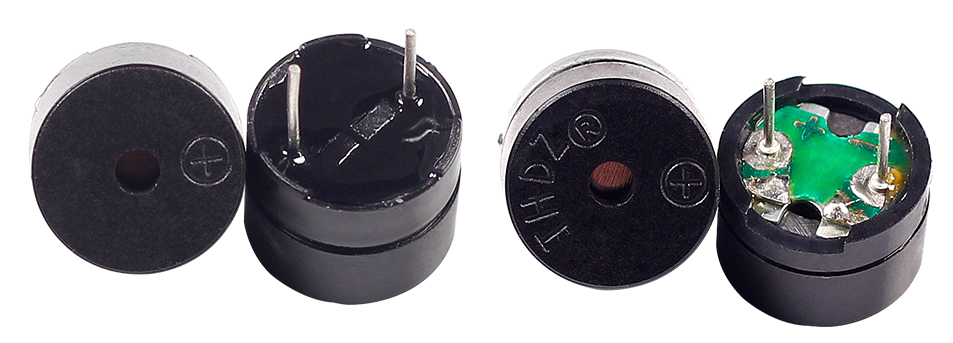
Active buzzer Passive buzzer
The difference between an active buzzer and a passive buzzer is:
An active buzzer has a built-in oscillating source, so it will make sounds when electrified. But a passive buzzer does not have such source, so it will not beep if DC signals are used; instead, you need to use square waves whose frequency is between 2K and 5K to drive it. The active buzzer is often more expensive than the passive one because of multiple built-in oscillating circuits.
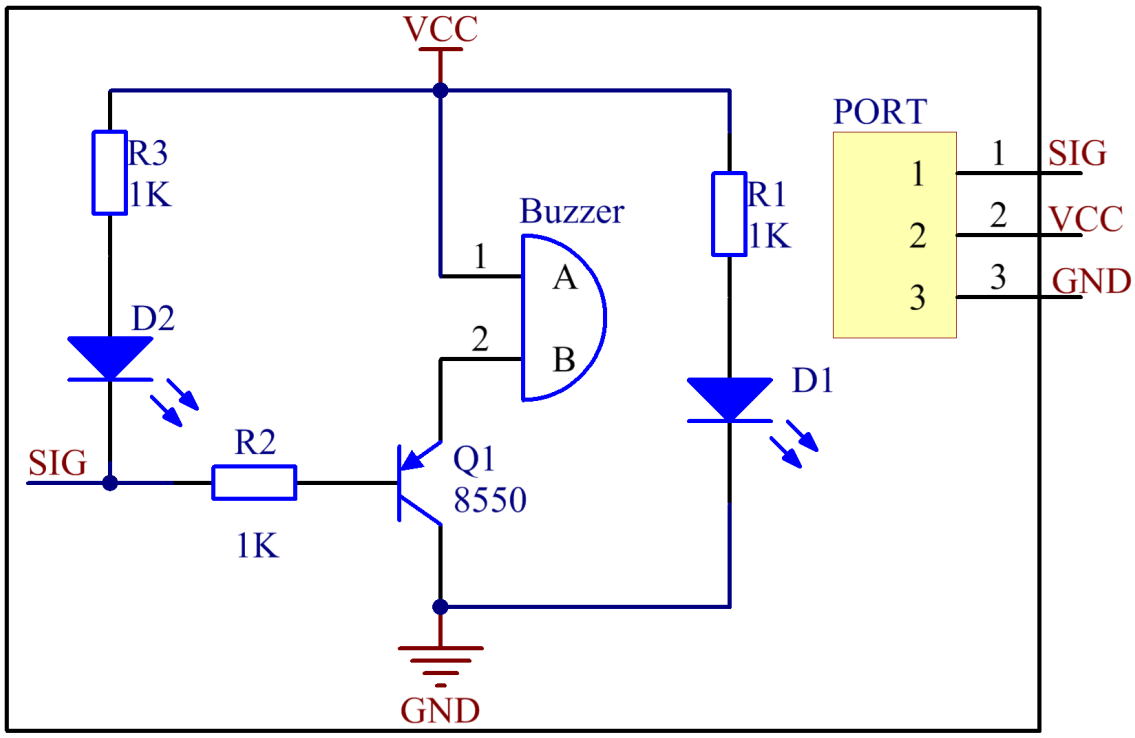
The schematic diagram of the module is as shown below:
Experimental Procedures
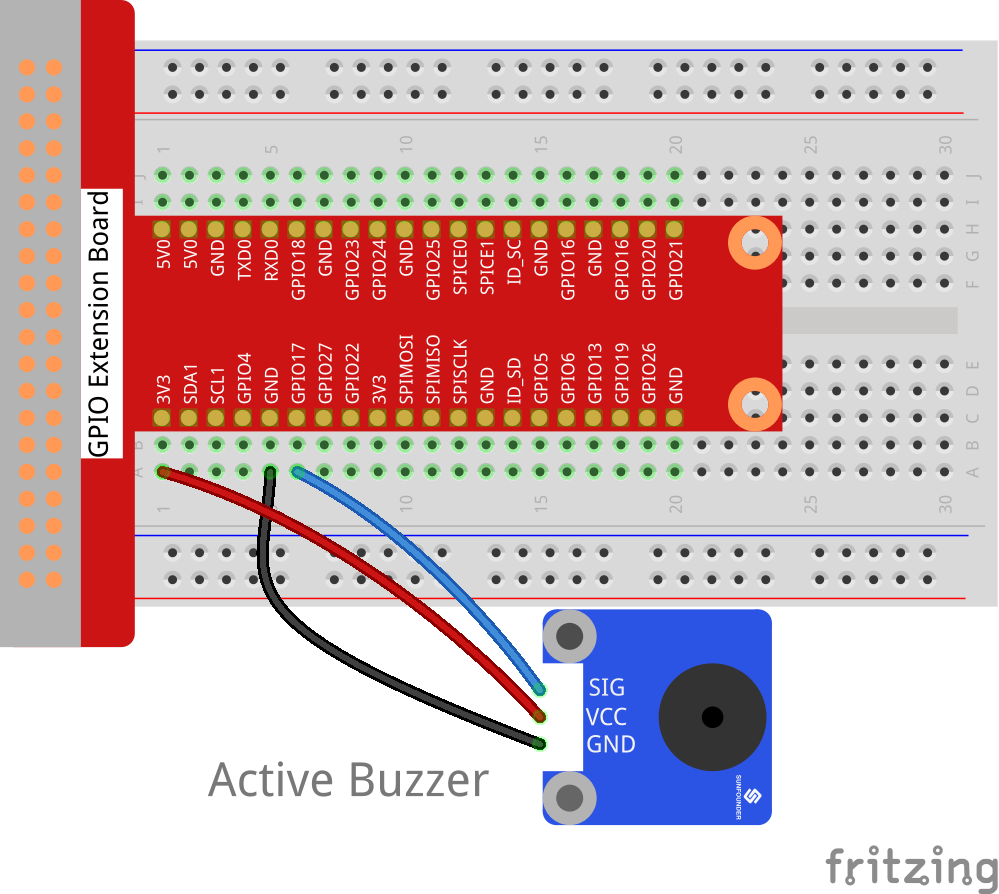
Active Buzzer
Note
The active buzzer has built-in oscillating source, so it will beep as long as it is wired up, but it can only beep with fixed frequency.
Step 1: Build the circuit.
For C Users:
Step 2: Change directory.
cd /home/pi/SunFounder_SensorKit_for_RPi2/C/10_active_buzzer/
Step 3: Compile.
gcc active_buzzer.c -lwiringPi
Note
If it does not work after running, or there is an error prompt wiringPi.h: No such file or directory, please refer to WiringPi to install it.
Step 4: Run.
sudo ./a.out
Code
#include <wiringPi.h>
#include <stdio.h>

#define BuzzerPin      0

int main(void)
{
    if(wiringPiSetup() == -1){ //when initialize wiring failed,print messageto screen
        printf("setup wiringPi failed !");
        return 1;
    }
//  printf("linker LedPin : GPIO %d(wiringPi pin)\n",VoicePin); //when initialize wiring successfully,print message to screen

    pinMode(BuzzerPin,  OUTPUT);

    while(1){
            digitalWrite(BuzzerPin, HIGH);
            delay(100);
            digitalWrite(BuzzerPin, LOW);
            delay(100);
    }

    return 0;
}
For Python Users:
Step 2: Change directory.
cd /home/pi/SunFounder_SensorKit_for_RPi2/Python/
Step 3: Run.
sudo python3 10_active_buzzer.py
Code
#!/usr/bin/env python3
import RPi.GPIO as GPIO
import time

Buzzer = 11    # pin11

def setup(pin):
    global BuzzerPin
    BuzzerPin = pin
    GPIO.setmode(GPIO.BOARD)       # Numbers GPIOs by physical location
    GPIO.setup(BuzzerPin, GPIO.OUT)
    GPIO.output(BuzzerPin, GPIO.HIGH)

def on():
    GPIO.output(BuzzerPin, GPIO.LOW)

def off():
    GPIO.output(BuzzerPin, GPIO.HIGH)

def beep(x):
    on()
    time.sleep(x)
    off()
    time.sleep(x)

def loop():
    while True:
        beep(0.5)

def destroy():
    GPIO.output(BuzzerPin, GPIO.HIGH)
    GPIO.cleanup()                     # Release resource

if __name__ == '__main__':     # Program start from here
    setup(Buzzer)
    try:
        loop()
    except KeyboardInterrupt:  # When 'Ctrl+C' is pressed, the child program destroy() will be  executed.
        destroy()
Now you can hear the active buzzer beeping.
Passive Buzzer
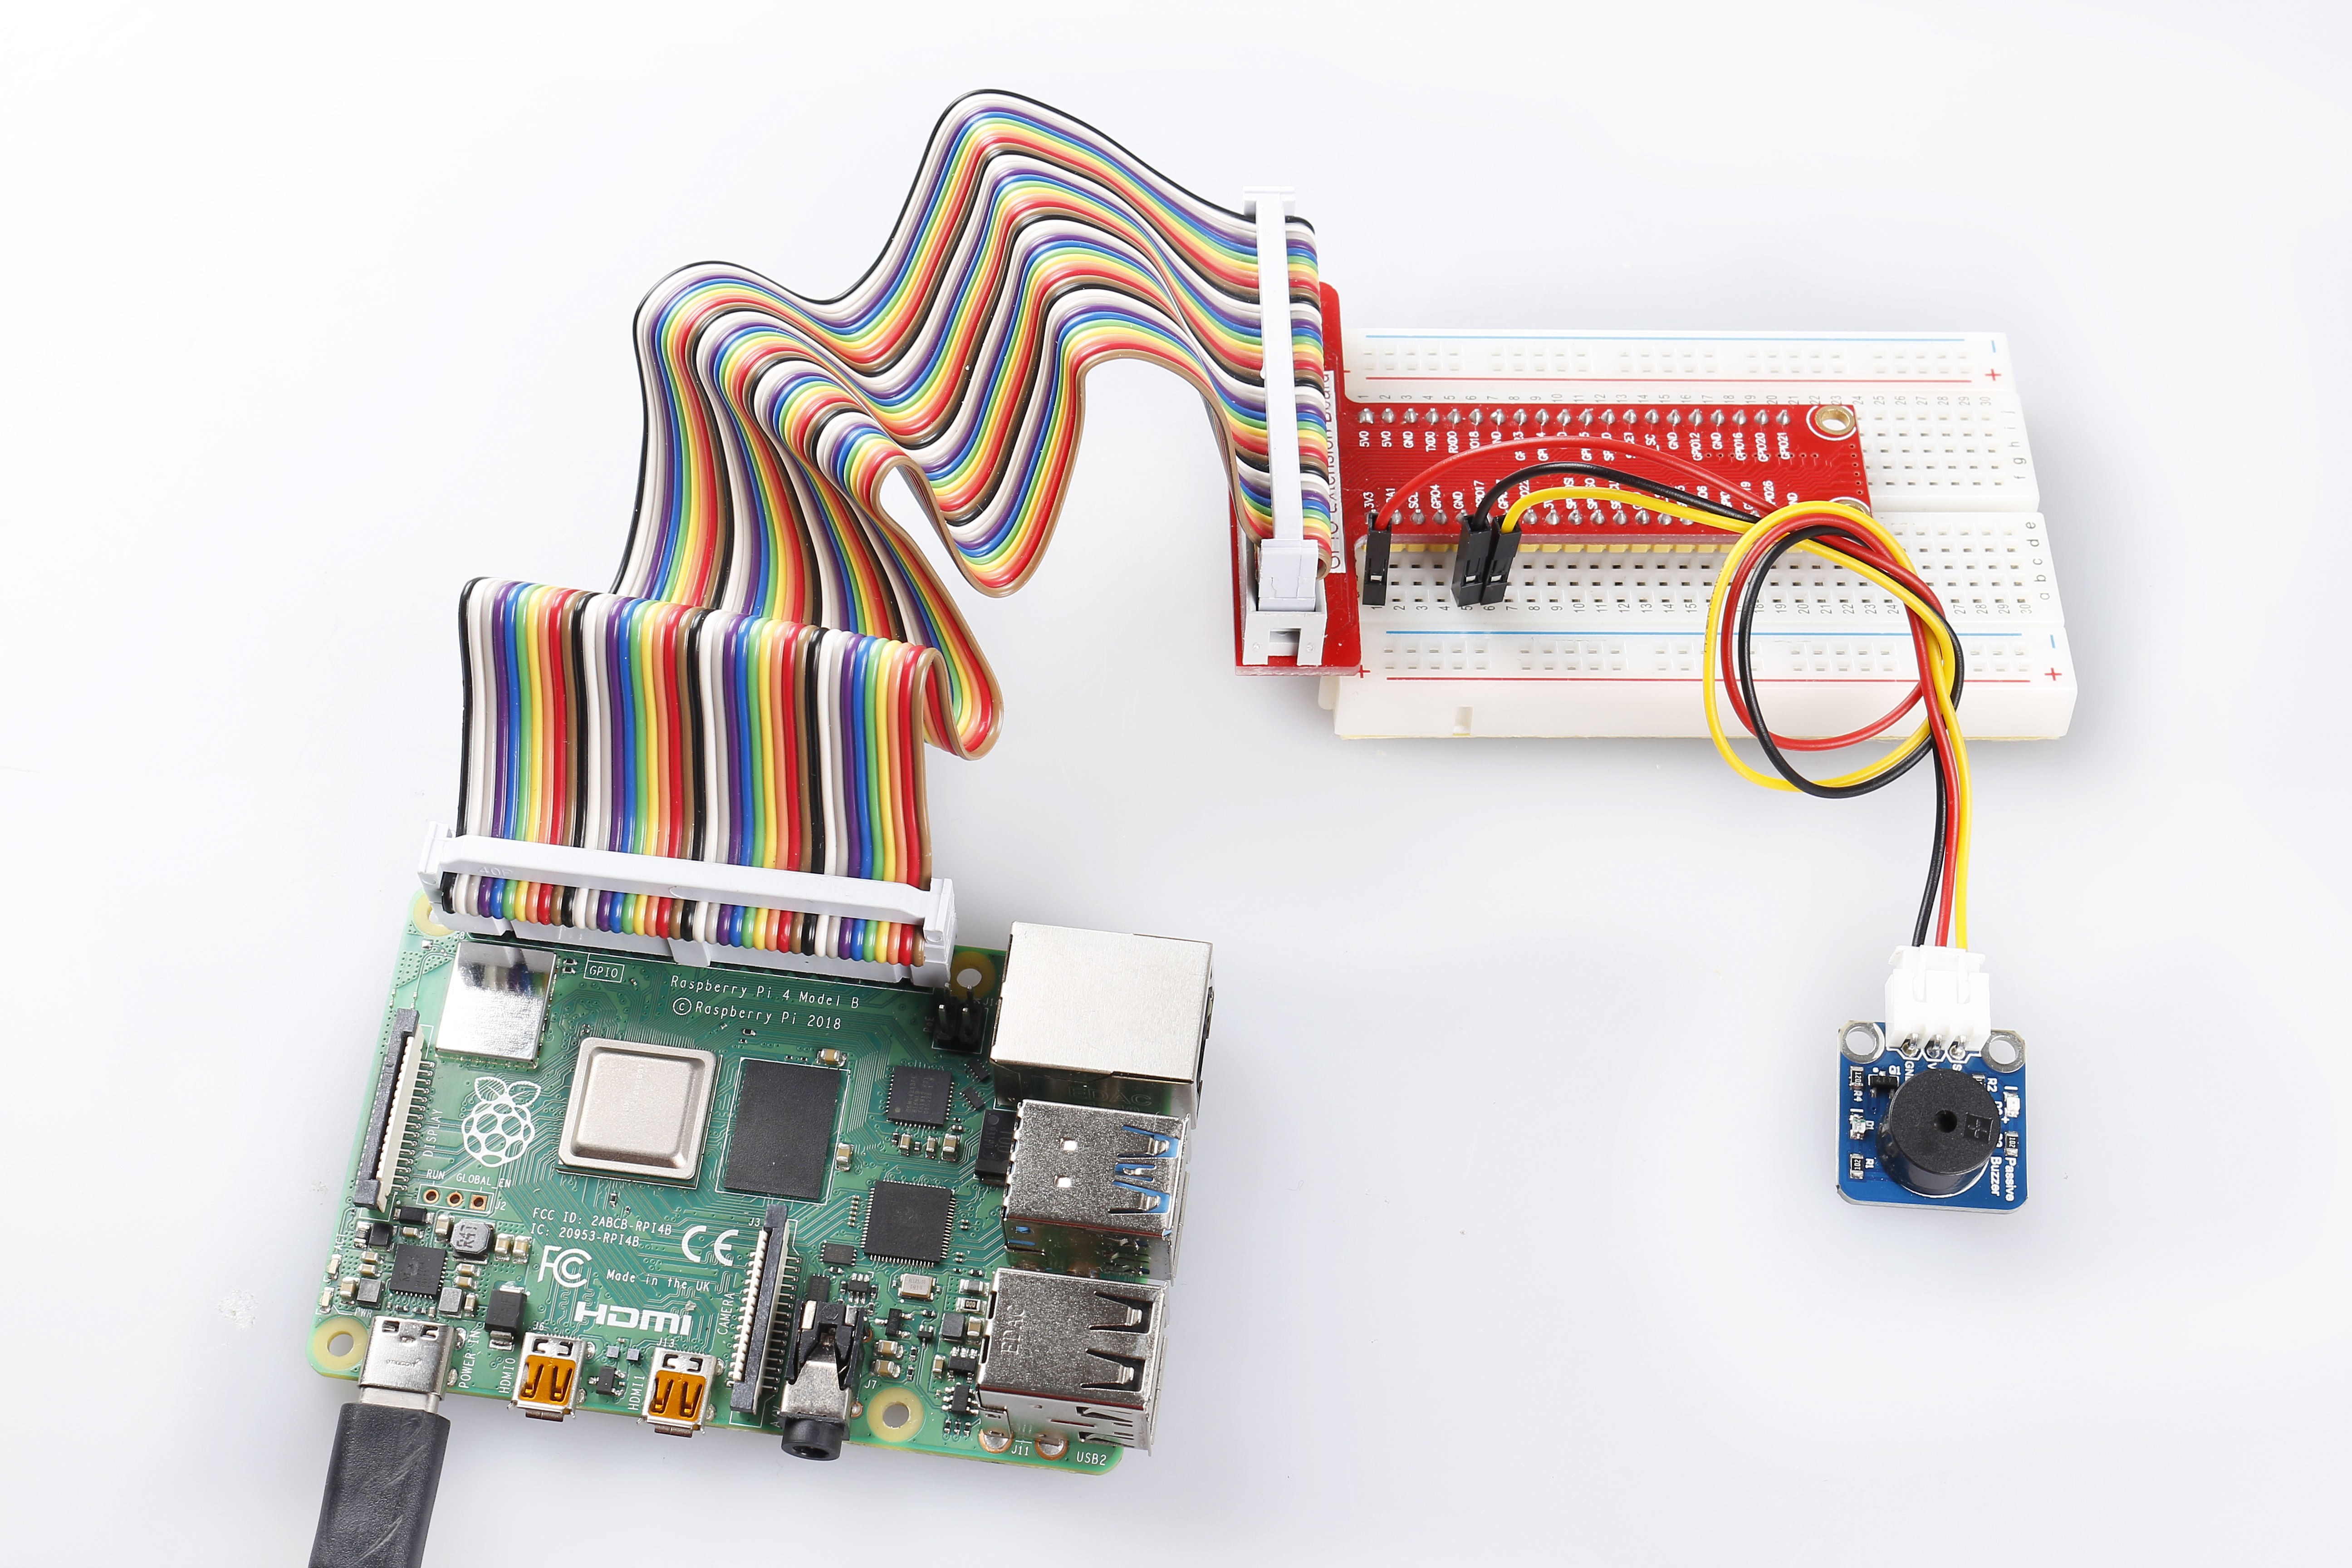
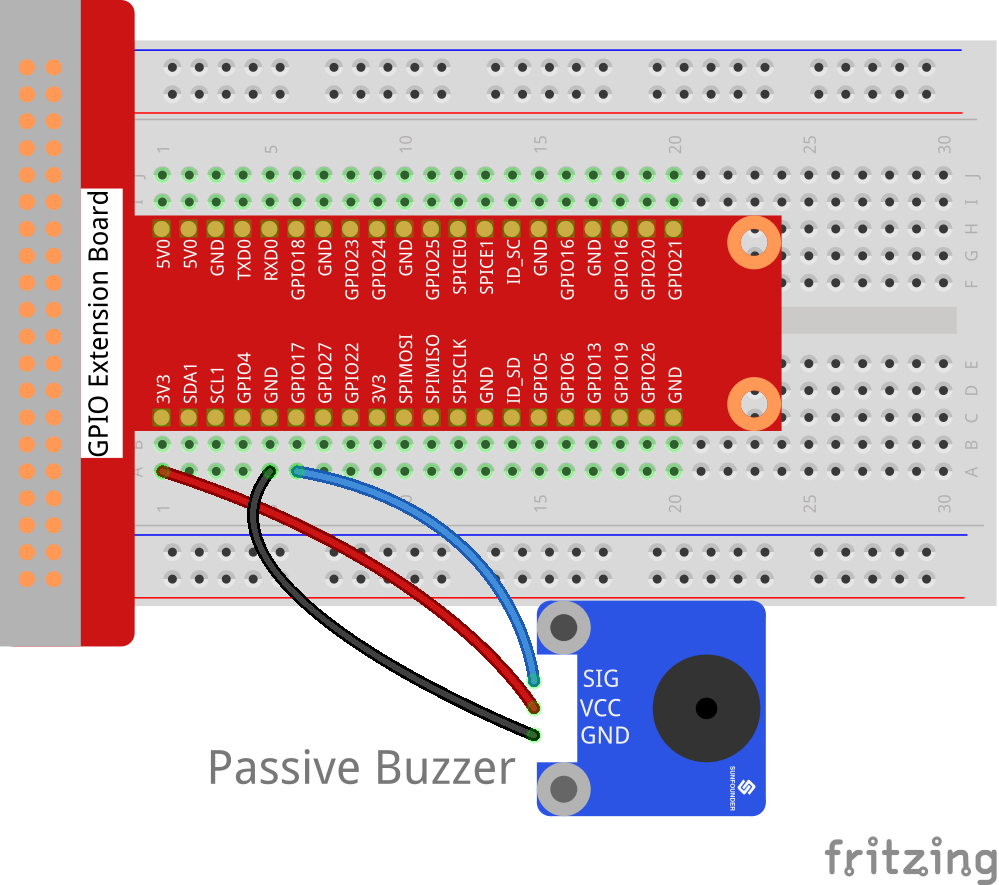
Step 1: Build the circuit.
Raspberry Pi |
GPIO Extension Board |
Passive Buzzer Module |
GPIO0 |
GPIO17 |
SIG |
3.3V |
3V3 |
VCC |
GND |
GND |
GND |
For C Users:
Step 2: Change directory.
cd /home/pi/SunFounder_SensorKit_for_RPi2/C/10_passive_buzzer/
Step 3: Compile.
gcc passive_buzzer.c -lwiringPi
Step 4: Run.
sudo ./a.out
Code
#include <wiringPi.h>
#include <softTone.h>
#include <stdio.h>

#define BuzPin    0

#define  CL1  131
#define  CL2  147
#define  CL3  165
#define  CL4  175
#define  CL5  196
#define  CL6  221
#define  CL7  248

#define  CM1  262
#define  CM2  294
#define  CM3  330
#define  CM4  350
#define  CM5  393
#define  CM6  441
#define  CM7  495

#define  CH1  525
#define  CH2  589
#define  CH3  661
#define  CH4  700
#define  CH5  786
#define  CH6  882
#define  CH7  990

int song_1[] = {CM3,CM5,CM6,CM3,CM2,CM3,CM5,CM6,CH1,CM6,CM5,CM1,CM3,CM2,
                CM2,CM3,CM5,CM2,CM3,CM3,CL6,CL6,CL6,CM1,CM2,CM3,CM2,CL7,
                CL6,CM1,CL5};

int beat_1[] = {1,1,3,1,1,3,1,1,1,1,1,1,1,1,3,1,1,3,1,1,1,1,1,1,1,2,1,1,
                1,1,1,1,1,1,3};

int song_2[] = {CM1,CM1,CM1,CL5,CM3,CM3,CM3,CM1,CM1,CM3,CM5,CM5,CM4,CM3,CM2,
                CM2,CM3,CM4,CM4,CM3,CM2,CM3,CM1,CM1,CM3,CM2,CL5,CL7,CM2,CM1
                };

int beat_2[] = {1,1,1,3,1,1,1,3,1,1,1,1,1,1,3,1,1,1,2,1,1,1,3,1,1,1,3,3,2,3};

int main(void)
{
    int i, j;

    if(wiringPiSetup() == -1){ //when initialize wiring failed,print messageto screen
        printf("setup wiringPi failed !");
        return 1;
    }

    if(softToneCreate(BuzPin) == -1){
        printf("setup softTone failed !");
        return 1;
    }

    while(1){
        printf("music is being played...\n");

        for(i=0;i<sizeof(song_1)/4;i++){
            softToneWrite(BuzPin, song_1[i]);
            delay(beat_1[i] * 500);
        }

        for(i=0;i<sizeof(song_2)/4;i++){
            softToneWrite(BuzPin, song_2[i]);
            delay(beat_2[i] * 500);
        }
    }
    return 0;
}
For Python Users:
Step 2: Change directory.
cd /home/pi/SunFounder_SensorKit_for_RPi2/Python/
Step 3: Run.
sudo python3 10_passive_buzzer.py
Code
#!/usr/bin/env python3
import RPi.GPIO as GPIO
import time

Buzzer = 11

CL = [0, 131, 147, 165, 175, 196, 211, 248]         # Frequency of Low C notes

CM = [0, 262, 294, 330, 350, 393, 441, 495]         # Frequency of Middle C notes

CH = [0, 525, 589, 661, 700, 786, 882, 990]         # Frequency of High C notes

song_1 = [  CM[3], CM[5], CM[6], CM[3], CM[2], CM[3], CM[5], CM[6], # Notes of song1
            CH[1], CM[6], CM[5], CM[1], CM[3], CM[2], CM[2], CM[3],
            CM[5], CM[2], CM[3], CM[3], CL[6], CL[6], CL[6], CM[1],
            CM[2], CM[3], CM[2], CL[7], CL[6], CM[1], CL[5] ]

beat_1 = [  1, 1, 3, 1, 1, 3, 1, 1,                         # Beats of song 1, 1 means 1/8 beats
            1, 1, 1, 1, 1, 1, 3, 1,
            1, 3, 1, 1, 1, 1, 1, 1,
            1, 2, 1, 1, 1, 1, 1, 1,
            1, 1, 3 ]

song_2 = [  CM[1], CM[1], CM[1], CL[5], CM[3], CM[3], CM[3], CM[1], # Notes of song2
            CM[1], CM[3], CM[5], CM[5], CM[4], CM[3], CM[2], CM[2],
            CM[3], CM[4], CM[4], CM[3], CM[2], CM[3], CM[1], CM[1],
            CM[3], CM[2], CL[5], CL[7], CM[2], CM[1]        ]

beat_2 = [  1, 1, 2, 2, 1, 1, 2, 2,                         # Beats of song 2, 1 means 1/8 beats
            1, 1, 2, 2, 1, 1, 3, 1,
            1, 2, 2, 1, 1, 2, 2, 1,
            1, 2, 2, 1, 1, 3 ]

def setup():
    GPIO.setmode(GPIO.BOARD)                # Numbers GPIOs by physical location
    GPIO.setup(Buzzer, GPIO.OUT)    # Set pins' mode is output
    global Buzz                                             # Assign a global variable to replace GPIO.PWM
    Buzz = GPIO.PWM(Buzzer, 440)    # 440 is initial frequency.
    Buzz.start(50)                                  # Start Buzzer pin with 50% duty ration

def loop():
    while True:
        #    Playing song 1...
        for i in range(1, len(song_1)):             # Play song 1
            Buzz.ChangeFrequency(song_1[i]) # Change the frequency along the song note
            time.sleep(beat_1[i] * 0.5)             # delay a note for beat * 0.5s
        time.sleep(1)                                               # Wait a second for next song.

        #    Playing song 2...
        for i in range(1, len(song_2)):     # Play song 1
            Buzz.ChangeFrequency(song_2[i]) # Change the frequency along the song note
            time.sleep(beat_2[i] * 0.5)     # delay a note for beat * 0.5s

def destory():
    Buzz.stop()                                     # Stop the buzzer
    GPIO.output(Buzzer, 1)          # Set Buzzer pin to High
    GPIO.cleanup()                          # Release resource

if __name__ == '__main__':          # Program start from here
    setup()
    try:
        loop()
    except KeyboardInterrupt:       # When 'Ctrl+C' is pressed, the child program destroy() will be  executed.
        destory()
Now you can hear the passive buzzer playing music.