Nota
¡Hola! Bienvenido a la comunidad de entusiastas de SunFounder Raspberry Pi & Arduino & ESP32 en Facebook. Sumérgete en el mundo de Raspberry Pi, Arduino y ESP32 junto con otros entusiastas.
¿Por qué unirte?
Soporte experto: Resuelve problemas post-venta y desafíos técnicos con la ayuda de nuestra comunidad y equipo.
Aprende y comparte: Intercambia consejos y tutoriales para mejorar tus habilidades.
Avances exclusivos: Obtén acceso anticipado a nuevos anuncios de productos y adelantos.
Descuentos especiales: Disfruta de descuentos exclusivos en nuestros productos más nuevos.
Promociones festivas y sorteos: Participa en sorteos y promociones de temporada.
👉 ¿Listo para explorar y crear con nosotros? Haz clic en [Aquí] y únete hoy mismo.
4.1.15 Timbre de Alarma
Introducción
En este proyecto, crearemos un dispositivo de alarma manual. Puedes reemplazar el interruptor de palanca con un termistor o un sensor fotosensible para crear una alarma de temperatura o de luz.
Componentes necesarios
En este proyecto, necesitamos los siguientes componentes.

Definitivamente es conveniente comprar un kit completo, aquí está el enlace:
Nombre |
ELEMENTOS EN ESTE KIT |
ENLACE |
|---|---|---|
Kit Raphael |
337 |
También puedes comprarlos por separado en los enlaces a continuación.
INTRODUCCIÓN DEL COMPONENTE |
ENLACE DE COMPRA |
|---|---|
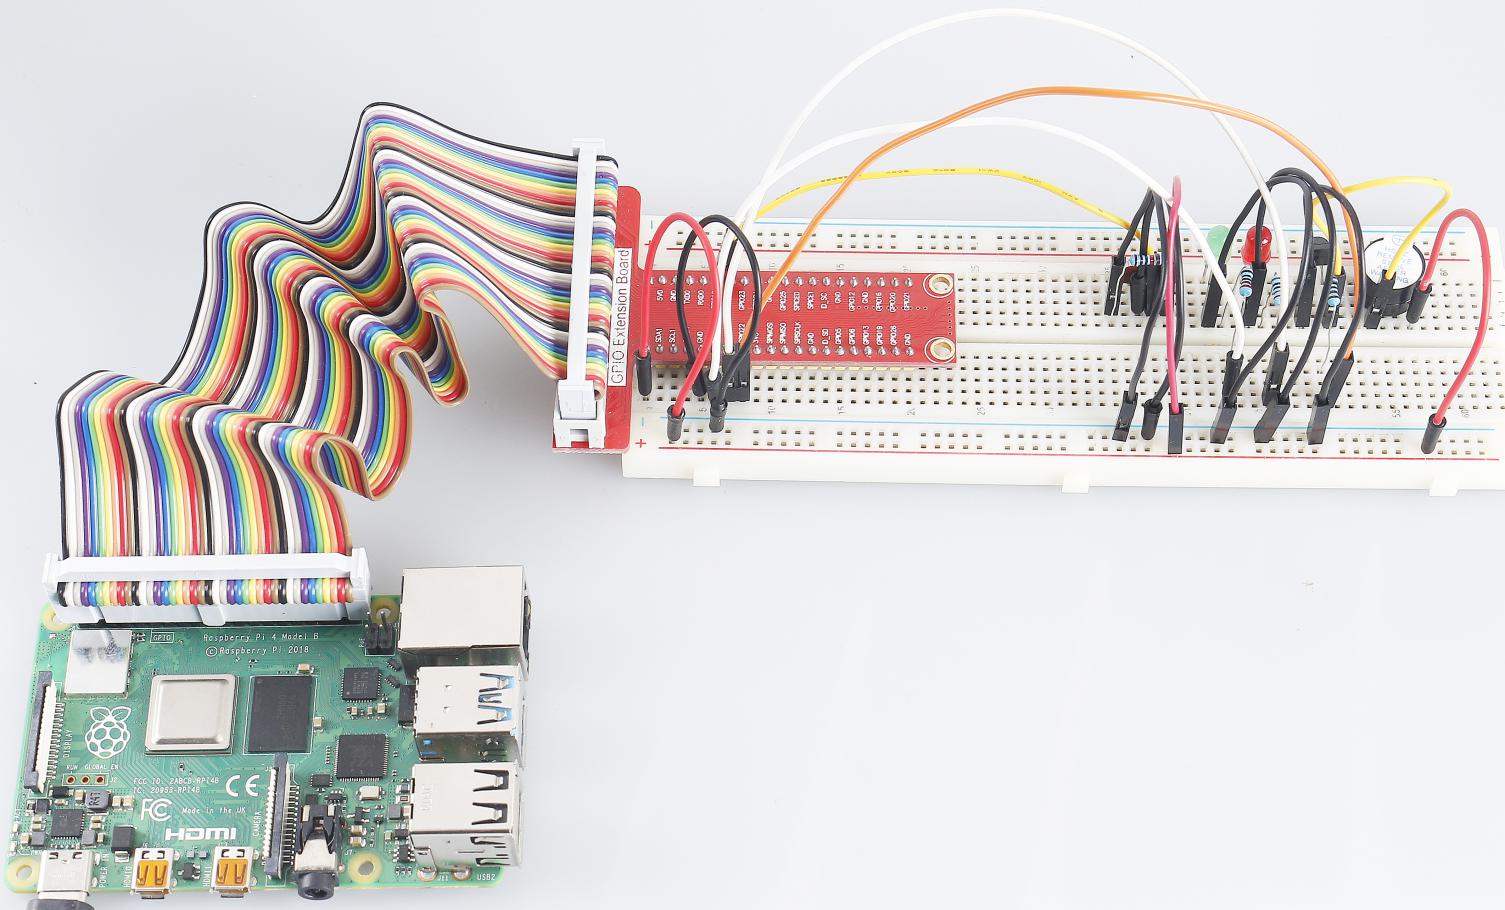
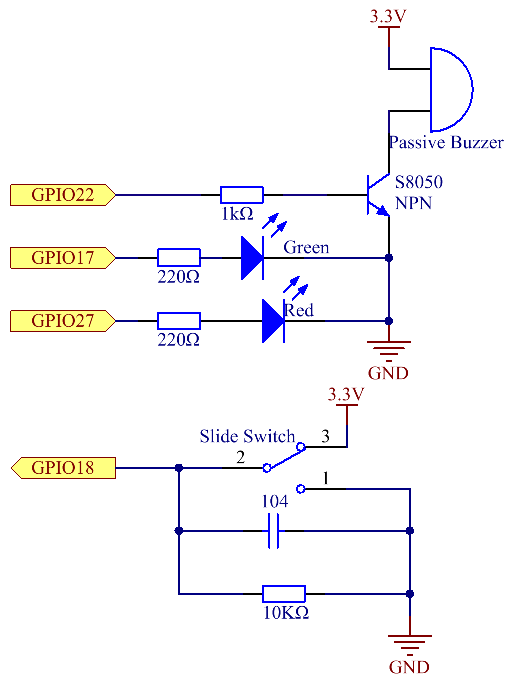
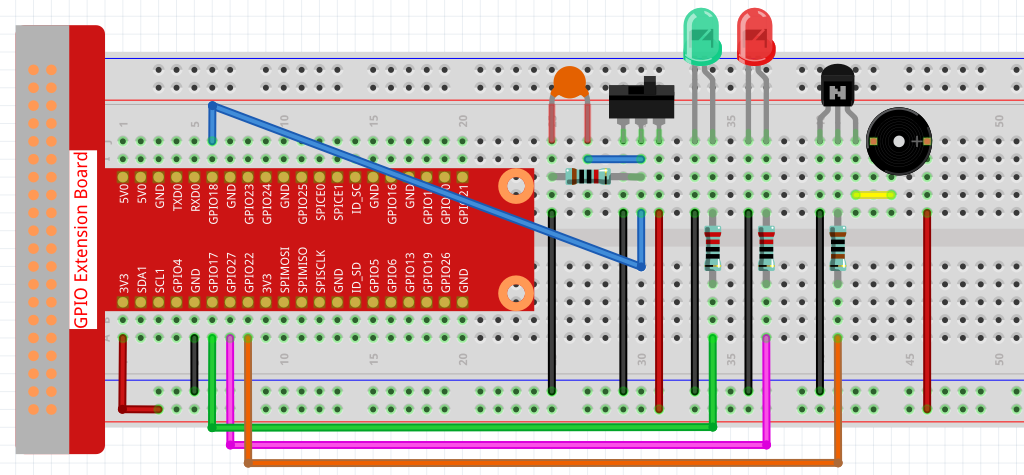
Diagrama esquemático
Nombre T-Board |
Pin físico |
wiringPi |
BCM |
GPIO17 |
Pin 11 |
0 |
17 |
GPIO18 |
Pin 12 |
1 |
18 |
GPIO27 |
Pin 13 |
2 |
27 |
GPIO22 |
Pin 15 |
3 |
22 |
Procedimientos experimentales
Paso 1: Construir el circuito.
Paso 2: Cambiar directorio.
cd ~/raphael-kit/python/
Paso 3: Ejecutar.
sudo python3 4.1.15_AlarmBell.py
Después de que el programa se inicie, el interruptor de palanca se moverá hacia la derecha, y el buzzer emitirá sonidos de alarma. Al mismo tiempo, los LEDs rojo y verde parpadearán a cierta frecuencia.
Código
Nota
Puedes Modificar/Restablecer/Copiar/Ejecutar/Detener el código a continuación. Pero antes de eso, debes ir a la ruta del código fuente como raphael-kit/python.
#!/usr/bin/env python3

import RPi.GPIO as GPIO
import time
import threading

BeepPin=22
ALedPin=17
BLedPin=27
switchPin=18

Buzz=0
flag =0
note=150
pitch=20

def setup():
    GPIO.setmode(GPIO.BCM)
    GPIO.setup(BeepPin, GPIO.OUT)
    GPIO.setup(ALedPin,GPIO.OUT,initial=GPIO.LOW)
    GPIO.setup(BLedPin,GPIO.OUT,initial=GPIO.LOW)
    GPIO.setup(switchPin,GPIO.IN)
    global Buzz
    Buzz=GPIO.PWM(BeepPin,note)

def ledWork():
    while flag:
        GPIO.output(ALedPin,GPIO.HIGH)
        time.sleep(0.5)
        GPIO.output(ALedPin,GPIO.LOW)
        GPIO.output(BLedPin,GPIO.HIGH)
        time.sleep(0.5)
        GPIO.output(BLedPin,GPIO.LOW)

def buzzerWork():
    global pitch
    global note
    while flag:
        if note >= 800 or note <=130:
            pitch = -pitch
        note = note + pitch
        Buzz.ChangeFrequency(note)
        time.sleep(0.01)

def on():
    global flag
    flag = 1
    Buzz.start(50)
    tBuzz = threading.Thread(target=buzzerWork)
    tBuzz.start()
    tLed = threading.Thread(target=ledWork)
    tLed.start()

def off():
    global flag
    flag = 0
    Buzz.stop()
    GPIO.output(ALedPin,GPIO.LOW)
    GPIO.output(BLedPin,GPIO.LOW)

def main():
    lastState=0
    while True:
        currentState =GPIO.input(switchPin)
        if currentState == 1 and lastState == 0:
            on()
        elif currentState == 0 and lastState == 1:
            off()
        lastState=currentState

def destroy():
    off()
    GPIO.cleanup()

if __name__ == '__main__':
    setup()
    try:
        main()
    except KeyboardInterrupt:
        destroy()
Explicación del Código
import threading
Aquí, importamos el módulo Threading que permite realizar múltiples
tareas a la vez, mientras que los programas normales solo pueden ejecutar
el código de arriba a abajo. Con los módulos Threading, el LED y el
buzzer pueden funcionar por separado.
def ledWork():
    while flag:
        GPIO.output(ALedPin,GPIO.HIGH)
        time.sleep(0.5)
        GPIO.output(ALedPin,GPIO.LOW)
        GPIO.output(BLedPin,GPIO.HIGH)
        time.sleep(0.5)
        GPIO.output(BLedPin,GPIO.LOW)
La función ledWork() ayuda a establecer el estado de funcionamiento de
estos 2 LEDs: mantiene el LED verde encendido durante 0.5s y luego se apaga;
de manera similar, mantiene el LED rojo encendido durante 0.5s y luego se apaga.
def buzzerWork():
    global pitch
    global note
    while flag:
        if note >= 800 or note <=130:
            pitch = -pitch
        note = note + pitch
        Buzz.ChangeFrequency(note)
        time.sleep(0.01)
La función buzzWork() se utiliza para establecer el estado de funcionamiento del
buzzer. Aquí establecemos la frecuencia entre 130 y 800, para acumular o decaer en un
intervalo de 20.
def on():
    global flag
    flag = 1
    Buzz.start(50)
    tBuzz = threading.Thread(target=buzzerWork)
    tBuzz.start()
    tLed = threading.Thread(target=ledWork)
    tLed.start()
En la función on() :
Definir la marca “flag=1”, indicando el final del hilo de control.
Iniciar el Buzz y establecer el ciclo de trabajo en 50%.
Crear 2 hilos separados para que el LED y el buzzer puedan funcionar al mismo tiempo.
La función threading.Thread() se utiliza para crear el hilo y su prototipo es el siguiente:
class threading.Thread(group=None, target=None, name=None, args=(), kwargs={}, *, daemon=None)
Entre los métodos de construcción, el parámetro principal es target, necesitamos asignar un objeto invocable (aquí están las funciones ledWork y BuzzWork) a target.
Luego, se llama a start() para iniciar el objeto hilo, por ejemplo, tBuzz.start() se usa para iniciar el hilo tBuzz recién instalado.
def off():
    global flag
    flag = 0
    Buzz.stop()
    GPIO.output(ALedPin,GPIO.LOW)
    GPIO.output(BLedPin,GPIO.LOW)
La función Off() define “flag=0” para salir de los hilos ledWork y BuzzWork
y luego apagar el buzzer y el LED.
def main():
    lastState=0
    while True:
        currentState =GPIO.input(switchPin)
        if currentState == 1 and lastState == 0:
            on()
        elif currentState == 0 and lastState == 1:
            off()
        lastState=currentState
Main() contiene todo el proceso del programa: primero lee el valor del interruptor
deslizante; si el interruptor se desliza hacia la derecha (la lectura es 1), se llama a la función on() para que el buzzer emita sonidos y los LEDs rojo y verde parpadeen. De lo contrario, el buzzer y el LED no funcionan.
Imagen del Fenómeno