Nota
Hola, ¡bienvenido a la comunidad de entusiastas de SunFounder Raspberry Pi, Arduino y ESP32 en Facebook! Sumérgete más profundamente en Raspberry Pi, Arduino y ESP32 junto a otros entusiastas.
¿Por qué unirse?
Soporte experto: Resuelve problemas postventa y desafíos técnicos con la ayuda de nuestra comunidad y equipo.
Aprender y compartir: Intercambia consejos y tutoriales para mejorar tus habilidades.
Avances exclusivos: Accede anticipadamente a nuevos anuncios de productos y adelantos exclusivos.
Descuentos especiales: Disfruta de descuentos exclusivos en nuestros productos más recientes.
Promociones y sorteos festivos: Participa en sorteos y promociones navideñas.
👉 ¿Listo para explorar y crear con nosotros? Haz clic en [Aquí] y únete hoy mismo.
4.1.8 Bienvenido
Introducción
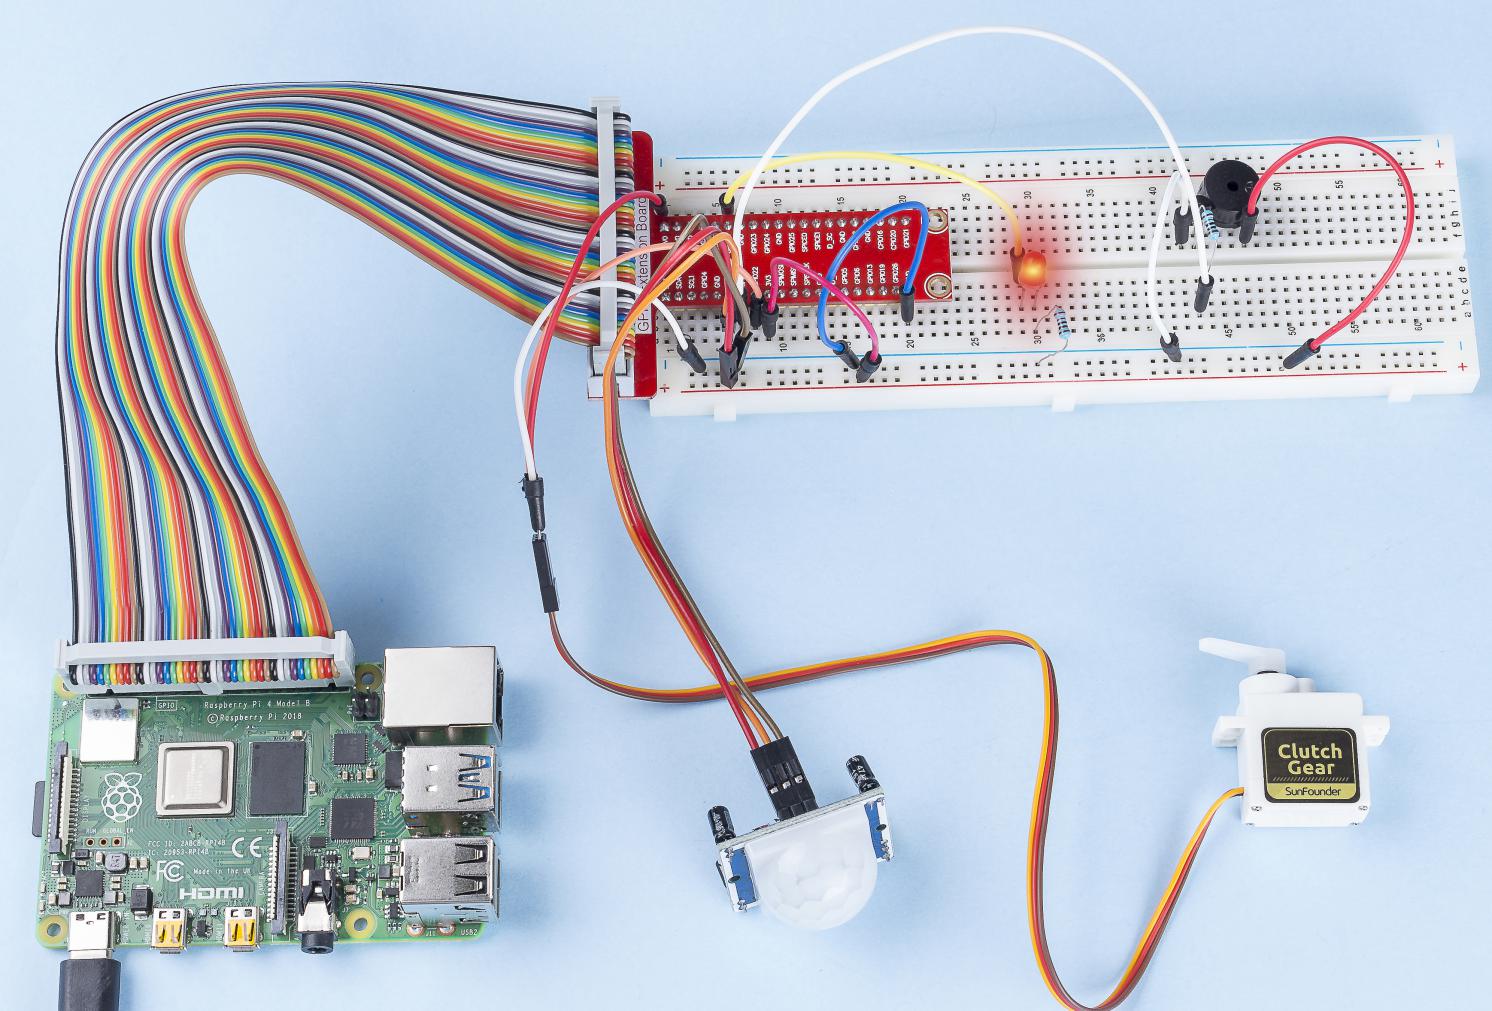
En este proyecto, utilizaremos un sensor PIR para detectar el movimiento de los peatones, y utilizaremos servos, LED y un zumbador para simular el funcionamiento de la puerta automática de una tienda de conveniencia. Cuando el peatón aparezca dentro del rango de detección del PIR, se encenderá la luz indicadora, se abrirá la puerta y el zumbador tocará el timbre de apertura.
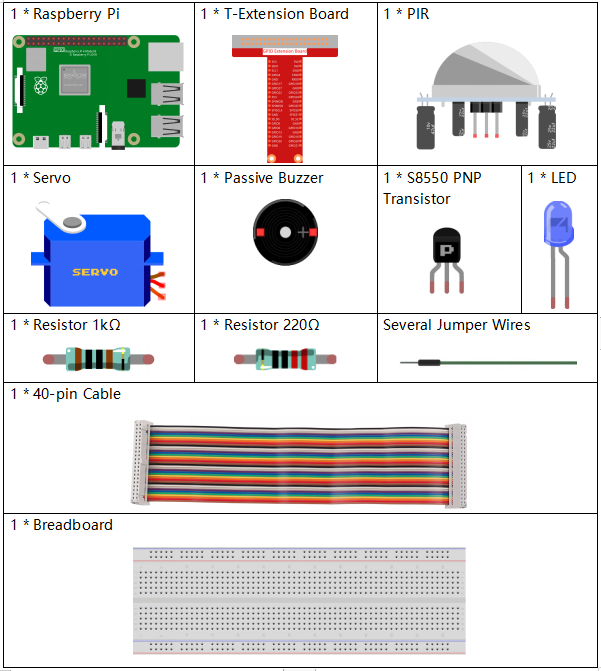
Componentes Necesarios
En este proyecto, necesitamos los siguientes componentes.
Es muy conveniente comprar un kit completo, aquí está el enlace:
Nombre |
ELEMENTOS EN ESTE KIT |
ENLACE |
|---|---|---|
Kit Raphael |
337 |
También puedes comprarlos por separado en los enlaces a continuación.
INTRODUCCIÓN DEL COMPONENTE |
ENLACE DE COMPRA |
|---|---|
- |
|
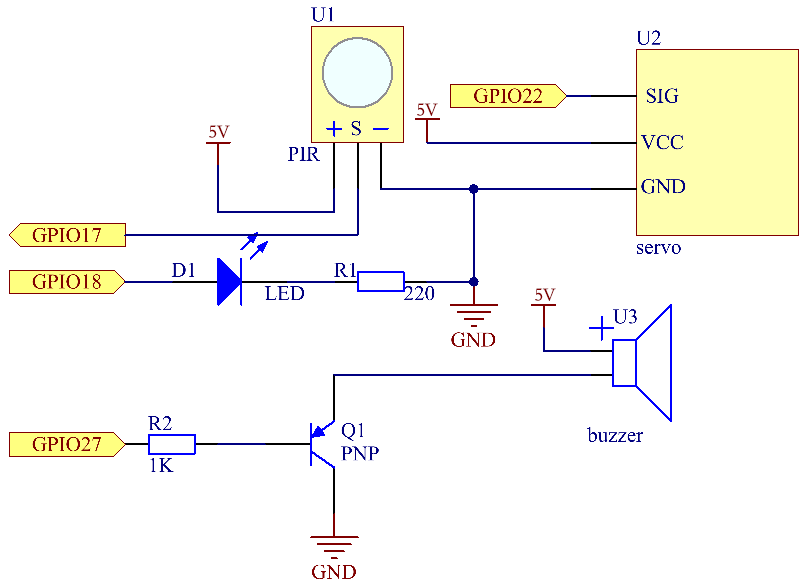
Diagrama Esquemático
Nombre T-Board |
cableado físico |
wiringPi |
BCM |
GPIO18 |
Pin 12 |
1 |
18 |
GPIO17 |
Pin 11 |
0 |
17 |
GPIO27 |
Pin 13 |
2 |
27 |
GPIO22 |
Pin 15 |
3 |
22 |
Procedimientos Experimentales
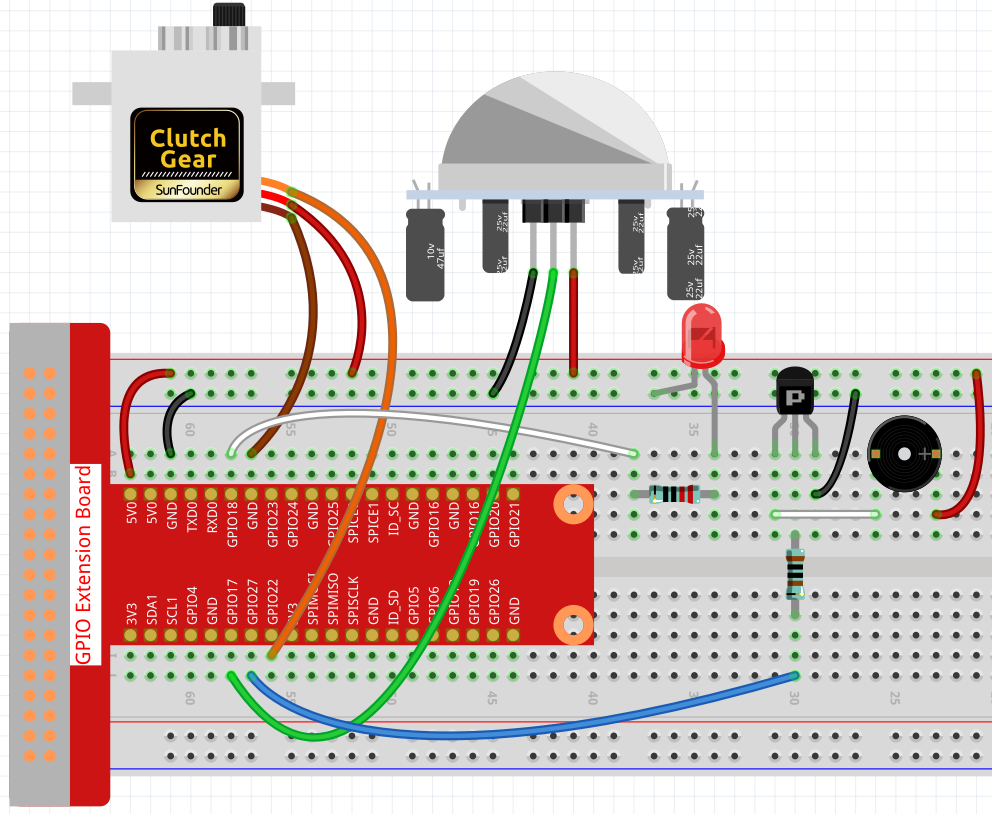
Paso 1: Construye el circuito.
Paso 2: Cambia de directorio.
cd ~/raphael-kit/python/
Paso 3: Ejecuta.
sudo python3 4.1.8_Welcome.py
Después de que el código se ejecute, si el sensor PIR detecta que alguien pasa, la puerta se abrirá automáticamente (simulada por el servo), se encenderá el indicador y sonará la música del timbre. Después de que la música del timbre suene, el sistema cerrará automáticamente la puerta y apagará la luz indicadora, esperando la próxima vez que alguien pase.
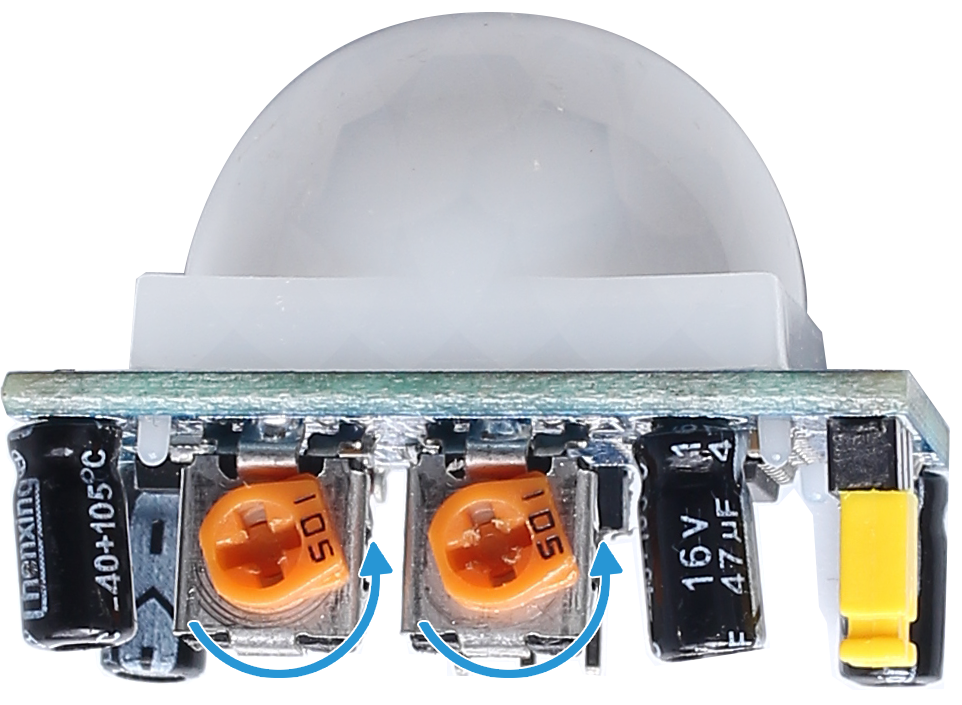
Hay dos potenciómetros en el módulo PIR: uno es para ajustar la sensibilidad y el otro es para ajustar la distancia de detección. Para que el módulo PIR funcione mejor, debes girar ambos en sentido antihorario hasta el final.
Código
Nota
Puedes Modificar/Restablecer/Copiar/Ejecutar/Detener el código a continuación. Pero antes de eso, necesitas ir a la ruta del código fuente como raphael-kit/python. Después de modificar el código, puedes ejecutarlo directamente para ver el efecto.
#!/usr/bin/env python3

import RPi.GPIO as GPIO
import time

SERVO_MIN_PULSE = 500
SERVO_MAX_PULSE = 2500

ledPin = 18    # define the ledPin
pirPin = 17    # define the sensorPin
servoPin = 22  # define the servoPin
buzPin = 27    # define the buzzerpin


CL = [0, 131, 147, 165, 175, 196, 211, 248]        # Frequency of Low C notes

CM = [0, 262, 294, 330, 350, 393, 441, 495]        # Frequency of Middle C notes

CH = [0, 525, 589, 661, 700, 786, 882, 990]        # Frequency of High C notes

song = [    CH[5],CH[2],CM[6],CH[2],CH[3],CH[6],CH[3],CH[5],CH[3],CM[6],CH[2]    ]

beat = [    1,1,1,1,1,2,1,1,1,1,1,]


def setup():
    global p
    global Buzz                        # Assign a global variable to replace GPIO.PWM
    GPIO.setmode(GPIO.BCM)       # Numbers GPIOs by physical location
    GPIO.setup(ledPin, GPIO.OUT)   # Set ledPin's mode is output
    GPIO.setup(pirPin, GPIO.IN)    # Set sensorPin's mode is input
    GPIO.setup(servoPin, GPIO.OUT)   # Set servoPin's mode is output
    GPIO.output(servoPin, GPIO.LOW)  # Set servoPin to low
    GPIO.setup(buzPin, GPIO.OUT)    # Set pins' mode is output

    Buzz = GPIO.PWM(buzPin, 440)    # 440 is initial frequency.
    Buzz.start(50)                    # Start Buzzer pin with 50% duty ration

    p = GPIO.PWM(servoPin, 50)     # set Frequece to 50Hz
    p.start(0)                     # Duty Cycle = 0

def map(value, inMin, inMax, outMin, outMax):
    return (outMax - outMin) * (value - inMin) / (inMax - inMin) + outMin


def setAngle(angle):      # make the servo rotate to specific angle (0-180 degrees)
    angle = max(0, min(180, angle))
    pulse_width = map(angle, 0, 180, SERVO_MIN_PULSE, SERVO_MAX_PULSE)
    pwm = map(pulse_width, 0, 20000, 0, 100)
    p.ChangeDutyCycle(pwm)#map the angle to duty cycle and output it

def doorbell():
    for i in range(1, len(song)):        # Play song 1
        Buzz.ChangeFrequency(song[i])    # Change the frequency along the song note
        time.sleep(beat[i] * 0.25)        # delay a note for beat * 0.25s
    time.sleep(1)                        # Wait a second for next song.

def closedoor():
    GPIO.output(ledPin, GPIO.LOW)
    for i in range(180, -1, -1): #make servo rotate from 180 to 0 deg
        setAngle(i)
        time.sleep(0.001)
    time.sleep(1)
def opendoor():
    GPIO.output(ledPin, GPIO.HIGH)
    for i in range(0, 181, 1):   #make servo rotate from 0 to 180 deg
        setAngle(i)     # Write to servo
        time.sleep(0.001)
    time.sleep(1)
    doorbell()
    closedoor()

def loop():
    while True:
        if GPIO.input(pirPin)==GPIO.HIGH:
            opendoor()


def destroy():
    GPIO.cleanup()                     # Release resource
    p.stop()
    Buzz.stop()

if __name__ == '__main__':     # Program start from here
    setup()
    try:
        loop()
    except KeyboardInterrupt:  # When 'Ctrl+C' is pressed, the program destroy() will be  executed.
        destroy()
Explicación del Código
def setup():
    global p
    global Buzz                        # Assign a global variable to replace GPIO.PWM
    GPIO.setmode(GPIO.BCM)       # Numbers GPIOs by physical location
    GPIO.setup(ledPin, GPIO.OUT)   # Set ledPin's mode is output
    GPIO.setup(pirPin, GPIO.IN)    # Set sensorPin's mode is input
    GPIO.setup(buzPin, GPIO.OUT)    # Set pins' mode is output
    Buzz = GPIO.PWM(buzPin, 440)    # 440 is initial frequency.
    Buzz.start(50)                    # Start Buzzer pin with 50% duty ration
    GPIO.setup(servoPin, GPIO.OUT)   # Set servoPin's mode is output
    GPIO.output(servoPin, GPIO.LOW)  # Set servoPin to low
    p = GPIO.PWM(servoPin, 50)     # set Frequece to 50Hz
    p.start(0)                     # Duty Cycle = 0
Estas declaraciones se utilizan para inicializar los pines de cada componente.
def setAngle(angle):      # make the servo rotate to specific angle (0-180 degrees)
    angle = max(0, min(180, angle))
    pulse_width = map(angle, 0, 180, SERVO_MIN_PULSE, SERVO_MAX_PULSE)
    pwm = map(pulse_width, 0, 20000, 0, 100)
    p.ChangeDutyCycle(pwm)#map the angle to duty cycle and output it
Crear una función, setAngle, para escribir el ángulo en el servo que va de 0 a 180 grados.
def doorbell():
    for i in range(1,len(song)): # Play song1
        Buzz.ChangeFrequency(song[i]) # Change the frequency along the song note
        time.sleep(beat[i] * 0.25) # delay a note for beat * 0.25s
Crear una función, doorbell, para que el zumbador pueda reproducir música.
def closedoor():
    GPIO.output(ledPin, GPIO.LOW)
    Buzz.ChangeFrequency(1)
    for i in range(180, -1, -1): #make servo rotate from 180 to 0 deg
        setAngle(i)
        time.sleep(0.001)
Cerrar la puerta y apagar la luz indicadora.
def opendoor():
    GPIO.output(ledPin, GPIO.HIGH)
    for i in range(0, 181, 1):   #make servo rotate from 0 to 180 deg
        setAngle(i)     # Write to servo
        time.sleep(0.001)
    doorbell()
    closedoor()
La función, opendoor() consta de varias partes: encender la luz indicadora,
girar el servo (para simular la acción de abrir la puerta), reproducir la música
del timbre de la tienda de conveniencia y llamar a la función closedoor()
después de reproducir la música.
def loop():
while True:
    if GPIO.input(pirPin)==GPIO.HIGH:
        opendoor()
Cuando el PIR detecta que alguien pasa, llama a la función opendoor().
Imagen del Fenómeno