Note
Hello, welcome to the SunFounder Raspberry Pi & Arduino & ESP32 Enthusiasts Community on Facebook! Dive deeper into Raspberry Pi, Arduino, and ESP32 with fellow enthusiasts.
Why Join?
Expert Support: Solve post-sale issues and technical challenges with help from our community and team.
Learn & Share: Exchange tips and tutorials to enhance your skills.
Exclusive Previews: Get early access to new product announcements and sneak peeks.
Special Discounts: Enjoy exclusive discounts on our newest products.
Festive Promotions and Giveaways: Take part in giveaways and holiday promotions.
👉 Ready to explore and create with us? Click [here] and join today!
QMC5883L
Overview
In this tutorial, we will explore the GY-87 IMU module, focusing on its QMC5883L magnetometer. The first part of the tutorial guides you through calibrating the QMC5883L magnetometer, which is essential for accurate magnetic field measurements. You will learn how to upload a calibration sketch to Arduino, perform real-time calibration, and apply these settings in your projects. The second part of the tutorial covers initializing the MPU6050 (accelerometer and gyroscope) and QMC5883L on an Arduino Uno using the Adafruit MPU6050 and QMC5883LCompass libraries. You will learn how to read and display sensor data on the Serial Monitor, which is a fundamental skill for applications in navigation, motion tracking, and orientation detection.
Required Components
In this project, we need the following components.
It’s definitely convenient to buy a whole kit, here’s the link:
Name |
ITEMS IN THIS KIT |
LINK |
|---|---|---|
Elite Explorer Kit |
300+ |
You can also buy them separately from the links below.
COMPONENT INTRODUCTION |
PURCHASE LINK |
|---|---|
- |
|
- |
Wiring
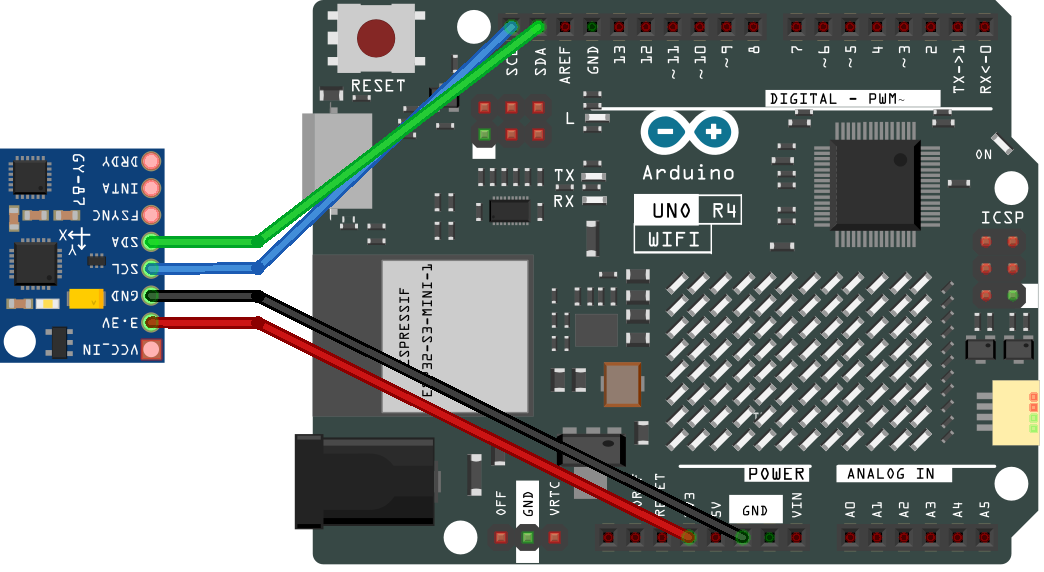
Schematic Diagram

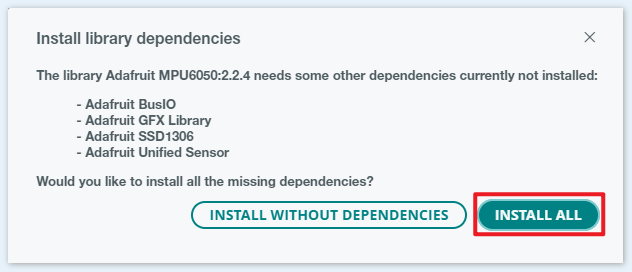
Install Library
Note
To install the library, use the Arduino Library Manager.
Search for “Adafruit MPU6050” and install
When installing each library, please make sure to select the installation of all dependencies.
Search for “QMC5883LCompass” and install
Calibrate QMC5883L
Note
You can open the file
09-gy87_compass_calibration.inounder the path ofelite-explorer-kit-main\basic_project\09-gy87_compass_calibrationdirectly.Or copy this code into Arduino IDE.
 1/*
 2  This code is used to calibrate the QMC5883L magnetometer in the gy-87 module.
 3
 4  Upload this calibration sketch onto your Arduino to provide calibration for
 5  your QMC5883L chip. After upload, run the serial monitor and follow the directions.
 6  When prompted, copy the last line into your project's actual sketch.
 7
 8  Board: Arduino Uno R4
 9  Component: GY-87 IMU Module
10  Library: https://github.com/adafruit/Adafruit_MPU6050  (Adafruit MPU6050 by Adafruit)
11           https://github.com/mprograms/QMC5883LCompass  (QMC5883LCompass by MPrograms)
12           https://github.com/adafruit/Adafruit-BMP085-Library  (Adafruit BMP085 Library by Adafruit)
13*/
14
15#include <Adafruit_MPU6050.h>
16#include <QMC5883LCompass.h>
17
18Adafruit_MPU6050 mpu;
19QMC5883LCompass compass;
20
21void setup() {
22  Serial.begin(9600);
23
24  initializeMPU6050();
25
26  // Enable I2C bypass on MPU6050 to directly access the QMC5883L magnetometer
27  mpu.setI2CBypass(true);
28
29  compass.init();
30
31  Serial.println("This will provide calibration settings for your QMC5883L chip. When prompted, move the magnetometer in all directions until the calibration is complete.");
32  Serial.println("Calibration will begin in 5 seconds.");
33  delay(5000);
34
35  Serial.println("CALIBRATING. Keep moving your sensor...");
36  compass.calibrate();
37
38  Serial.println("DONE. Copy the lines below and paste it into your projects sketch.);");
39  Serial.println();
40  Serial.print("compass.setCalibrationOffsets(");
41  Serial.print(compass.getCalibrationOffset(0));
42  Serial.print(", ");
43  Serial.print(compass.getCalibrationOffset(1));
44  Serial.print(", ");
45  Serial.print(compass.getCalibrationOffset(2));
46  Serial.println(");");
47  Serial.print("compass.setCalibrationScales(");
48  Serial.print(compass.getCalibrationScale(0));
49  Serial.print(", ");
50  Serial.print(compass.getCalibrationScale(1));
51  Serial.print(", ");
52  Serial.print(compass.getCalibrationScale(2));
53  Serial.println(");");
54}
55
56void loop() {
57  delay(1000);
58}
59
60void initializeMPU6050() {
61  // Check if the MPU6050 sensor is detected
62  if (!mpu.begin()) {
63    Serial.println("Failed to find MPU6050 chip");
64    while (1)
65      ;  // Halt if sensor not found
66  }
67  Serial.println("MPU6050 Found!");
68
69  // set accelerometer range to +-8G
70  mpu.setAccelerometerRange(MPU6050_RANGE_8_G);
71
72  // set gyro range to +- 500 deg/s
73  mpu.setGyroRange(MPU6050_RANGE_500_DEG);
74
75  // set filter bandwidth to 21 Hz
76  mpu.setFilterBandwidth(MPU6050_BAND_21_HZ);
77
78  Serial.println("");
79  delay(100);
80}
After uploading the code, open the serial monitor. Follow the instructions in the serial monitor to calibrate QMC5883L. When prompted to move the sensor, it is recommended to use Figure 8 calibration method. Alternatively, simply keep the sensor parallel to the ground and rotate it clockwise or counterclockwise until the serial monitor prompts that calibration is complete.

Once all calibration data has been collected, the sketch will tell provide you with some code that will look like compass.setCalibrationOffsets(-375.00, -179.00, 85.00); and compass.setCalibrationScales(1.04, 0.96, 1.01);. Copy this code. You may want to save it for future reference.
When using QMC5883L: Open your project’s sketch and paste the line of code you copied directly below the compass.init() call. Just like this:
void initializeQMC5883L() {

  compass.init();

  // You should replace the code below according to your calibration results
  compass.setCalibrationOffsets(-375.00, -179.00, 85.00);
  compass.setCalibrationScales(1.04, 0.96, 1.01);

}
Code
Note
Magnetometers must be calibrated(Calibrate QMC5883L) before they can be used as compasses, and must held level in use and kept away from iron objects, magnetized materials and current carrying wires.
Note
You can open the file
09-gy87_qmc5883l.inounder the path ofelite-explorer-kit-main\basic_project\09-gy87_qmc5883ldirectly.Or copy this code into Arduino IDE.
Put the code obtained from the calibration steps below the line of code
compass.init()in the functioninitializeQMC5883L().
  1/*
  2  This Arduino code interfaces with the GY-87 IMU  module, focusing specifically on
  3  the QMC5883L magnetometer for measuring magnetic field data. It initializes the
  4  QMC5883L sensor and continuously outputs its readings, including directional data,
  5  to the Serial Monitor.
  6
  7  Board: Arduino Uno R4
  8  Component: GY-87 IMU Module
  9  Library: https://github.com/adafruit/Adafruit_MPU6050  (Adafruit MPU6050 by Adafruit)
 10           https://github.com/mprograms/QMC5883LCompass  (QMC5883LCompass by MPrograms)
 11*/
 12
 13// Include required libraries
 14#include <Adafruit_MPU6050.h>
 15#include <Adafruit_Sensor.h>
 16#include <Wire.h>
 17#include <QMC5883LCompass.h>
 18
 19// Initialize sensor objects
 20Adafruit_MPU6050 mpu;
 21QMC5883LCompass compass;
 22
 23void setup() {
 24  // Initialize the serial communication with a baud rate of 9600
 25  Serial.begin(9600);
 26
 27  // Initialize the MPU6050 sensor (accelerometer and gyroscope)
 28  initializeMPU6050();
 29
 30  // Enable I2C bypass on MPU6050 to directly access the QMC5883L magnetometer
 31  mpu.setI2CBypass(true);
 32
 33  // Initialize the QMC5883L magnetometer sensor
 34  initializeQMC5883L();
 35}
 36
 37
 38void loop() {
 39  // Print QMC5883L data
 40  printQMC5883L();
 41
 42  delay(500);
 43}
 44
 45void initializeQMC5883L() {
 46  compass.init();
 47
 48  // You should replace the code below according to your calibration results
 49  compass.setCalibrationOffsets(-549.00, -66.00, 160.00);
 50  compass.setCalibrationScales(0.97, 1.02, 1.02);
 51}
 52
 53void printQMC5883L() {
 54
 55  Serial.println();
 56  Serial.println("QMC5883L ------------");
 57
 58  int x, y, z, a;
 59  char myArray[3];
 60
 61  compass.read();
 62
 63  x = compass.getX();
 64  y = compass.getY();
 65  z = compass.getZ();
 66
 67  a = compass.getAzimuth();
 68
 69  compass.getDirection(myArray, a);
 70
 71  Serial.print("X: ");
 72  Serial.print(x);
 73
 74  Serial.print(" Y: ");
 75  Serial.print(y);
 76
 77  Serial.print(" Z: ");
 78  Serial.print(z);
 79
 80  Serial.print(" Azimuth: ");
 81  Serial.print(a);
 82
 83  Serial.print(" Direction: ");
 84  Serial.print(myArray[0]);
 85  Serial.print(myArray[1]);
 86  Serial.println(myArray[2]);
 87
 88  Serial.println("QMC5883L ------------");
 89  Serial.println();
 90}
 91
 92void initializeMPU6050() {
 93  // Check if the MPU6050 sensor is detected
 94  if (!mpu.begin()) {
 95    Serial.println("Failed to find MPU6050 chip");
 96    while (1)
 97      ;  // Halt if sensor not found
 98  }
 99  Serial.println("MPU6050 Found!");
100
101  // set accelerometer range to +-8G
102  mpu.setAccelerometerRange(MPU6050_RANGE_8_G);
103
104  // set gyro range to +- 500 deg/s
105  mpu.setGyroRange(MPU6050_RANGE_500_DEG);
106
107  // set filter bandwidth to 21 Hz
108  mpu.setFilterBandwidth(MPU6050_BAND_21_HZ);
109
110  Serial.println("");
111  delay(100);
112}
Code Analysis
Include Libraries and Initialize Sensors This section includes the necessary libraries for the MPU6050 and QMC5883L sensors and initializes their objects.
#include <Adafruit_MPU6050.h>
#include <Adafruit_Sensor.h>
#include <Wire.h>
#include <QMC5883LCompass.h>

Adafruit_MPU6050 mpu;
QMC5883LCompass compass;
Setup Function
Initializes serial communication, the MPU6050 sensor, and sets the MPU6050 to I2C bypass mode to allow direct access to the QMC5883L magnetometer. Then, it initializes the QMC5883L magnetometer.
void setup() {
  // Initialize the serial communication with a baud rate of 9600
  Serial.begin(9600);

  // Initialize the MPU6050 sensor (accelerometer and gyroscope)
  initializeMPU6050();

  // Enable I2C bypass on MPU6050 to directly access the QMC5883L magnetometer
  mpu.setI2CBypass(true);

  // Initialize the QMC5883L magnetometer sensor
  initializeQMC5883L();
}
Loop Function
Continuously reads data from the QMC5883L magnetometer and prints it to the Serial Monitor.
void loop() {
  printQMC5883L();
  delay(500);
}
Initialize QMC5883L Function
Initializes and calibrates the QMC5883L magnetometer. The calibration values should be adjusted based on specific calibration data.(Calibrate QMC5883L)
void initializeQMC5883L() {
  compass.init();

  // You should replace the code below according to your calibration results
  compass.setCalibrationOffsets(-549.00, -66.00, 160.00);
  compass.setCalibrationScales(0.97, 1.02, 1.02);
}
Print QMC5883L Data Function
This function reads the magnetometer’s X, Y, Z values, and azimuth, then prints them to the Serial Monitor.
void printQMC5883L() {

  Serial.println();
  Serial.println("QMC5883L ------------");

    int x, y, z, a;
    char myArray[3];

    compass.read();

    x = compass.getX();
    y = compass.getY();
    z = compass.getZ();

    a = compass.getAzimuth();

    compass.getDirection(myArray, a);

    Serial.print("X: ");
    Serial.print(x);

    Serial.print(" Y: ");
    Serial.print(y);

    Serial.print(" Z: ");
    Serial.print(z);

    Serial.print(" Azimuth: ");
    Serial.print(a);

    Serial.print(" Direction: ");
    Serial.print(myArray[0]);
    Serial.print(myArray[1]);
    Serial.println(myArray[2]);

  Serial.println("QMC5883L ------------");
  Serial.println();
}