Note
Hello, welcome to the SunFounder Raspberry Pi & Arduino & ESP32 Enthusiasts Community on Facebook! Dive deeper into Raspberry Pi, Arduino, and ESP32 with fellow enthusiasts.
Why Join?
Expert Support: Solve post-sale issues and technical challenges with help from our community and team.
Learn & Share: Exchange tips and tutorials to enhance your skills.
Exclusive Previews: Get early access to new product announcements and sneak peeks.
Special Discounts: Enjoy exclusive discounts on our newest products.
Festive Promotions and Giveaways: Take part in giveaways and holiday promotions.
👉 Ready to explore and create with us? Click [here] and join today!
IMU Module (GY-87)
Note
Different versions of this kit may use different IMU modules. Please select the appropriate tutorial based on the version of the kit you have. If you have a 10-axis IMU module, please refer to IMU Module (10-Axis). If you have a GY-87 module, please refer to this lesson.
The GY-87 module is equipped with three sensor chips: MPU6050, QMC5883L, and BMP180, each offering unique capabilities. The MPU6050 combines a gyroscope and an accelerometer for motion tracking, the QMC5883L serves as a magnetometer for directional sensing, and the BMP180 is used for measuring barometric pressure and temperature. These can be interfaced using the I2C protocol for effective communication with an Arduino.
These sensors are designed for seamless integration via the I2C protocol, ensuring efficient communication with platforms like Arduino. Each sensor in the GY-87 module is accessible through unique I2C addresses: MPU6050 is accessed at 0x68, QMC5883L at 0x0D, and BMP180 at 0x77.
Individual tutorials for each sensor chip:
If you want to use these three chips simultaneously, here is a simple example:
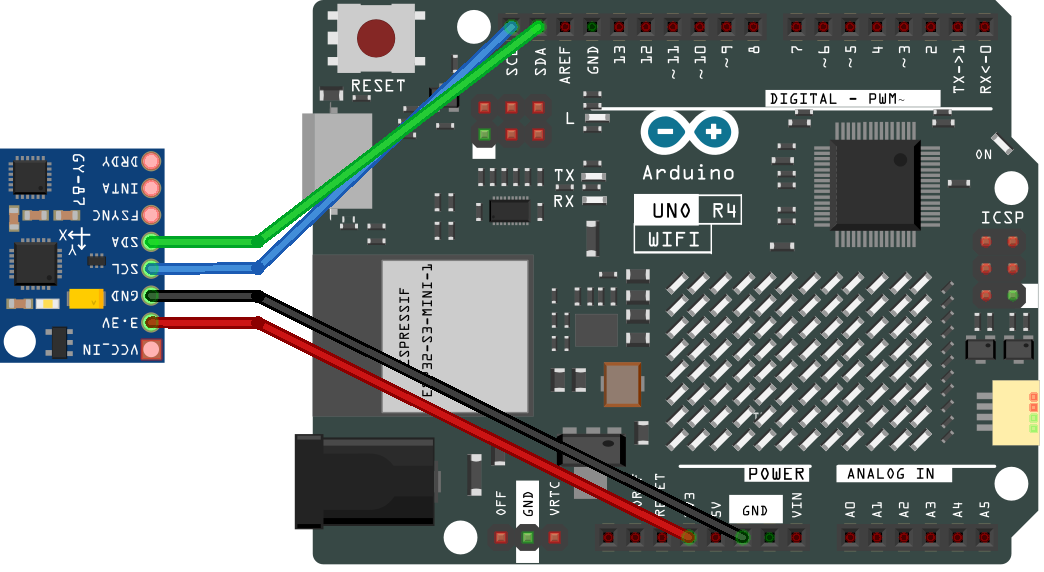
Note
You can open the file
09-gy87.inounder the path ofelite-explorer-kit-main\basic_project\09-gy87directly.Or copy this code into Arduino IDE.
Note
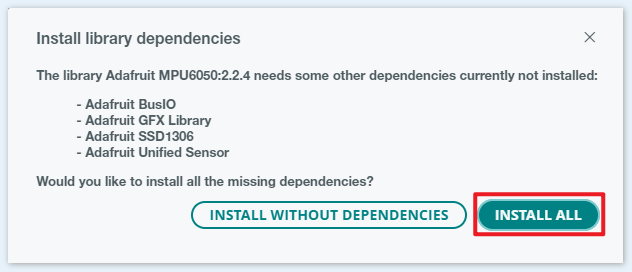
To install the library, use the Arduino Library Manager.
Search for “Adafruit MPU6050” and install
When installing each library, please make sure to select the installation of all dependencies.
Search for “Adafruit Unified Sensor” and install
Search for “QMC5883LCompass” and install
Search for “Adafruit BMP085 Library” and install
  1/*
  2  This Arduino code is designed to work with the GY-87 IMU (Inertial Measurement Unit) module,
  3  which is a multi-sensor module containing three individual sensors: MPU6050 (Accelerometer and Gyroscope),
  4  QMC5883L Magnetometer, and BMP180 (Barometric Pressure and Temperature). The code initializes these
  5  sensors and continuously prints their readings to the Serial Monitor.
  6
  7  Board: Arduino Uno R4
  8  Component: GY-87 IMU Module
  9  Library: https://github.com/adafruit/Adafruit_MPU6050  (Adafruit MPU6050 by Adafruit)
 10           https://github.com/mprograms/QMC5883LCompass  (QMC5883LCompass by MPrograms)
 11           https://github.com/adafruit/Adafruit-BMP085-Library  (Adafruit BMP085 Library by Adafruit)
 12*/
 13
 14// Include required libraries
 15#include <Adafruit_MPU6050.h>
 16#include <Adafruit_Sensor.h>
 17#include <Wire.h>
 18#include <Adafruit_BMP085.h>
 19#include <QMC5883LCompass.h>
 20
 21// Initialize sensor objects
 22Adafruit_MPU6050 mpu;
 23Adafruit_BMP085 bmp;
 24QMC5883LCompass compass;
 25
 26void setup() {
 27  // Initialize the serial communication with a baud rate of 9600
 28  Serial.begin(9600);
 29
 30  // Initialize the MPU6050 sensor (accelerometer and gyroscope)
 31  initializeMPU6050();
 32
 33  // Enable I2C bypass on MPU6050 to directly access the QMC5883L magnetometer
 34  mpu.setI2CBypass(true);
 35
 36  // Initialize the QMC5883L magnetometer sensor
 37  initializeQMC5883L();
 38
 39  // Initialize BMP180 barometric sensor
 40  initializeBMP180();
 41}
 42
 43
 44void loop() {
 45  // Print MPU6050 data
 46  printMPU6050();
 47
 48  // Print QMC5883L data
 49  printQMC5883L();
 50
 51  // Print BMP180 data
 52  printBMP180();
 53
 54  delay(500);
 55}
 56
 57void initializeQMC5883L() {
 58
 59  compass.init();
 60
 61  // You should replace the code below according to your calibration results
 62  compass.setCalibrationOffsets(-458.00, -310.00, -362.00);
 63  compass.setCalibrationScales(0.79, 0.79, 2.19);
 64
 65}
 66
 67void printQMC5883L() {
 68
 69  Serial.println();
 70  Serial.println("QMC5883L ------------");
 71
 72	int x, y, z, a;
 73	char myArray[3];
 74
 75	compass.read();
 76
 77	x = compass.getX();
 78	y = compass.getY();
 79	z = compass.getZ();
 80
 81	a = compass.getAzimuth();
 82
 83	compass.getDirection(myArray, a);
 84
 85	Serial.print("X: ");
 86	Serial.print(x);
 87
 88	Serial.print(" Y: ");
 89	Serial.print(y);
 90
 91	Serial.print(" Z: ");
 92	Serial.print(z);
 93
 94	Serial.print(" Azimuth: ");
 95	Serial.print(a);
 96
 97	Serial.print(" Direction: ");
 98	Serial.print(myArray[0]);
 99	Serial.print(myArray[1]);
100	Serial.println(myArray[2]);
101
102  Serial.println("QMC5883L ------------");
103  Serial.println();
104}
105
106
107void initializeMPU6050() {
108  // Check if the MPU6050 sensor is detected
109  if (!mpu.begin()) {
110    Serial.println("Failed to find MPU6050 chip");
111    while (1)
112      ;  // Halt if sensor not found
113  }
114  Serial.println("MPU6050 Found!");
115
116  // set accelerometer range to +-8G
117  mpu.setAccelerometerRange(MPU6050_RANGE_8_G);
118
119  // set gyro range to +- 500 deg/s
120  mpu.setGyroRange(MPU6050_RANGE_500_DEG);
121
122  // set filter bandwidth to 21 Hz
123  mpu.setFilterBandwidth(MPU6050_BAND_21_HZ);
124
125  Serial.println("");
126  delay(100);
127}
128
129void printMPU6050() {
130
131  Serial.println();
132  Serial.println("MPU6050 ------------");
133
134  /* Get new sensor events with the readings */
135  sensors_event_t a, g, temp;
136  mpu.getEvent(&a, &g, &temp);
137
138  /* Print out the values */
139  Serial.print("Acceleration X: ");
140  Serial.print(a.acceleration.x);
141  Serial.print(", Y: ");
142  Serial.print(a.acceleration.y);
143  Serial.print(", Z: ");
144  Serial.print(a.acceleration.z);
145  Serial.println(" m/s^2");
146
147  Serial.print("Rotation X: ");
148  Serial.print(g.gyro.x);
149  Serial.print(", Y: ");
150  Serial.print(g.gyro.y);
151  Serial.print(", Z: ");
152  Serial.print(g.gyro.z);
153  Serial.println(" rad/s");
154
155  Serial.print("Temperature: ");
156  Serial.print(temp.temperature);
157  Serial.println(" degC");
158
159  Serial.println("MPU6050 ------------");
160  Serial.println();
161}
162
163void initializeBMP180() {
164  // Start BMP180 initialization
165  if (!bmp.begin()) {
166    Serial.println("Could not find a valid BMP180 sensor, check wiring!");
167    while (1)
168      ;  // Halt if sensor not found
169  }
170  Serial.println("BMP180 Found!");
171}
172
173void printBMP180() {
174  Serial.println();
175  Serial.println("BMP180 ------------");
176  Serial.print("Temperature = ");
177  Serial.print(bmp.readTemperature());
178  Serial.println(" *C");
179
180  Serial.print("Pressure = ");
181  Serial.print(bmp.readPressure());
182  Serial.println(" Pa");
183
184  // Calculate altitude assuming 'standard' barometric
185  // pressure of 1013.25 millibar = 101325 Pascal
186  Serial.print("Altitude = ");
187  Serial.print(bmp.readAltitude());
188  Serial.println(" meters");
189
190  Serial.print("Pressure at sealevel (calculated) = ");
191  Serial.print(bmp.readSealevelPressure());
192  Serial.println(" Pa");
193  Serial.println("BMP180 ------------");
194  Serial.println();
195}
Note
Magnetometers must be calibrated(Calibrate QMC5883L) before they can be used as compasses, and must held level in use and kept away from iron objects, magnetized materials and current carrying wires.
After the code is successfully uploaded to your Arduino Uno R4, the Serial Monitor will come to life, continuously printing out sensor data from the GY-87 IMU module. This module incorporates three individual sensors: the MPU6050 for accelerometer and gyroscope readings, the QMC5883L for magnetometer readings, and the BMP180 for barometric pressure and temperature readings.