Note
Hello, welcome to the SunFounder Raspberry Pi & Arduino & ESP32 Enthusiasts Community on Facebook! Dive deeper into Raspberry Pi, Arduino, and ESP32 with fellow enthusiasts.
Why Join?
Expert Support: Solve post-sale issues and technical challenges with help from our community and team.
Learn & Share: Exchange tips and tutorials to enhance your skills.
Exclusive Previews: Get early access to new product announcements and sneak peeks.
Special Discounts: Enjoy exclusive discounts on our newest products.
Festive Promotions and Giveaways: Take part in giveaways and holiday promotions.
👉 Ready to explore and create with us? Click [here] and join today!
OLED
Overview
In this lesson, you will learn about OLED Displays using the SSD1306 driver. OLED (Organic Light-Emitting Diodes) displays are widely used in various electronic devices such as smartwatches, mobile phones, and even televisions. The SSD1306 is a single-chip CMOS OLED/PLED driver with controller for organic/polymer light emitting diode dot-matrix graphic display system. It offers a crisp and clear visual output through the means of organic material-based diodes that emit light when an electric current passes through them.
In the code provided, an OLED display is interfaced with an Arduino board via the I2C protocol. The code uses the Adafruit SSD1306 library to control the display. The program covers various functionalities such as:
Displaying text: “Hello world!” is printed on the screen.
Inverted text: The text “Hello world!” is displayed in an inverted color scheme.
Font Size: The text “Hello!” is displayed with an increased font size.
Numerical Display: The numbers 123456789 are displayed.
ASCII Characters: A set of ASCII characters are displayed.
Scrolling: Text is scrolled horizontally across the display.
Bitmap Display: A predefined bitmap image is displayed on the OLED screen.
This OLED display can be used in a multitude of applications including digital clocks, mini game consoles, information displays, and so on. It offers a great way to provide a user interface in compact and portable devices.
Required Components
In this project, we need the following components.
It’s definitely convenient to buy a whole kit, here’s the link:
Name |
ITEMS IN THIS KIT |
LINK |
|---|---|---|
Elite Explorer Kit |
300+ |
You can also buy them separately from the links below.
COMPONENT INTRODUCTION |
PURCHASE LINK |
|---|---|
- |
|
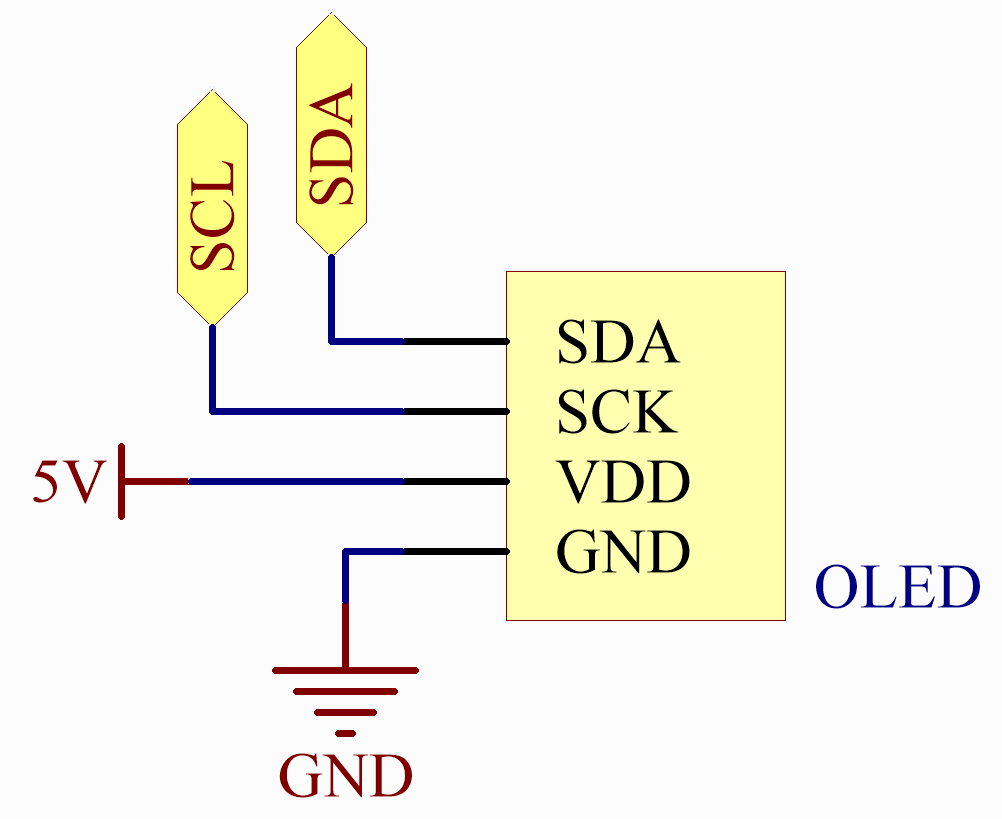
Wiring
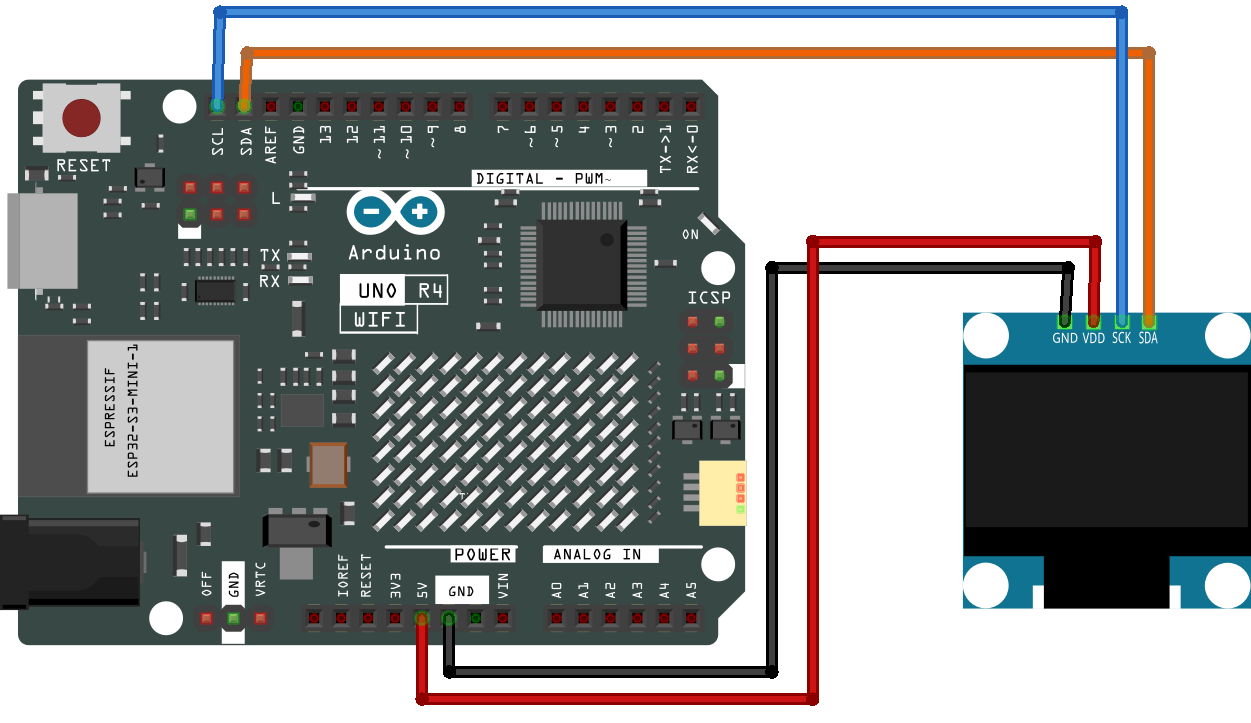
Schematic Diagram
Code
Note
You can open the file
15-oled.inounder the path ofelite-explorer-kit-main\basic_project\15-oleddirectly.Or copy this code into Arduino IDE.
Note
To install the library, use the Arduino Library Manager and search for “Adafruit SSD1306” and “Adafruit GFX” and install it.
  1/*
  2  This code initializes an OLED display (SSD1306) using the Adafruit SSD1306 library,
  3  and displays various text, numbers, and scroll animations on the screen.
  4
  5  Board: Arduino Uno R4 (or R3)
  6  Component:  OLED (SSD1306)
  7  Library: https://github.com/adafruit/Adafruit_SSD1306 (Adafruit SSD1306 by Adafruit)
  8           https://github.com/adafruit/Adafruit-GFX-Library (Adafruit GFX Library by Adafruit)
  9*/
 10
 11#include <SPI.h>
 12#include <Wire.h>
 13#include <Adafruit_GFX.h>
 14#include <Adafruit_SSD1306.h>
 15
 16#define SCREEN_WIDTH 128  // OLED display width, in pixels
 17#define SCREEN_HEIGHT 64  // OLED display height, in pixels
 18
 19// Declaration for SSD1306 display connected using I2C
 20#define OLED_RESET -1  // Reset pin # (or -1 if sharing Arduino reset pin)
 21#define SCREEN_ADDRESS 0x3C
 22Adafruit_SSD1306 display(SCREEN_WIDTH, SCREEN_HEIGHT, &Wire, OLED_RESET);
 23
 24//Bitmap data
 25static const unsigned char PROGMEM sunfounderIcon[] = {
 26	0xff, 0xff, 0xff, 0xff, 0xff, 0xff, 0xff, 0xff, 0xff, 0xff, 0xff, 0xf8, 0x7f, 0xff, 0xff, 0xff,
 27	0xff, 0xff, 0xff, 0xf0, 0x1f, 0xff, 0xff, 0xff, 0xff, 0xff, 0xff, 0xe0, 0x0f, 0xff, 0xff, 0xff,
 28	0xff, 0xff, 0xff, 0xc0, 0x07, 0xff, 0xff, 0xff, 0xff, 0xff, 0xff, 0x80, 0x03, 0xff, 0xff, 0xff,
 29	0xff, 0xff, 0xff, 0x00, 0x01, 0xff, 0xff, 0xff, 0xff, 0xff, 0xfe, 0x00, 0x00, 0x7f, 0xff, 0xff,
 30	0xff, 0xff, 0xfc, 0x00, 0x00, 0x3f, 0xff, 0xff, 0xff, 0xff, 0xf8, 0x00, 0x00, 0x1f, 0xff, 0xff,
 31	0xff, 0xff, 0xf0, 0x00, 0x00, 0x0f, 0xff, 0xff, 0xff, 0xff, 0xe0, 0x01, 0x00, 0x07, 0xff, 0xff,
 32	0xff, 0xff, 0xc0, 0x07, 0xc0, 0x01, 0xff, 0xff, 0xff, 0xff, 0x80, 0x0f, 0xe0, 0x00, 0xff, 0xff,
 33	0xff, 0xff, 0x00, 0x1f, 0xf0, 0x00, 0x7f, 0xff, 0xff, 0xfe, 0x00, 0x3f, 0xf8, 0x00, 0x3f, 0xff,
 34	0xff, 0xfc, 0x00, 0x7f, 0xfe, 0x00, 0x0f, 0xff, 0xff, 0xfc, 0x00, 0xfe, 0xff, 0x00, 0x07, 0xff,
 35	0xff, 0xf8, 0x01, 0xfc, 0x7f, 0x80, 0x03, 0xff, 0xff, 0xf0, 0x03, 0xf8, 0x3f, 0xc0, 0x01, 0xff,
 36	0xff, 0xe0, 0x07, 0xf0, 0x0f, 0xe0, 0x00, 0xff, 0xff, 0xc0, 0x0f, 0xe0, 0x07, 0xf8, 0x00, 0x3f,
 37	0xff, 0x80, 0x0f, 0xc0, 0x03, 0xfc, 0x00, 0x7f, 0xff, 0x00, 0x1f, 0xc0, 0x01, 0xfe, 0x00, 0xff,
 38	0xff, 0x00, 0x0f, 0xe0, 0x00, 0x7f, 0x81, 0xff, 0xff, 0x00, 0x0f, 0xf0, 0x00, 0x3f, 0xc3, 0xff,
 39	0xff, 0x80, 0x03, 0xfc, 0x00, 0x1f, 0xe7, 0xff, 0xff, 0xc0, 0x01, 0xfe, 0x00, 0x0f, 0xff, 0xff,
 40	0xff, 0xe0, 0x00, 0xff, 0x00, 0x03, 0xff, 0xff, 0xff, 0xf0, 0x00, 0x7f, 0x80, 0x01, 0xff, 0xff,
 41	0xff, 0xf8, 0x00, 0x1f, 0xe0, 0x00, 0xff, 0xff, 0xff, 0xfe, 0x00, 0x0f, 0xf0, 0x00, 0x7f, 0xff,
 42	0xff, 0xff, 0x00, 0x07, 0xf8, 0x00, 0x3f, 0xff, 0xff, 0xff, 0x80, 0x03, 0xfc, 0x00, 0x0f, 0xff,
 43	0xff, 0xff, 0xc0, 0x00, 0xff, 0x00, 0x07, 0xff, 0xff, 0xff, 0xe0, 0x00, 0x7f, 0x80, 0x03, 0xff,
 44	0xff, 0xff, 0xf8, 0x00, 0x3f, 0xc0, 0x01, 0xff, 0xff, 0xf3, 0xfc, 0x00, 0x1f, 0xe0, 0x00, 0xff,
 45	0xff, 0xe1, 0xfe, 0x00, 0x07, 0xf8, 0x00, 0x7f, 0xff, 0xc0, 0x7f, 0x00, 0x03, 0xf8, 0x00, 0x7f,
 46	0xff, 0x80, 0x3f, 0xc0, 0x01, 0xfc, 0x00, 0xff, 0xff, 0x00, 0x1f, 0xe0, 0x03, 0xf8, 0x00, 0xff,
 47	0xfe, 0x00, 0x0f, 0xf0, 0x03, 0xf0, 0x01, 0xff, 0xff, 0x80, 0x07, 0xf8, 0x07, 0xe0, 0x03, 0xff,
 48	0xff, 0xc0, 0x01, 0xfc, 0x0f, 0xc0, 0x07, 0xff, 0xff, 0xe0, 0x00, 0xff, 0x1f, 0xc0, 0x0f, 0xff,
 49	0xff, 0xf0, 0x00, 0x7f, 0xbf, 0x00, 0x1f, 0xff, 0xff, 0xf8, 0x00, 0x3f, 0xff, 0x00, 0x3f, 0xff,
 50	0xff, 0xfe, 0x00, 0x0f, 0xfe, 0x00, 0x7f, 0xff, 0xff, 0xff, 0x00, 0x07, 0xfc, 0x00, 0xff, 0xff,
 51	0xff, 0xff, 0x80, 0x03, 0xf8, 0x01, 0xff, 0xff, 0xff, 0xff, 0xc0, 0x01, 0xf0, 0x03, 0xff, 0xff,
 52	0xff, 0xff, 0xf0, 0x00, 0x00, 0x07, 0xff, 0xff, 0xff, 0xff, 0xf8, 0x00, 0x00, 0x0f, 0xff, 0xff,
 53	0xff, 0xff, 0xfc, 0x00, 0x00, 0x0f, 0xff, 0xff, 0xff, 0xff, 0xfe, 0x00, 0x00, 0x1f, 0xff, 0xff,
 54	0xff, 0xff, 0xff, 0x00, 0x00, 0x3f, 0xff, 0xff, 0xff, 0xff, 0xff, 0xc0, 0x00, 0x7f, 0xff, 0xff,
 55	0xff, 0xff, 0xff, 0xe0, 0x00, 0xff, 0xff, 0xff, 0xff, 0xff, 0xff, 0xf0, 0x01, 0xff, 0xff, 0xff,
 56	0xff, 0xff, 0xff, 0xf8, 0x03, 0xff, 0xff, 0xff, 0xff, 0xff, 0xff, 0xfc, 0x07, 0xff, 0xff, 0xff,
 57	0xff, 0xff, 0xff, 0xff, 0x0f, 0xff, 0xff, 0xff, 0xff, 0xff, 0xff, 0xff, 0xff, 0xff, 0xff, 0xff
 58};
 59
 60void setup() {
 61  Serial.begin(9600);
 62
 63  // initialize the OLED object
 64  if (!display.begin(SSD1306_SWITCHCAPVCC, SCREEN_ADDRESS)) {
 65    Serial.println(F("SSD1306 allocation failed"));
 66    for (;;)
 67      ;
 68  }
 69
 70  // Clear the buffer.
 71  display.clearDisplay();
 72
 73  // Display Text
 74  display.setTextSize(1);       // Set text size
 75  display.setTextColor(WHITE);  // Set text color
 76  display.setCursor(0, 28);     // Set cursor position
 77  display.println("Hello world!");
 78  display.display();  // Display the content on the screen
 79  delay(2000);
 80  display.clearDisplay();  // Clear the screen
 81
 82  // Display Inverted Text
 83  display.setTextColor(BLACK, WHITE);  // 'inverted' text
 84  display.setCursor(0, 28);
 85  display.println("Hello world!");
 86  display.display();
 87  delay(2000);
 88  display.clearDisplay();
 89
 90  // Changing Font Size
 91  display.setTextColor(WHITE);
 92  display.setCursor(0, 24);
 93  display.setTextSize(2);
 94  display.println("Hello!");
 95  display.display();
 96  delay(2000);
 97  display.clearDisplay();
 98
 99  // Display Numbers
100  display.setTextSize(1);
101  display.setCursor(0, 28);
102  display.println(123456789);
103  display.display();
104  delay(2000);
105  display.clearDisplay();
106
107  // Display ASCII Characters
108  display.setCursor(0, 24);
109  display.setTextSize(2);
110  for (int i = 1; i < 8; i++) {
111    display.write(i);
112  }
113  display.display();
114  delay(2000);
115  display.clearDisplay();
116
117  // Scroll full screen
118  display.setCursor(0, 0);
119  display.setTextSize(1);
120  display.println("Full");
121  display.println("screen");
122  display.println("scrolling!");
123  display.display();
124  display.startscrollright(0x00, 0x07);  // Scroll the screen to the right
125  delay(5000);
126  display.stopscroll();
127  delay(1000);
128  display.startscrollleft(0x00, 0x07);  // Scroll the screen to the left
129  delay(5000);
130  display.stopscroll();
131  delay(1000);
132  display.clearDisplay();
133
134  // Scroll part of the screen
135  display.setCursor(0, 0);
136  display.setTextSize(1);
137  display.println("Scroll");
138  display.println("some part");
139  display.println("of the screen.");
140  display.display();
141  display.startscrollright(0x00, 0x00);  // Scroll the first column of the screen to the right
142  delay(4000);
143  display.stopscroll();
144  display.clearDisplay();
145
146  // Display bitmap
147  display.drawBitmap(32, 0, sunfounderIcon, 64, 64, WHITE);
148  display.display();
149}
150
151void loop() {
152}
Code Analysis
Library Inclusion and Initial Definitions: The necessary libraries for interfacing with the OLED are included. Following that, definitions regarding the OLED’s dimensions and I2C address are provided.
Adafruit SSD1306: This library is designed to help with the interfacing of the SSD1306 OLED display. It provides methods to initialize the display, control its settings, and display content.
Adafruit GFX Library: This is a core graphics library for displaying text, producing colors, drawing shapes, etc., on various screens including OLEDs.
Note
To install the library, use the Arduino Library Manager and search for “Adafruit SSD1306” and “Adafruit GFX” and install it.
#include <SPI.h>
#include <Wire.h>
#include <Adafruit_GFX.h>
#include <Adafruit_SSD1306.h>

#define SCREEN_WIDTH 128  // OLED display width, in pixels
#define SCREEN_HEIGHT 64  // OLED display height, in pixels

#define OLED_RESET -1
#define SCREEN_ADDRESS 0x3C
Bitmap Data: Bitmap data for displaying a custom icon on the OLED screen. This data represents an image in a format that the OLED can interpret.
You can use this online tool called image2cpp that can turn your image into an array.
The
PROGMEMkeyword denotes that the array is stored in the program memory of the Arduino microcontroller. Storing data in program memory(PROGMEM) instead of RAM can be helpful for large amounts of data, which would otherwise take up too much space in RAM.static const unsigned char PROGMEM sunfounderIcon[] = {...};
Setup Function (Initialization and Display): The
setup()function initializes the OLED and displays a series of patterns, texts, and animations.void setup() { ... // Serial initialization and OLED object initialization ... // Displaying various text, numbers, and animations }