Note
Hello, welcome to the SunFounder Raspberry Pi & Arduino & ESP32 Enthusiasts Community on Facebook! Dive deeper into Raspberry Pi, Arduino, and ESP32 with fellow enthusiasts.
Why Join?
Expert Support: Solve post-sale issues and technical challenges with help from our community and team.
Learn & Share: Exchange tips and tutorials to enhance your skills.
Exclusive Previews: Get early access to new product announcements and sneak peeks.
Special Discounts: Enjoy exclusive discounts on our newest products.
Festive Promotions and Giveaways: Take part in giveaways and holiday promotions.
👉 Ready to explore and create with us? Click [here] and join today!
WS2812 RGB LEDs Strip
Overview
In this lesson, you will learn about NeoPixel LEDs and how to control them using the FastLED library on an Arduino Uno R4. NeoPixel LEDs are widely used in various applications like home decor, wearables, and event lighting. The FastLED library simplifies the process of programming these LEDs. Here, a chain of 8 NeoPixel LEDs is connected to an Arduino, and each LED in the sequence is lit up in blue color momentarily before turning off, moving on to the next LED in the chain. This basic example can serve as the foundation for more complex light patterns or interactive lighting projects.
Required Components
In this project, we need the following components.
It’s definitely convenient to buy a whole kit, here’s the link:
Name |
ITEMS IN THIS KIT |
LINK |
|---|---|---|
Elite Explorer Kit |
300+ |
You can also buy them separately from the links below.
COMPONENT INTRODUCTION |
PURCHASE LINK |
|---|---|
- |
|
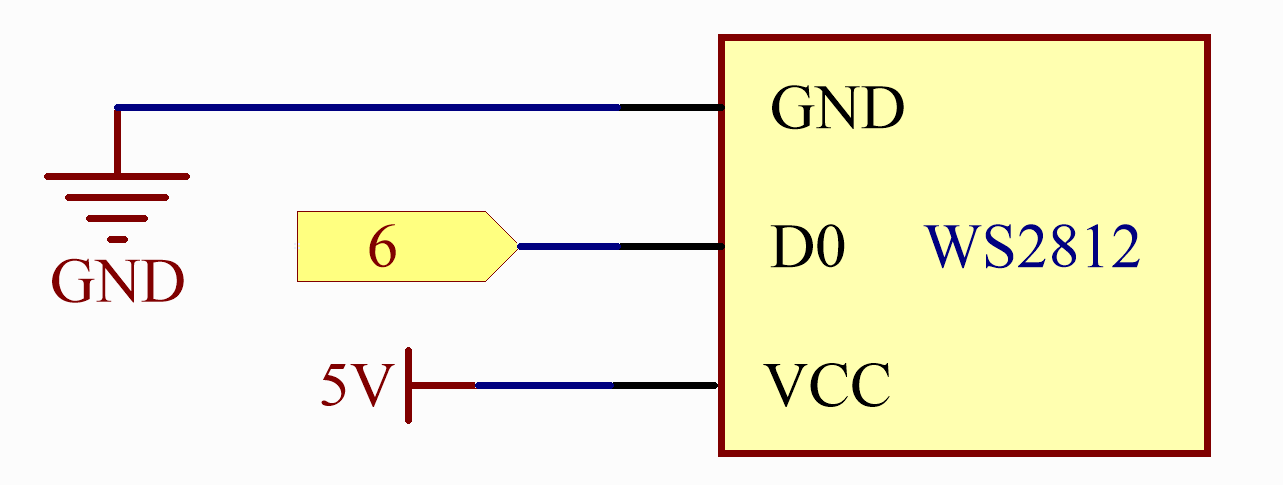
Wiring
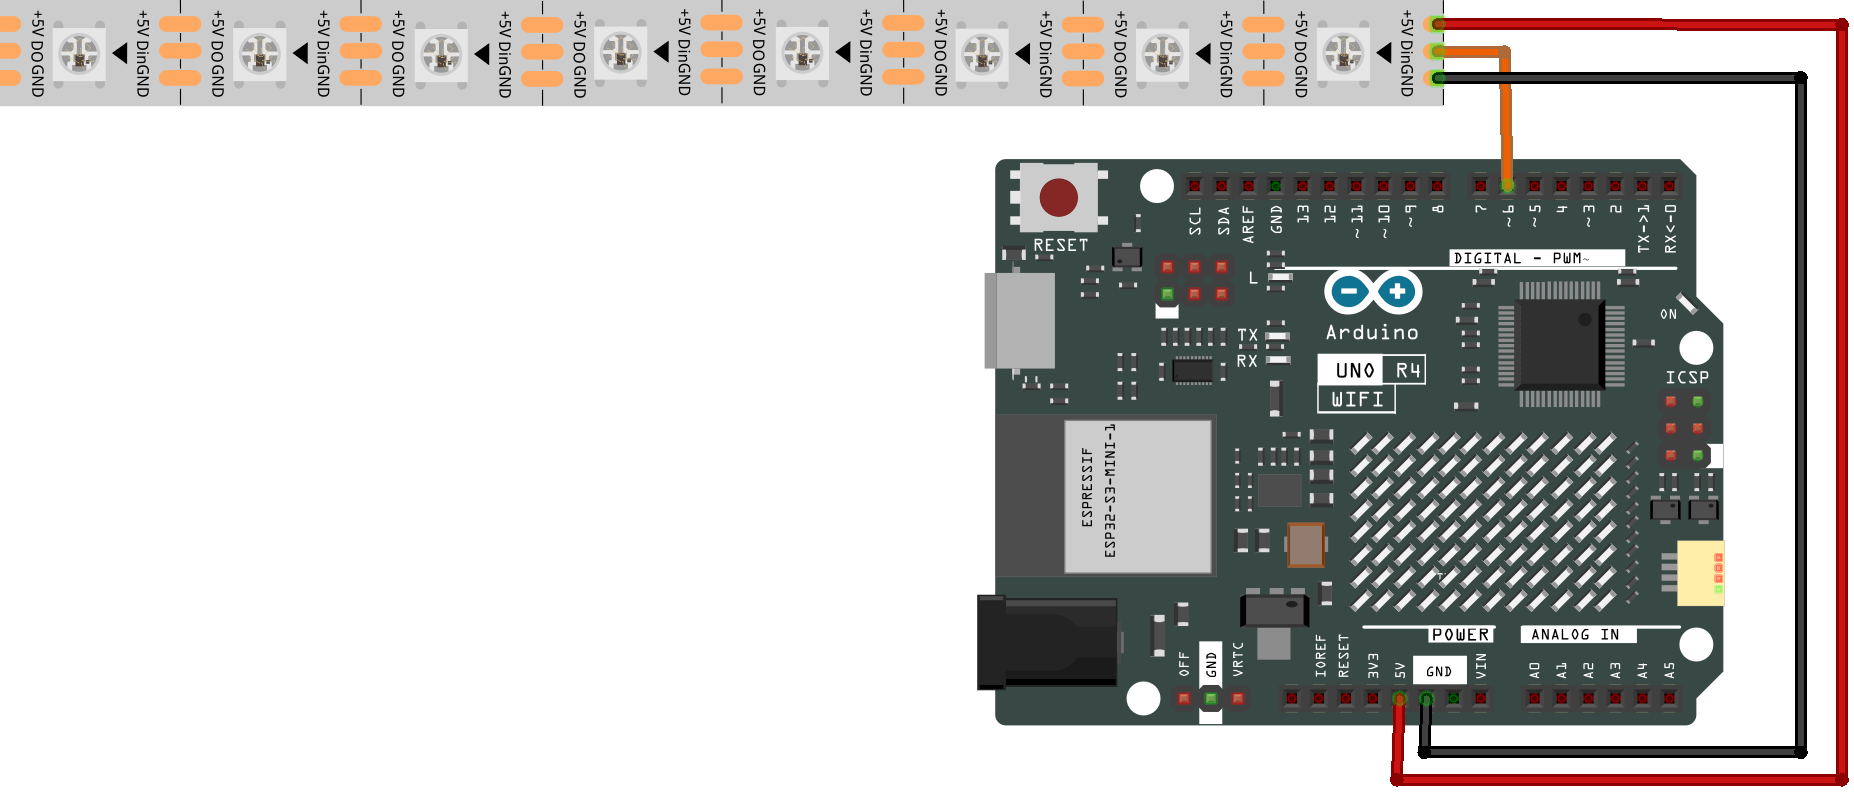
Schematic Diagram
Code
Note
You can open the file
12-ws2812.inounder the path ofelite-explorer-kit-main\basic_project\12-ws2812directly.Or copy this code into Arduino IDE.
Note
To install the library, use the Arduino Library Manager and search for “FastLED” and install it.
Important
With the release of FastLED 3.7.0, the FastLED library now officially supports the Arduino UNO R4. Therefore, you no longer need to manually install the development version. Simply update or install the FastLED library using the Arduino Library Manager.
Warning
[Outdated] Since the FastLED library has not officially released a version supporting Arduino R4 yet, you’ll need to download the latest development code of the FastLED library and overwrite the existing FastLED library files. For detailed instructions on how to do this, please refer to the Manual Installation section. (This note will be retracted when the FastLED library officially releases an update that supports the Arduino UNO R4.)
 1/*
 2  The code controls a chain of 8 NeoPixel LEDs using the FastLED library. It
 3  lights up each LED in the chain one at a time, in a blue color, with a small
 4  delay between each LED. After lighting up an LED, it turns it off ("Black")
 5  before moving to the next one.
 6
 7  Board: Arduino Uno R4
 8  Component: WS2812 RGB LEDs Strip
 9  Library: https://github.com/FastLED/FastLED  (FastLED by Daniel Garcia)
10*/
11
12#include <FastLED.h>  // Include FastLED library
13#define NUM_LEDS 8    // Number of LEDs in the chain
14#define DATA_PIN 6    // Data pin for LED control
15
16CRGB leds[NUM_LEDS];  // Array to hold LED color data
17
18void setup() {
19  FastLED.addLeds<NEOPIXEL, DATA_PIN>(leds, NUM_LEDS);  // Initialize LEDs
20}
21
22void loop() {
23  // Loop through each LED and set it to blue
24  for (int dot = 0; dot < NUM_LEDS; dot++) {
25    leds[dot] = CRGB::Blue;   // Set the current LED to blue
26    FastLED.show();           // Update LEDs
27    leds[dot] = CRGB::Black;  // Clear the current LED
28    delay(30);                // Wait for a short period before moving to the next LED
29  }
30}
After the code is uploaded successfully, you will see each LED in the chain of 8 NeoPixel LEDs light up one at a time in a blue color. The program will loop through this sequence continuously, turning off each LED before moving on to the next. With a short delay between each LED, the lighting effect will appear as a traveling blue dot along the chain.
Code Analysis
Import Library and Setup Constants
Importing the
FastLEDlibrary to use its functions.Defining the number of LEDs and the data pin they are connected to.
#include <FastLED.h>  // Include FastLED library
#define NUM_LEDS 8    // Number of LEDs in the chain
#define DATA_PIN 6    // Data pin for LED control
Initialize LED Array
Creating an array of
CRGBtype to store the color information of each LED.CRGB leds[NUM_LEDS]; // Array to hold LED color data
Initialize LEDs in Setup
Using
FastLED.addLedsto initialize the LEDs.void setup() { FastLED.addLeds<NEOPIXEL, DATA_PIN>(leds, NUM_LEDS); // Initialize LEDs }
Control LEDs in Loop
Looping through each LED to set it to blue, display it, clear it, and then delay.
The
ledsarray serves as a color buffer for your LED strip. Each element in this array corresponds to an individual LED on your physical strip, and its color value determines the color that the LED will display. The order of elements in the array matches the order of LEDs on the strip, starting from the first LED (which corresponds toleds[0]) through to the last LED. To change the color of a specific LED on your strip, you simply modify the corresponding element in theledsarray. You can use predefined colors or set colors using RGB (Taking green as an example, useleds[dot] = CRGB::Greenorleds[dot] = CRGB(0, 255, 0);).The
FastLED.show();function updates the LED strip with new color data, making changes visible. It is like hitting the “publish” button for your LED strip after making edits and adjustments in the code.
void loop() {
  for (int dot = 0; dot < NUM_LEDS; dot++) {
    leds[dot] = CRGB::Blue;   // Set the current LED to blue
    FastLED.show();           // Update LEDs
    leds[dot] = CRGB::Black;  // Clear the current LED
    delay(30);                // Wait for a short period before moving to the next LED
  }
}