Note
Hello, welcome to the SunFounder Raspberry Pi & Arduino & ESP32 Enthusiasts Community on Facebook! Dive deeper into Raspberry Pi, Arduino, and ESP32 with fellow enthusiasts.
Why Join?
Expert Support: Solve post-sale issues and technical challenges with help from our community and team.
Learn & Share: Exchange tips and tutorials to enhance your skills.
Exclusive Previews: Get early access to new product announcements and sneak peeks.
Special Discounts: Enjoy exclusive discounts on our newest products.
Festive Promotions and Giveaways: Take part in giveaways and holiday promotions.
👉 Ready to explore and create with us? Click [here] and join today!
MPU6050
Overview
In this tutorial, you’ll learn to interface the GY-87 IMU module with an Arduino Uno, focusing on the MPU6050 sensor. We’ll cover initializing the MPU6050 and displaying its accelerometer, gyroscope, and temperature data on the Serial Monitor. This lesson is essential for projects needing motion and temperature sensing, like robotics, gesture-controlled devices, and interactive art installations.
Required Components
In this project, we need the following components.
It’s definitely convenient to buy a whole kit, here’s the link:
Name |
ITEMS IN THIS KIT |
LINK |
|---|---|---|
Elite Explorer Kit |
300+ |
You can also buy them separately from the links below.
COMPONENT INTRODUCTION |
PURCHASE LINK |
|---|---|
- |
|
- |
Wiring
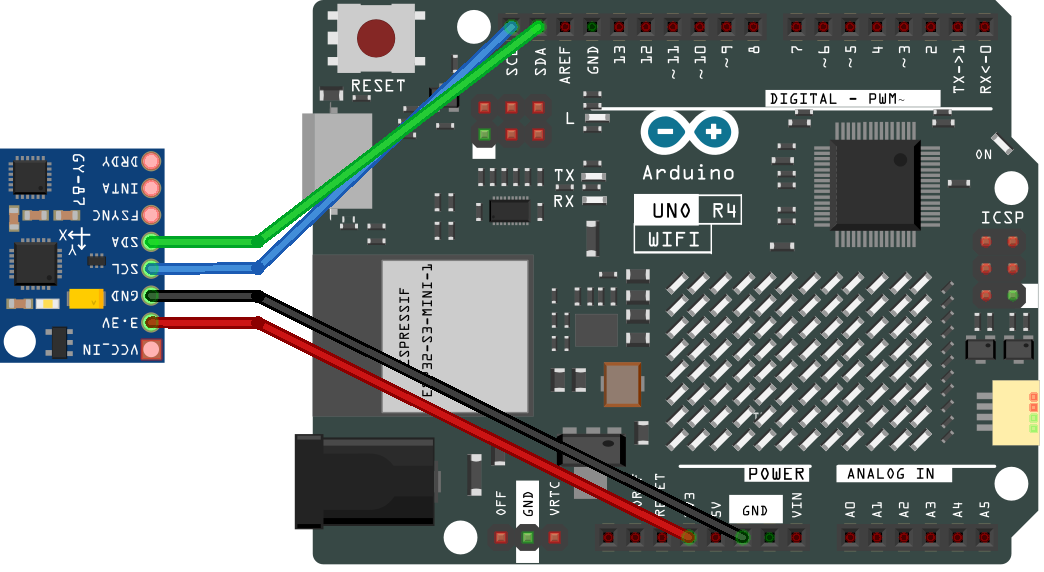
Schematic Diagram

Code
Note
You can open the file
09-gy87_mpu6050.inounder the path ofelite-explorer-kit-main\basic_project\09-gy87_mpu6050directly.Or copy this code into Arduino IDE.
Note
To install the library, use the Arduino Library Manager and search for “Adafruit MPU6050” and install it.
 1/*
 2  This Arduino code is designed for interfacing with the GY-87 IMU module, focusing
 3  specifically on the MPU6050 sensor, which includes an accelerometer and a gyroscope.
 4  The code initializes the MPU6050 sensor and prints its accelerometer, gyroscope, and
 5  temperature readings to the Serial Monitor at regular intervals.
 6
 7  Board: Arduino Uno R4
 8  Component: GY-87 IMU Module
 9  Library: https://github.com/adafruit/Adafruit_MPU6050  (Adafruit MPU6050 by Adafruit)
10*/
11
12// Include required libraries
13#include <Adafruit_MPU6050.h>
14#include <Adafruit_Sensor.h>
15#include <Wire.h>
16
17// Initialize sensor objects
18Adafruit_MPU6050 mpu;
19
20void setup() {
21  // Initialize the serial communication with a baud rate of 9600
22  Serial.begin(9600);
23
24  // Initialize the MPU6050 sensor (accelerometer and gyroscope)
25  initializeMPU6050();
26}
27
28void loop() {
29  // Print MPU6050 data
30  printMPU6050();
31
32  delay(500);
33}
34
35
36void initializeMPU6050() {
37  // Check if the MPU6050 sensor is detected
38  if (!mpu.begin()) {
39    Serial.println("Failed to find MPU6050 chip");
40    while (1)
41      ;  // Halt if sensor not found
42  }
43  Serial.println("MPU6050 Found!");
44
45  // set accelerometer range to +-8G
46  mpu.setAccelerometerRange(MPU6050_RANGE_8_G);
47
48  // set gyro range to +- 500 deg/s
49  mpu.setGyroRange(MPU6050_RANGE_500_DEG);
50
51  // set filter bandwidth to 21 Hz
52  mpu.setFilterBandwidth(MPU6050_BAND_21_HZ);
53
54  Serial.println("");
55  delay(100);
56}
57
58void printMPU6050() {
59
60  Serial.println();
61  Serial.println("MPU6050 ------------");
62
63  /* Get new sensor events with the readings */
64  sensors_event_t a, g, temp;
65  mpu.getEvent(&a, &g, &temp);
66
67  /* Print out the values */
68  Serial.print("Acceleration X: ");
69  Serial.print(a.acceleration.x);
70  Serial.print(", Y: ");
71  Serial.print(a.acceleration.y);
72  Serial.print(", Z: ");
73  Serial.print(a.acceleration.z);
74  Serial.println(" m/s^2");
75
76  Serial.print("Rotation X: ");
77  Serial.print(g.gyro.x);
78  Serial.print(", Y: ");
79  Serial.print(g.gyro.y);
80  Serial.print(", Z: ");
81  Serial.print(g.gyro.z);
82  Serial.println(" rad/s");
83
84  Serial.print("Temperature: ");
85  Serial.print(temp.temperature);
86  Serial.println(" degC");
87
88  Serial.println("MPU6050 ------------");
89  Serial.println();
90}
Code Analysis
Include Libraries
The
Adafruit_MPU6050,Adafruit_Sensor, andWirelibraries are included for sensor interfacing and communication.#include <Adafruit_MPU6050.h> #include <Adafruit_Sensor.h> #include <Wire.h>
Initialize Sensor Object
An object of the Adafruit_MPU6050 class is created to represent the MPU6050 sensor.
Adafruit_MPU6050 mpu;
Setup Function
Initializes serial communication and calls the function to initialize the MPU6050 sensor.
void setup() {
  Serial.begin(9600);
  initializeMPU6050();
}
Loop Function
Repeatedly calls the function to print MPU6050 data with a delay of 500 milliseconds between each call.
void loop() {
  printMPU6050();
  delay(500);
}
Initialize MPU6050 Function
Checks if the MPU6050 is connected, sets accelerometer and gyro ranges, and configures the filter bandwidth.
void initializeMPU6050() {
  // Check if the MPU6050 sensor is detected
  if (!mpu.begin()) {
    Serial.println("Failed to find MPU6050 chip");
    while (1)
      ;  // Halt if sensor not found
  }
  Serial.println("MPU6050 Found!");

  // set accelerometer range to +-8G
  mpu.setAccelerometerRange(MPU6050_RANGE_8_G);

  // set gyro range to +- 500 deg/s
  mpu.setGyroRange(MPU6050_RANGE_500_DEG);

  // set filter bandwidth to 21 Hz
  mpu.setFilterBandwidth(MPU6050_BAND_21_HZ);

  Serial.println("");
  delay(100);
}
Print MPU6050 Data Function
Reads and prints the acceleration, gyroscope, and temperature data from the MPU6050 to the Serial Monitor.
void printMPU6050() {

  Serial.println();
  Serial.println("MPU6050 ------------");

  /* Get new sensor events with the readings */
  sensors_event_t a, g, temp;
  mpu.getEvent(&a, &g, &temp);

  /* Print out the values */
  Serial.print("Acceleration X: ");
  Serial.print(a.acceleration.x);
  Serial.print(", Y: ");
  Serial.print(a.acceleration.y);
  Serial.print(", Z: ");
  Serial.print(a.acceleration.z);
  Serial.println(" m/s^2");

  Serial.print("Rotation X: ");
  Serial.print(g.gyro.x);
  Serial.print(", Y: ");
  Serial.print(g.gyro.y);
  Serial.print(", Z: ");
  Serial.print(g.gyro.z);
  Serial.println(" rad/s");

  Serial.print("Temperature: ");
  Serial.print(temp.temperature);
  Serial.println(" degC");

  Serial.println("MPU6050 ------------");
  Serial.println();
}