Note
Hello, welcome to the SunFounder Raspberry Pi & Arduino & ESP32 Enthusiasts Community on Facebook! Dive deeper into Raspberry Pi, Arduino, and ESP32 with fellow enthusiasts.
Why Join?
Expert Support: Solve post-sale issues and technical challenges with help from our community and team.
Learn & Share: Exchange tips and tutorials to enhance your skills.
Exclusive Previews: Get early access to new product announcements and sneak peeks.
Special Discounts: Enjoy exclusive discounts on our newest products.
Festive Promotions and Giveaways: Take part in giveaways and holiday promotions.
👉 Ready to explore and create with us? Click [here] and join today!
Humiture Sensor Module
Overview
Humidity and temperature are closely related from the physical quantity itself to the actual people’s life. The temperature and humidity of human environment will directly affect the thermoregulatory function and heat transfer effect of human body. It will further affect the thinking activity and mental state, thus affecting the efficiency of our study and work.
Temperature is one of the seven basic physical quantities in the International System of Units, which is used to measure the degree of hot and cold of an object. Celsius is one of the more widely used temperature scales in the world, expressed by the symbol “℃”.
Humidity is the concentration of water vapor present in the air. The relative humidity of air is commonly used in life and is expressed in %RH. Relative humidity is closely related to temperature. For a certain volume of sealed gas, the higher the temperature, the lower the relative humidity, and the lower the temperature, the higher the relative humidity.
The dht11, a digital temperature and humidity sensor, is provided in this kit. It uses a capacitive humidity sensor and thermistor to measure the surrounding air and outputs a digital signal on the data pin.
Required Components
In this project, we need the following components.
It’s definitely convenient to buy a whole kit, here’s the link:
Name |
ITEMS IN THIS KIT |
LINK |
|---|---|---|
Elite Explorer Kit |
300+ |
You can also buy them separately from the links below.
COMPONENT INTRODUCTION |
PURCHASE LINK |
|---|---|
- |
|
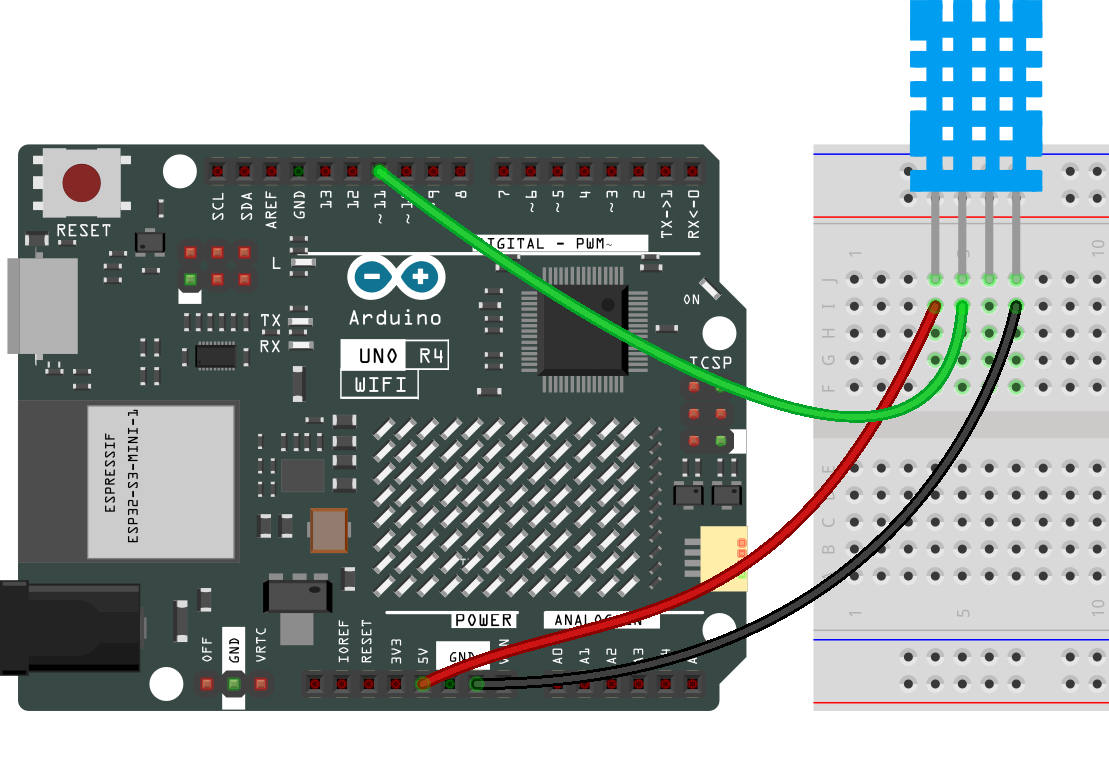
Wiring
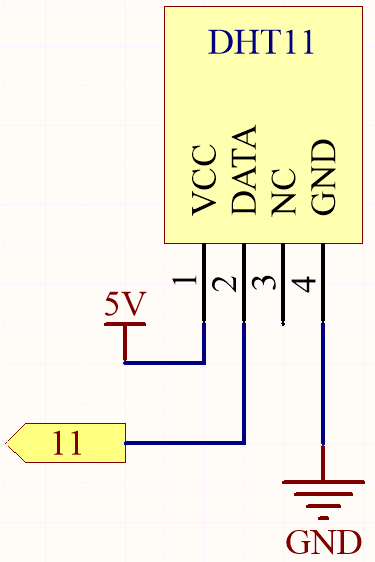
Schematic Diagram
Code
Note
You can open the file
07-humiture_sensor.inounder the path ofelite-explorer-kit-main\basic_project\07-humiture_sensordirectly.Or copy this code into Arduino IDE.
Note
To install the library, use the Arduino Library Manager and search for “DHT sensor library” and install it.
 1/*
 2  This code reads the temperature and humidity values from a DHT11 sensor
 3  connected to pin 11 and prints them to the serial monitor.
 4  It also calculates and prints the heat index value in both Celsius and Fahrenheit.
 5
 6  Board: Arduino Uno R4
 7  Component: Temperature and humidity module(DHT11)
 8  Library: https://github.com/adafruit/DHT-sensor-library  (DHT sensor library by Adafruit)
 9*/
10
11#include <DHT.h>
12
13#define DHTPIN 11       // Define the pin used to connect the sensor
14#define DHTTYPE DHT11  // Define the sensor type
15
16DHT dht(DHTPIN, DHTTYPE);  // Create a DHT object
17
18void setup() {
19  // Initialize the serial communication
20  Serial.begin(9600);
21  Serial.println(F("DHT11 test!"));
22
23  dht.begin();  // Initialize the DHT sensor
24}
25
26void loop() {
27  // Wait a few seconds between measurements.
28  delay(2000);
29
30  // Reading temperature or humidity takes about 250 milliseconds!
31  // Sensor readings may also be up to 2 seconds 'old' (its a very slow sensor)
32  float h = dht.readHumidity();
33  // Read temperature as Celsius (the default)
34  float t = dht.readTemperature();
35  // Read temperature as Fahrenheit (isFahrenheit = true)
36  float f = dht.readTemperature(true);
37
38  // Check if any reads failed and exit early (to try again).
39  if (isnan(h) || isnan(t) || isnan(f)) {
40    Serial.println(F("Failed to read from DHT sensor!"));
41    return;
42  }
43
44  // Compute heat index in Fahrenheit (the default)
45  float hif = dht.computeHeatIndex(f, h);
46  // Compute heat index in Celsius (isFahreheit = false)
47  float hic = dht.computeHeatIndex(t, h, false);
48
49  // Print the humidity, temperature, and heat index values to the serial monitor
50  Serial.print(F("Humidity: "));
51  Serial.print(h);
52  Serial.print(F("%  Temperature: "));
53  Serial.print(t);
54  Serial.print(F("°C "));
55  Serial.print(f);
56  Serial.print(F("°F  Heat index: "));
57  Serial.print(hic);
58  Serial.print(F("°C "));
59  Serial.print(hif);
60  Serial.println(F("°F"));
61}
After the code is uploaded successfully, you will see the Serial Monitor continuously print out the temperature and humidity, and as the program runs steadily, these two values will become more and more accurate.
Code Analysis
Inclusion of necessary libraries and definition of constants. This part of the code includes the DHT sensor library and defines the pin number and sensor type used in this project.
Note
To install the library, use the Arduino Library Manager and search for “DHT sensor library” and install it.
#include <DHT.h>
#define DHTPIN 11       // Define the pin used to connect the sensor
#define DHTTYPE DHT11  // Define the sensor type
Creation of DHT object. Here we create a DHT object using the defined pin number and sensor type.
DHT dht(DHTPIN, DHTTYPE); // Create a DHT object
This function is executed once when the Arduino starts. We initialize the serial communication and the DHT sensor in this function.
void setup() {
  Serial.begin(9600);
  Serial.println(F("DHT11 test!"));
  dht.begin();  // Initialize the DHT sensor
}
Main loop. The
loop()function runs continuously after the setup function. Here, we read the humidity and temperature values, calculate the heat index, and print these values to the serial monitor. If the sensor read fails (returns NaN), it prints an error message.Note
The heat index is a way to measure how hot it feels outside by combining the air temperature and the humidity. It is also called the “felt air temperature” or “apparent temperature”.
void loop() {
  delay(2000);
  float h = dht.readHumidity();
  float t = dht.readTemperature();
  float f = dht.readTemperature(true);
  if (isnan(h) || isnan(t) || isnan(f)) {
    Serial.println(F("Failed to read from DHT sensor!"));
    return;
  }
  float hif = dht.computeHeatIndex(f, h);
  float hic = dht.computeHeatIndex(t, h, false);
  Serial.print(F("Humidity: "));
  Serial.print(h);
  Serial.print(F("%  Temperature: "));
  Serial.print(t);
  Serial.print(F("°C "));
  Serial.print(f);
  Serial.print(F("°F  Heat index: "));
  Serial.print(hic);
  Serial.print(F("°C "));
  Serial.print(hif);
  Serial.println(F("°F"));
}