Note
Hello, welcome to the SunFounder Raspberry Pi & Arduino & ESP32 Enthusiasts Community on Facebook! Dive deeper into Raspberry Pi, Arduino, and ESP32 with fellow enthusiasts.
Why Join?
Expert Support: Solve post-sale issues and technical challenges with help from our community and team.
Learn & Share: Exchange tips and tutorials to enhance your skills.
Exclusive Previews: Get early access to new product announcements and sneak peeks.
Special Discounts: Enjoy exclusive discounts on our newest products.
Festive Promotions and Giveaways: Take part in giveaways and holiday promotions.
👉 Ready to explore and create with us? Click [here] and join today!
7-segment Display
Overview
A 7-segment display is a device that can display numerals and letters. It’s made up of seven LEDs connected in parallel. Different letters/numbers can be shown by connecting pins on the display to the power source and enabling the related pins, thus turning on the corresponding LED segments. In this lesson let’s learn how to display specific characters on it.
Required Components
In this project, we need the following components.
It’s definitely convenient to buy a whole kit, here’s the link:
Name |
ITEMS IN THIS KIT |
LINK |
|---|---|---|
Elite Explorer Kit |
300+ |
You can also buy them separately from the links below.
COMPONENT INTRODUCTION |
PURCHASE LINK |
|---|---|
- |
|
Wiring

Schematic Diagram
In this experiment, connect each of pin a-g of the 7-Segment Display to one 1000 ohm current limiting resistor respectively and then to pin 4-11. GND connects to GND. By programming, we can set one or several of pin4-11 as High level to light up the corresponding LED(s).

Code
Note
You can open the file
13-7_segment.inounder the path ofelite-explorer-kit-main\basic_project\13-7_segmentdirectly.Or copy this code into Arduino IDE.
  1/*
  2  The code is designed to control a 7-segment display using an Arduino.
  3  It sequentially displays numbers 1-9 and letters A-F on the 7-segment
  4  display, with each symbol displayed for one second.
  5
  6  Board: Arduino Uno R4
  7  Component: 7-segment Display
  8*/
  9
 10// Define pins for each segment of the 7-segment display
 11const int a = 7;
 12const int b = 6;
 13const int c = 5;
 14const int d = 11;
 15const int e = 10;
 16const int f = 8;
 17const int g = 9;
 18const int dp = 4;  // Decimal point
 19
 20void setup() {
 21  // Set pins 4 to 11 as output
 22  for (int thisPin = 4; thisPin <= 11; thisPin++) {
 23    pinMode(thisPin, OUTPUT);
 24  }
 25  // Initialize display by turning off all segments
 26  turnOffAllSegments();
 27}
 28
 29void loop() {
 30  // Display numbers 1 to 9 and letters A to F sequentially
 31  digital_1(); delay(1000);
 32  digital_2(); delay(1000);
 33  digital_3(); delay(1000);
 34  digital_4(); delay(1000);
 35  digital_5(); delay(1000);
 36  digital_6(); delay(1000);
 37  digital_7(); delay(1000);
 38  digital_8(); delay(1000);
 39  digital_9(); delay(1000);
 40  digital_A(); delay(1000);
 41  digital_b(); delay(1000);
 42  digital_C(); delay(1000);
 43  digital_d(); delay(1000);
 44  digital_E(); delay(1000);
 45  digital_F(); delay(1000);
 46}
 47
 48void digital_1()  //display 1 to the 7-segment
 49{
 50  turnOffAllSegments();
 51  digitalWrite(b, HIGH);
 52  digitalWrite(c, HIGH);
 53}
 54
 55void digital_2()  //display 2 to the 7-segment
 56{
 57  turnOffAllSegments();
 58  digitalWrite(a, HIGH);
 59  digitalWrite(b, HIGH);
 60  digitalWrite(g, HIGH);
 61  digitalWrite(e, HIGH);
 62  digitalWrite(d, HIGH);
 63}
 64
 65void digital_3()  //display 3 to the 7-segment
 66{
 67  turnOffAllSegments();
 68  digitalWrite(a, HIGH);
 69  digitalWrite(b, HIGH);
 70  digitalWrite(c, HIGH);
 71  digitalWrite(d, HIGH);
 72  digitalWrite(g, HIGH);
 73}
 74void digital_4()  //display 4 to the 7-segment
 75{
 76  turnOffAllSegments();
 77  digitalWrite(b, HIGH);
 78  digitalWrite(c, HIGH);
 79  digitalWrite(f, HIGH);
 80  digitalWrite(g, HIGH);
 81}
 82
 83void digital_5()  //display 5 to the 7-segment
 84{
 85  turnOffAllSegments();
 86  digitalWrite(a, HIGH);
 87  digitalWrite(f, HIGH);
 88  digitalWrite(g, HIGH);
 89  digitalWrite(c, HIGH);
 90  digitalWrite(d, HIGH);
 91}
 92
 93void digital_6()  //display 6 to the 7-segment
 94{
 95  turnOffAllSegments();
 96  digitalWrite(a, HIGH);
 97  digitalWrite(f, HIGH);
 98  digitalWrite(e, HIGH);
 99  digitalWrite(d, HIGH);
100  digitalWrite(c, HIGH);
101  digitalWrite(g, HIGH);
102}
103
104void digital_7()  //display 7 to the 7-segment
105{
106  turnOffAllSegments();
107  digitalWrite(a, HIGH);
108  digitalWrite(b, HIGH);
109  digitalWrite(c, HIGH);
110}
111
112void digital_8()  //display 8 to the 7-segment
113{
114  turnOffAllSegments();
115  digitalWrite(a, HIGH);
116  digitalWrite(b, HIGH);
117  digitalWrite(c, HIGH);
118  digitalWrite(d, HIGH);
119  digitalWrite(e, HIGH);
120  digitalWrite(f, HIGH);
121  digitalWrite(g, HIGH);
122}
123
124void digital_9()  //display 9 to the 7-segment
125{
126  turnOffAllSegments();
127  digitalWrite(a, HIGH);
128  digitalWrite(b, HIGH);
129  digitalWrite(c, HIGH);
130  digitalWrite(d, HIGH);
131  digitalWrite(f, HIGH);
132  digitalWrite(g, HIGH);
133}
134
135void digital_A()  //display A to the 7-segment
136{
137  turnOffAllSegments();
138  digitalWrite(a, HIGH);
139  digitalWrite(b, HIGH);
140  digitalWrite(c, HIGH);
141  digitalWrite(e, HIGH);
142  digitalWrite(f, HIGH);
143  digitalWrite(g, HIGH);
144}
145
146void digital_b()  //display b to the 7-segment
147{
148  turnOffAllSegments();
149  digitalWrite(c, HIGH);
150  digitalWrite(d, HIGH);
151  digitalWrite(e, HIGH);
152  digitalWrite(f, HIGH);
153  digitalWrite(g, HIGH);
154}
155
156void digital_C()  //display C to the 7-segment
157{
158  turnOffAllSegments();
159  digitalWrite(a, HIGH);
160  digitalWrite(f, HIGH);
161  digitalWrite(e, HIGH);
162  digitalWrite(d, HIGH);
163}
164
165void digital_d()  //display d to the 7-segment
166{
167  turnOffAllSegments();
168  digitalWrite(b, HIGH);
169  digitalWrite(c, HIGH);
170  digitalWrite(d, HIGH);
171  digitalWrite(e, HIGH);
172  digitalWrite(g, HIGH);
173}
174
175void digital_E()  //display E to the 7-segment
176{
177  turnOffAllSegments();
178  digitalWrite(a, HIGH);
179  digitalWrite(d, HIGH);
180  digitalWrite(e, HIGH);
181  digitalWrite(f, HIGH);
182  digitalWrite(g, HIGH);
183}
184
185void digital_F()  //display F to the 7-segment
186{
187  turnOffAllSegments();
188  digitalWrite(a, HIGH);
189  digitalWrite(e, HIGH);
190  digitalWrite(f, HIGH);
191  digitalWrite(g, HIGH);
192}
193
194void turnOffAllSegments() {
195  // Turn off all segments of the 7-segment display
196  for (int thisPin = 4; thisPin <= 11; thisPin++) {
197    digitalWrite(thisPin, LOW);
198  }
199}
Code Analysis
The code may be a little long for this experiment. But the syntax is simple. Let’s take a look.
Call the function in loop()
digital_1(); //display 1 to the 7-segment

delay(1000); //wait for a second

digital_2(); //display 2 to the 7-segment

delay(1000); //wait for a second

digital_3(); //display 3 to the 7-segment

delay(1000); //wait for a second

digital_4(); //display 4 to the 7-segment
Calling these functions into the loop() is to let the 7-Segment display 0-F. The functions are shown below. Take digital_2() for example:
Detailed analysis of digital_2()
void digital_2()  //display 2 to the 7-segment
{
  turnOffAllSegments();
  digitalWrite(a, HIGH);
  digitalWrite(b, HIGH);
  digitalWrite(g, HIGH);
  digitalWrite(e, HIGH);
  digitalWrite(d, HIGH);
}
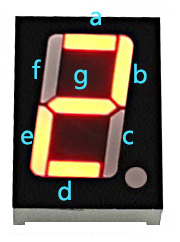
First, we need to understand how the numeral 2 appears on the 7-Segment display. It is achieved by powering on segments a, b, d, e, and g. In programming, pins connected to these segments are set to a High level while c and f are set to Low level. We start by using the function turnOffAllSegments() to turn off all segments and then light up the required ones.
After running this part, the 7-segment will display 2. Similarly, the display of other characters are the same. Since the letters b and d in upper case, namely B and D, would look the same with 8 and 0 on the display, they are displayed in lower case instead.