Note
Hello, welcome to the SunFounder Raspberry Pi & Arduino & ESP32 Enthusiasts Community on Facebook! Dive deeper into Raspberry Pi, Arduino, and ESP32 with fellow enthusiasts.
Why Join?
Expert Support: Solve post-sale issues and technical challenges with help from our community and team.
Learn & Share: Exchange tips and tutorials to enhance your skills.
Exclusive Previews: Get early access to new product announcements and sneak peeks.
Special Discounts: Enjoy exclusive discounts on our newest products.
Festive Promotions and Giveaways: Take part in giveaways and holiday promotions.
👉 Ready to explore and create with us? Click [here] and join today!
I2C LCD1602
Overview
In this lesson, you will learn about Liquid Crystal Displays (LCDs) with an I2C interface. These types of LCDs are widely used in a variety of electronic devices, such as digital clocks, microwave ovens, car dashboards, and even industrial equipment. The I2C interface simplifies the wiring and connections, making it more convenient and efficient for hobbyists and professionals alike.
Required Components
In this project, we need the following components.
It’s definitely convenient to buy a whole kit, here’s the link:
Name |
ITEMS IN THIS KIT |
LINK |
|---|---|---|
Elite Explorer Kit |
300+ |
You can also buy them separately from the links below.
COMPONENT INTRODUCTION |
PURCHASE LINK |
|---|---|
- |
|
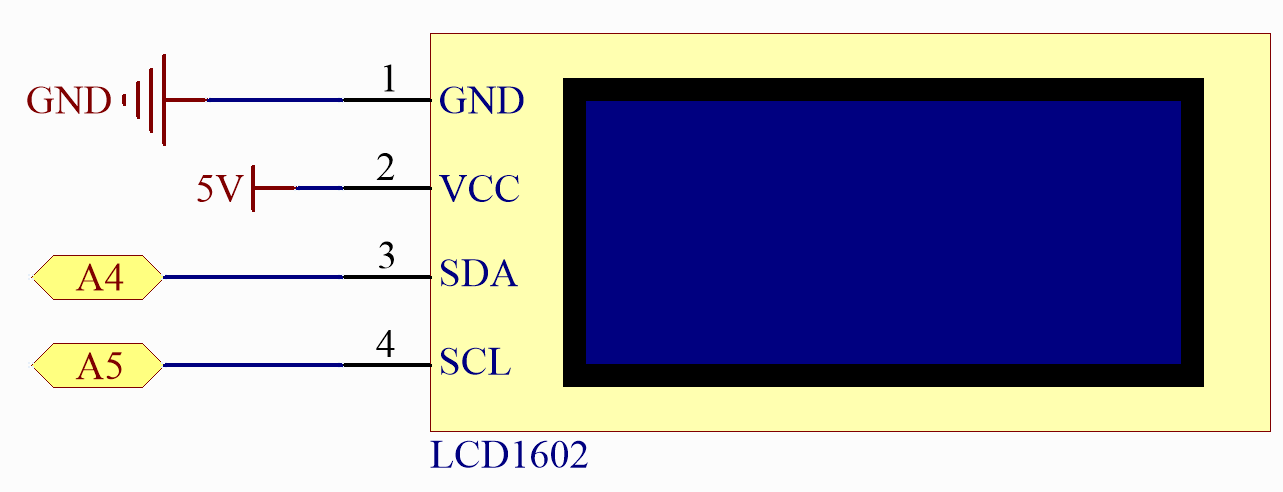
Wiring
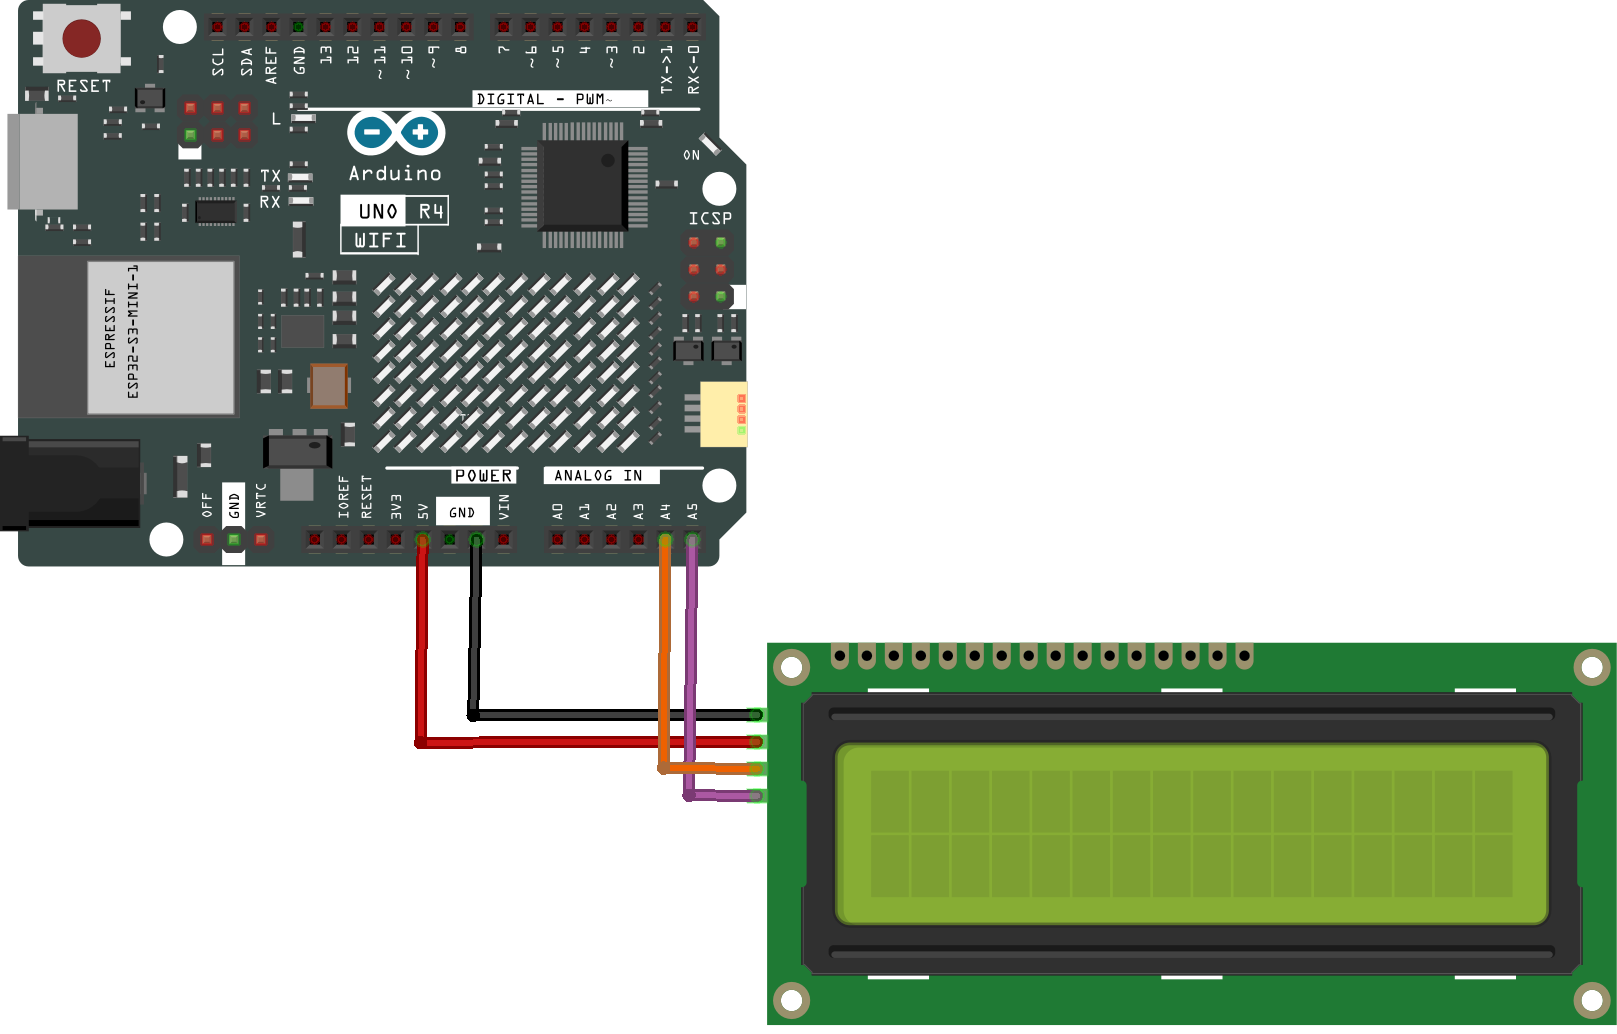
Schematic Diagram
Code
Note
You can open the file
14-i2c_lcd.inounder the path ofelite-explorer-kit-main\basic_project\14-i2c_lcddirectly.Or copy this code into Arduino IDE.
Note
To install the library, use the Arduino Library Manager and search for “LiquidCrystal I2C” and install it.
 1/*
 2  This code initializes and sets up a Liquid Crystal Display 16x2 with an I2C interface
 3  using the LiquidCrystal I2C library. And prints "Hello world!" and "LCD Tutorial" on the
 4  first and second lines of the display.
 5
 6  Board: Arduino Uno R4
 7  Component:  Liquid Crystal Display 1602 with I2C Interface
 8  Library: https://www.arduino.cc/reference/en/libraries/liquidcrystal-i2c/ (LiquidCrystal I2C by Frank de Brabander)
 9*/
10
11#include <LiquidCrystal_I2C.h>
12
13LiquidCrystal_I2C lcd(0x27, 16, 2);  // initialize the Liquid Crystal Display object with the I2C address 0x27, 16 columns and 2 rows
14
15void setup() {
16  lcd.init();       // initialize the LCD
17  lcd.clear();      // clear the LCD display
18  lcd.backlight();  // Make sure backlight is on
19
20  // Print a message on both lines of the LCD.
21  lcd.setCursor(2, 0);  //Set cursor to character 2 on line 0
22  lcd.print("Hello world!");
23
24  lcd.setCursor(2, 1);  //Move cursor to character 2 on line 1
25  lcd.print("LCD Tutorial");
26}
27
28void loop() {
29}
After the code is uploaded successfully to the Arduino, the Liquid Crystal Display (LCD) will show the message “Hello world!” on its first line and “LCD Tutorial” on its second line.
Note
If the LCD does not display any characters after uploading the code, you can adjust the contrast by rotating the potentiometer on the I2C module until the LCD functions correctly.
Code Analysis
Library Inclusion and LCD Initialization: The LiquidCrystal I2C library is included to provide functions and methods for LCD interfacing. Following that, an LCD object is created using the LiquidCrystal_I2C class, specifying the I2C address, number of columns, and number of rows.
Note
To install the library, use the Arduino Library Manager and search for “LiquidCrystal I2C” and install it.
#include <LiquidCrystal_I2C.h>
LiquidCrystal_I2C lcd(0x27, 16, 2);
Setup Function: The
setup()function is executed once when the Arduino starts. In this function, the LCD is initialized, cleared, and the backlight is turned on. Then, two messages are displayed on the LCD.void setup() { lcd.init(); // initialize the LCD lcd.clear(); // clear the LCD display lcd.backlight(); // Make sure backlight is on // Print a message on both lines of the LCD. lcd.setCursor(2, 0); //Set cursor to character 2 on line 0 lcd.print("Hello world!"); lcd.setCursor(2, 1); //Move cursor to character 2 on line 1 lcd.print("LCD Tutorial"); }