Note
Hello, welcome to the SunFounder Raspberry Pi & Arduino & ESP32 Enthusiasts Community on Facebook! Dive deeper into Raspberry Pi, Arduino, and ESP32 with fellow enthusiasts.
Why Join?
Expert Support: Solve post-sale issues and technical challenges with help from our community and team.
Learn & Share: Exchange tips and tutorials to enhance your skills.
Exclusive Previews: Get early access to new product announcements and sneak peeks.
Special Discounts: Enjoy exclusive discounts on our newest products.
Festive Promotions and Giveaways: Take part in giveaways and holiday promotions.
👉 Ready to explore and create with us? Click [here] and join today!
Ultrasonic
Overview
When you are reversing, you will see the distance between the car and the surrounding obstacles to avoid collision. The device for detecting the distance is an ultrasonic sensor. In this experiment, you will learn how the ultrasonic wave detects the distance.
Required Components
In this project, we need the following components.
It’s definitely convenient to buy a whole kit, here’s the link:
Name |
ITEMS IN THIS KIT |
LINK |
|---|---|---|
Elite Explorer Kit |
300+ |
You can also buy them separately from the links below.
COMPONENT INTRODUCTION |
PURCHASE LINK |
|---|---|
- |
|
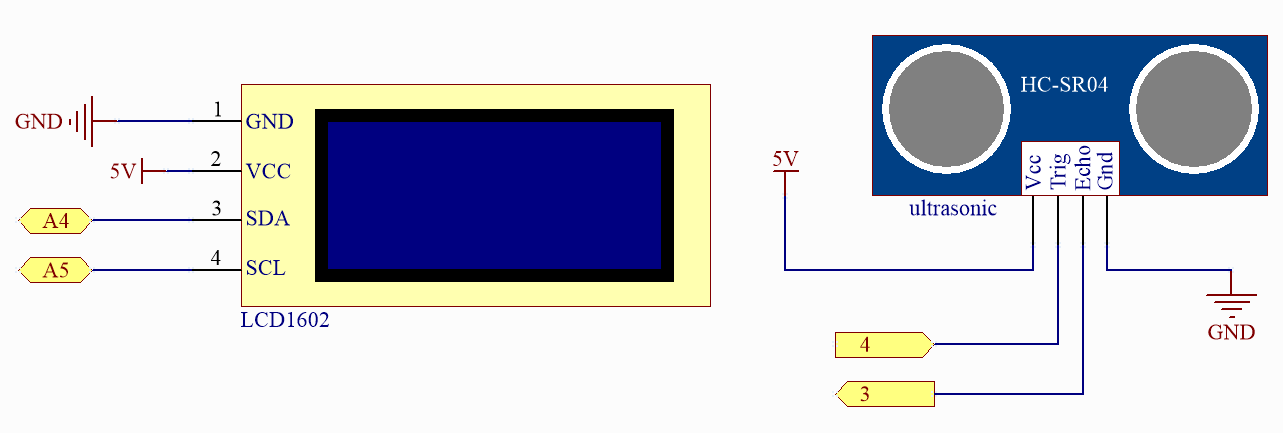
Wiring
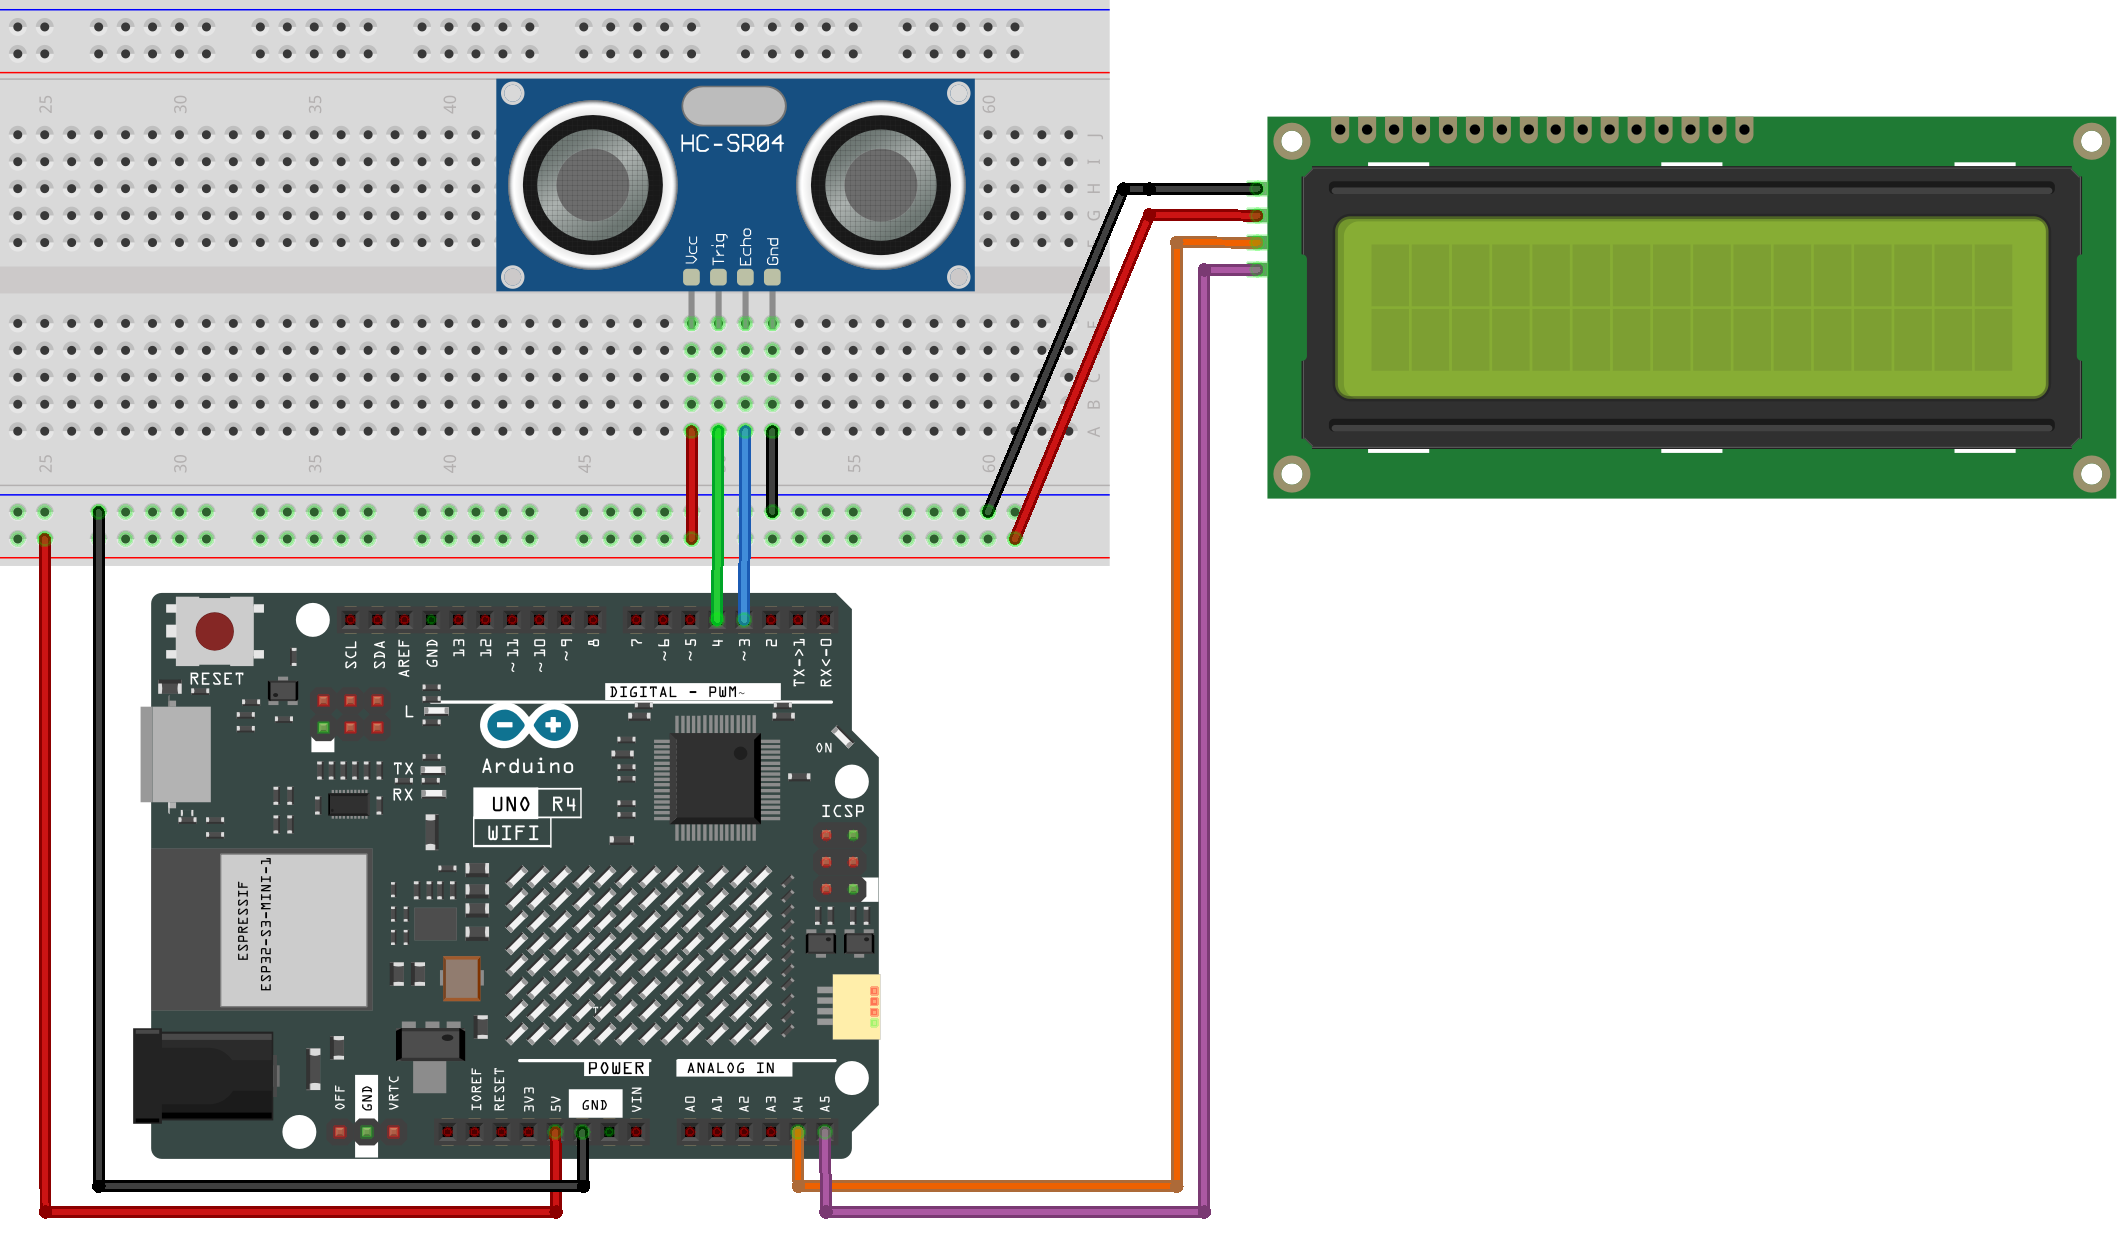
Schematic Diagram
Code
Note
You can open the file
06-ultrasonic.inounder the path ofelite-explorer-kit-main\basic_project\06-ultrasonicdirectly.Or copy this code into Arduino IDE.
 1/*
 2  This code read the distance from an ultrasonic sensor and display it on
 3  an LCD screen. It uses an Arduino Uno R4 board and a 16x2 Liquid Crystal
 4  Display (LCD) connected via I2C. The ultrasonic sensor is connected to
 5  pins 3 and 4 for echo and trigger, respectively.
 6
 7  Board: Arduino Uno R4
 8  Component: Ultrasonic Module
 9*/
10
11#include <LiquidCrystal_I2C.h>
12
13LiquidCrystal_I2C lcd(0x27, 16, 2);  // initialize the Liquid Crystal Display object with the I2C address 0x27, 16 columns and 2 rows
14
15// Define the pin numbers for the ultrasonic sensor
16const int echoPin = 3;
17const int trigPin = 4;
18
19void setup() {
20  pinMode(echoPin, INPUT);   // Set echo pin as input
21  pinMode(trigPin, OUTPUT);  // Set trig pin as output
22
23  lcd.init();       // initialize the LCD
24  lcd.clear();      // clear the LCD display
25  lcd.backlight();  // Make sure backlight is on
26}
27
28void loop() {
29  float distance = readDistance();  // Call the function to read the sensor data and get the distance
30
31  lcd.setCursor(0, 0);           //Place the cursor at Line 1, Column 1. From here the characters are to be displayed
32  lcd.print("Distance:");        ////Print Distance: on the LCD
33  lcd.setCursor(0, 1);           //Set the cursor at Line 1, Column 0
34  lcd.print("               ");  //Here is to leave some spaces after the characters so as to clear the previous characters that may still remain.
35  lcd.setCursor(7, 1);           //Set the cursor at Line 1, Column 7.
36  lcd.print(distance);           // print on the LCD the value of the distance converted from the time between ping sending and receiving.
37  lcd.setCursor(14, 1);          //Set the cursor at Line 1, Column 14.
38  lcd.print("cm");               //print the unit "cm"
39
40  delay(800);  // Delay for 800 milliseconds before repeating the loop
41}
42
43// Function to read the sensor data and calculate the distance
44float readDistance() {
45  digitalWrite(trigPin, LOW);   // Set trig pin to low to ensure a clean pulse
46  delayMicroseconds(2);         // Delay for 2 microseconds
47  digitalWrite(trigPin, HIGH);  // Send a 10 microsecond pulse by setting trig pin to high
48  delayMicroseconds(10);
49  digitalWrite(trigPin, LOW);  // Set trig pin back to low
50
51  // Measure the pulse width of the echo pin and calculate the distance value
52  float distance = pulseIn(echoPin, HIGH) / 58.00;  // Formula: (340m/s * 1us) / 2
53  return distance;
54}
Code Analysis
1. Initialize the ultrasonic sensor and LCD1602
#include <LiquidCrystal_I2C.h>

LiquidCrystal_I2C lcd(0x27, 16, 2);  // initialize the Liquid Crystal Display object with the I2C address 0x27, 16 columns and 2 rows

// Define the pin numbers for the ultrasonic sensor
const int echoPin = 3;
const int trigPin = 4;

void setup() {
  pinMode(echoPin, INPUT);               // Set echo pin as input
  pinMode(trigPin, OUTPUT);              // Set trig pin as output

  lcd.init();       // initialize the LCD
  lcd.clear();      // clear the LCD display
  lcd.backlight();  // Make sure backlight is on

}
2. Display the distance on the LCD1602
void loop() {
  float distance = readDistance();  // Call the function to read the sensor data and get the distance

  lcd.setCursor(0, 0);         //Place the cursor at Line 1, Column 1. From here the characters are to be displayed
  lcd.print("Distance:");      ////Print Distance: on the LCD
  lcd.setCursor(0, 1);         //Set the cursor at Line 1, Column 0
  lcd.print("               ");  //Here is to leave some spaces after the characters so as to clear the previous characters that may still remain.
  lcd.setCursor(7, 1);         //Set the cursor at Line 1, Column 7.
  lcd.print(distance);         // print on the LCD the value of the distance converted from the time between ping sending and receiving.
  lcd.setCursor(14, 1);        //Set the cursor at Line 1, Column 14.
  lcd.print("cm");             //print the unit "cm"

  delay(800);                       // Delay for 800 milliseconds before repeating the loop
}
3. Convert the time to distance
float readDistance(){// ...}Here, “PING” refers to the process where the ultrasonic sensor sends out an ultrasonic pulse (or “ping”) and then waits for its echo.
PING is triggered by a HIGH pulse of 2 or more microseconds. (Give a short LOW pulse beforehand to ensure a clean HIGH pulse.)
digitalWrite(trigPin, LOW);
delayMicroseconds(2);
digitalWrite(trigPin, HIGH);
delayMicroseconds(10);
digitalWrite(trigPin, LOW);
The echo pin is used to read signal from PING, a HIGH pulse whose duration is the time (in microseconds) from the sending of the ping to the reception of echo of the object. We use the following function to obtain the duration.
pulseIn(echoPin, HIGH);The speed of sound is 340 m/s or 29 microseconds per centimeter.
This gives the distance travelled by the ping, outbound and return, so we divide by 2 to get the distance of the obstacle.
float distance = pulseIn(echoPin, HIGH) / 29.00 / 2; // Formula: (340m/s * 1us) / 2