Note
Hello, welcome to the SunFounder Raspberry Pi & Arduino & ESP32 Enthusiasts Community on Facebook! Dive deeper into Raspberry Pi, Arduino, and ESP32 with fellow enthusiasts.
Why Join?
Expert Support: Solve post-sale issues and technical challenges with help from our community and team.
Learn & Share: Exchange tips and tutorials to enhance your skills.
Exclusive Previews: Get early access to new product announcements and sneak peeks.
Special Discounts: Enjoy exclusive discounts on our newest products.
Festive Promotions and Giveaways: Take part in giveaways and holiday promotions.
👉 Ready to explore and create with us? Click [here] and join today!
RFID-RC522 Module
Overview
In this lesson, you will learn how to use an RFID Module. RFID stands for Radio Frequency Identification. Its principle of operation involves contactless data communication between the reader and the label to identify the target. The applications of RFID are extensive, including animal chips, immobilizers, access control, parking control, production chain automation, material management, and more.
Required Components
In this project, we need the following components.
It’s definitely convenient to buy a whole kit, here’s the link:
Name |
ITEMS IN THIS KIT |
LINK |
|---|---|---|
Elite Explorer Kit |
300+ |
You can also buy them separately from the links below.
COMPONENT INTRODUCTION |
PURCHASE LINK |
|---|---|
- |
|
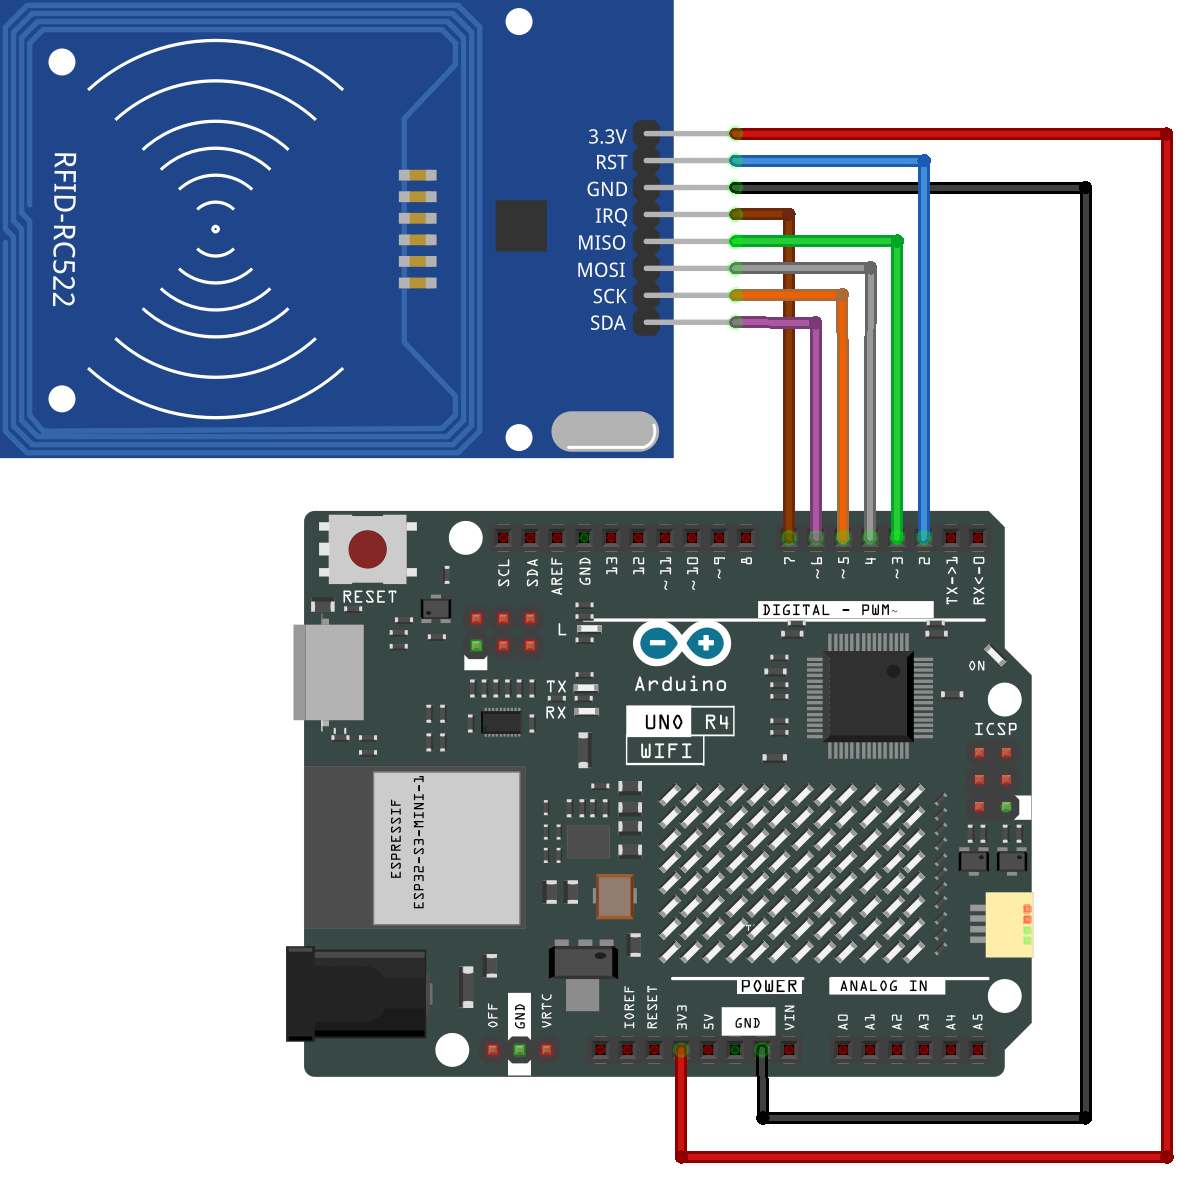
Fritzing Circuit
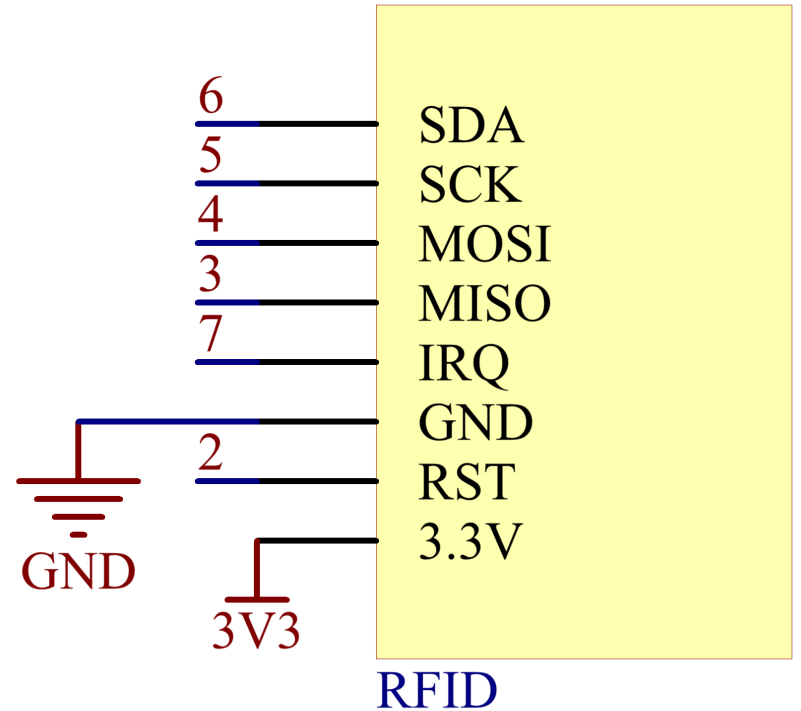
In this example, we insert the RFID into the breadboard. Get the 3.3V of RFID connected to 3.3V, GND to GND, RST to pin 2, SDA to pin 6, SCK to pin 5, MOSI to pin 4, MISO to pin 3 and IRQ to pin 7.
Schematic Diagram
Code
Note
You can open the file
08-mfrc522.inounder the path ofelite-explorer-kit-main\basic_project\08-mfrc522directly.The
RFID1library is used here. The library can be found in theelite-explorer-kit-main/library/directory, or you can click hereRFID1.zipto download it. Refer to Manual Installation for a tutorial on how to install it.
 1/*
 2  The code is designed for an Arduino system to interface with an RFID-RC522 Module
 3  using the "RFID1" library. It initializes the RFID module and continuously scans for
 4  RFID cards. When a card is detected, the code prints the card type and its 4-byte
 5  serial number to the serial monitor.
 6
 7  Board: Arduino Uno R4
 8  Component: RFID-RC522 Module
 9*/
10
11#include "rfid1.h"  // Include RFID1 library
12RFID1 rfid;         // Create an instance of the RFID1 class
13
14void setup() {
15  Serial.begin(9600);  // Initialize serial communication at 9600 baud
16  // Initialize the RFID reader with pin configuration
17  rfid.begin(7, 5, 4, 3, 6, 2);  // IRQ_PIN, SCK_PIN, MOSI_PIN, MISO_PIN, SDA_PIN, RST_PIN
18  delay(100);                    // Delay for 100 milliseconds
19  rfid.init();                   // Initialize the RFID module
20}
21
22void loop() {
23  uchar status;        // Status variable to hold the state of RFID functions
24  uchar str[MAX_LEN];  // Create an array to hold the RFID card data; maximum length is 16
25
26  // Search for an RFID card and get its type
27  status = rfid.request(PICC_REQIDL, str);
28  if (status != MI_OK) {
29    return;  // If no card is found, return to the beginning of loop()
30  }
31  Serial.print("Card type: ");
32  Serial.println(rfid.readCardType(str));  // Print the card type to the serial monitor
33
34  // Prevent RFID card collision and get the 4-byte serial number of the card
35  status = rfid.anticoll(str);
36  if (status == MI_OK) {
37    Serial.print("The card's number is: ");
38    int IDlen = 4;  // Length of the card's serial number
39    for (int i = 0; i < IDlen; i++) {
40      Serial.print(str[i], HEX);  // Print each byte of the card's serial number
41    }
42    Serial.println();
43    Serial.println();  // Print an empty line for better readability
44  }
45
46  delay(500);   // Delay for 500 milliseconds
47  rfid.halt();  // Put the card into sleep mode
48}
Uploaded the codes to the uno board, you can get your RFID card (secret key) close to the RFID Reader. The module will read the card information and then print it on the serial monitor.
Code Analysis
The functions of the module are included in the library rfid1.h.
#include <rfid1.h>
Library Functions:
RFID1 rfid;
Create a new instance of the rfid1 class that represents a particular RFID module attached to your Arduino .
void begin(IRQ_PIN,SCK_PIN,MOSI_PIN,MISO_PIN,SDA_PIN,RST_PIN)
Pin configuration.
IRQ_PIN,SCK_PIN,MOSI_PIN,MISO_PIN: the pins used for the SPI communication.SDA_PIN: Synchronous data adapter.RST_PIN: The pins used for reset.
void init()
Initialize the RFID.
uchar request(uchar reqMode, uchar *TagType);
Search card and read card type, and the function will return the current read status of RFID and return MI_OK if succeeded.
reqMode: Search methods. PICC_REQIDL is defined that 0x26 command bits (Search the cards that does not in the sleep mode in the antenna area).*TagType: It is used to store card type, and its value can be 4byte (e.g. 0x0400).
char * readCardType(uchar *TagType)
This function decodes the four-digit hexadecimal number of *tagType
into the specific card type and returns a string. If passed 0x0400,
“MFOne-S50” will be returned.
uchar anticoll(uchar *serNum);
Prevent conflict, and read the card serial number. The function will return the current reading status of RFID. It returns MI_OK if succeeded.
*serNum: It is used to store the card serial number, and return the 4 bytes card serial number. The 5th byte is recheck byte(e.g. e.g. my magnetic card ID is 5AE4C955).