Note
Hello, welcome to the SunFounder Raspberry Pi & Arduino & ESP32 Enthusiasts Community on Facebook! Dive deeper into Raspberry Pi, Arduino, and ESP32 with fellow enthusiasts.
Why Join?
Expert Support: Solve post-sale issues and technical challenges with help from our community and team.
Learn & Share: Exchange tips and tutorials to enhance your skills.
Exclusive Previews: Get early access to new product announcements and sneak peeks.
Special Discounts: Enjoy exclusive discounts on our newest products.
Festive Promotions and Giveaways: Take part in giveaways and holiday promotions.
👉 Ready to explore and create with us? Click [here] and join today!
Passive Buzzer
Overview
In this project, use these two functions to make the passive buzzer vibrate and produce sound. The function tone() generates a square wave with a specified frequency (and 50% duty cycle) on a pin. A duration can be specified, or the wave continues until noTone() is called.
Similar to the active buzzer, the passive buzzer also utilizes electromagnetic induction to operate.
The difference is that a passive buzzer does not have its own oscillating source, so it will not emit sound if DC signals are used.However, this allows the passive buzzer to adjust its own oscillation frequency and produce different notes such as “do, re, mi, fa, sol, la, ti”.
Required Components
In this project, we need the following components.
It’s definitely convenient to buy a whole kit, here’s the link:
Name |
ITEMS IN THIS KIT |
LINK |
|---|---|---|
Elite Explorer Kit |
300+ |
You can also buy them separately from the links below.
COMPONENT INTRODUCTION |
PURCHASE LINK |
|---|---|
- |
|
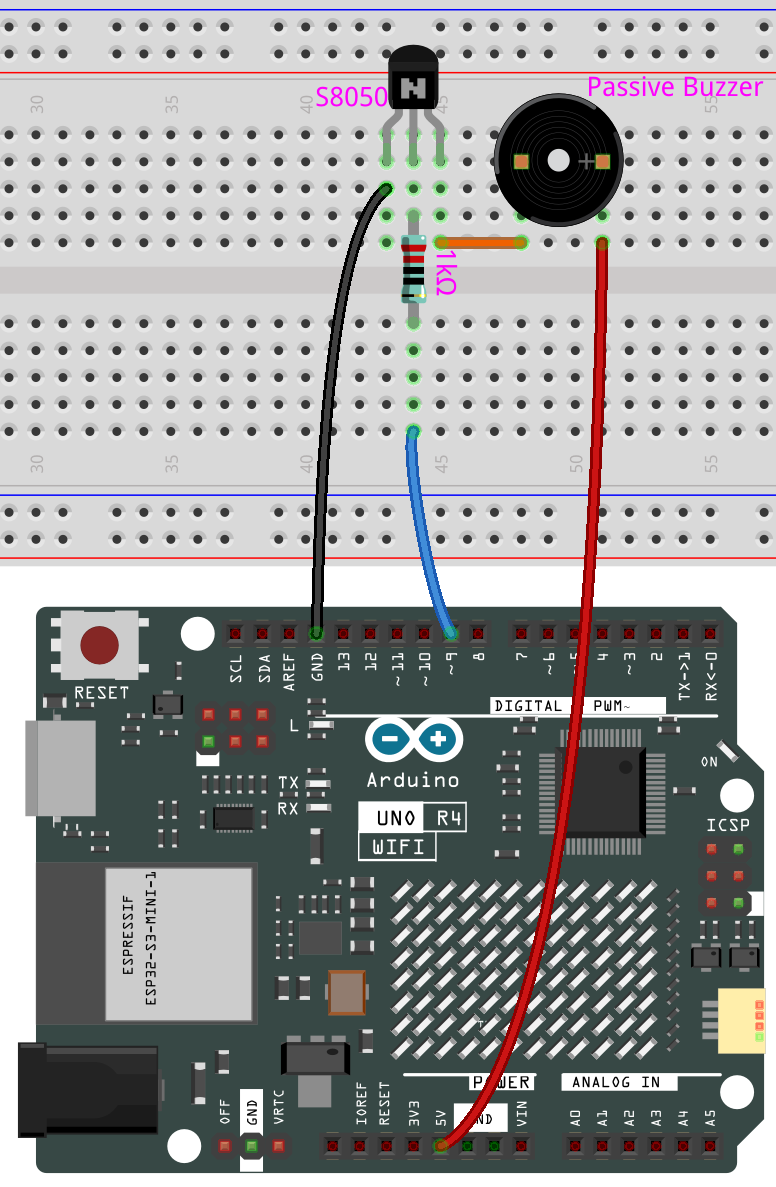
Wiring
Note
When connecting the buzzer, make sure to check its pins. The longer pin is the anode and the shorter one is the cathode. It’s important not to mix them up, as doing so will prevent the buzzer from producing any sound.
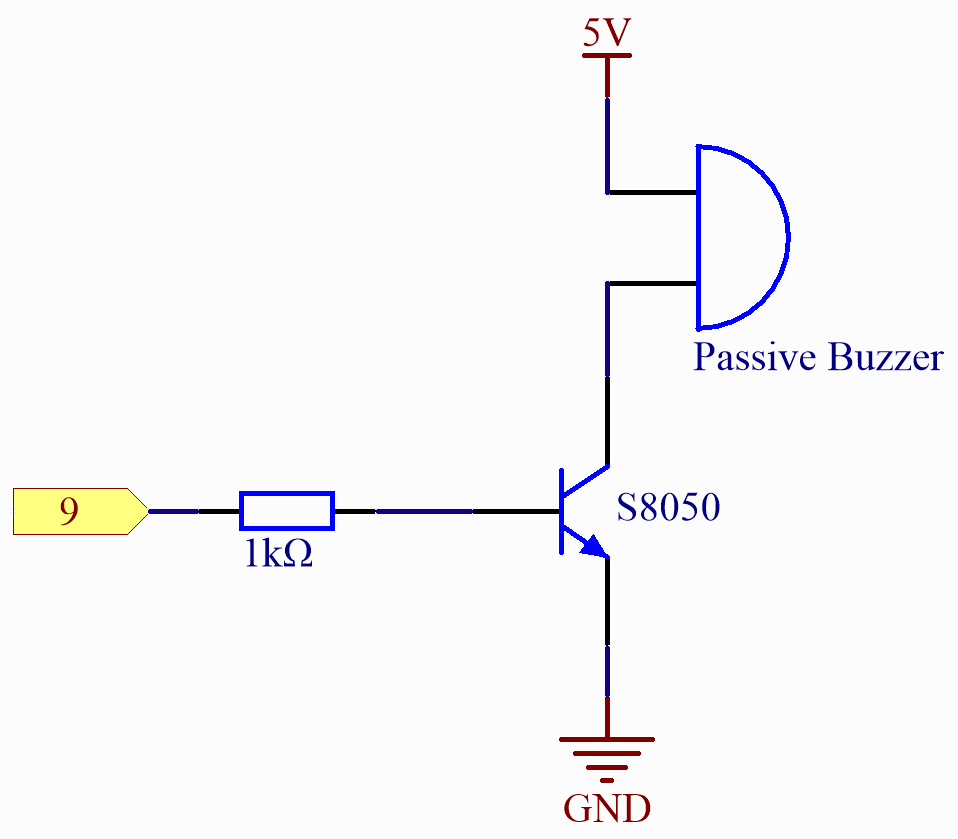
Schematic Diagram
Code
Note
You can open the file
16-passive_buzzer.inounder the path ofelite-explorer-kit-main\basic_project\16-passive_buzzerdirectly.Or copy this code into Arduino IDE.
The
pitches.hfile is also required — place it in the same directory.
/*****************
Public Constants
*****************/
#define NOTE_B0  31
#define NOTE_C1  33
#define NOTE_CS1 35
#define NOTE_D1  37
#define NOTE_DS1 39
#define NOTE_E1  41
#define NOTE_F1  44
#define NOTE_FS1 46
#define NOTE_G1  49
#define NOTE_GS1 52
#define NOTE_A1  55
#define NOTE_AS1 58
#define NOTE_B1  62
#define NOTE_C2  65
#define NOTE_CS2 69
#define NOTE_D2  73
#define NOTE_DS2 78
#define NOTE_E2  82
#define NOTE_F2  87
#define NOTE_FS2 93
#define NOTE_G2  98
#define NOTE_GS2 104
#define NOTE_A2  110
#define NOTE_AS2 117
#define NOTE_B2  123
#define NOTE_C3  131
#define NOTE_CS3 139
#define NOTE_D3  147
#define NOTE_DS3 156
#define NOTE_E3  165
#define NOTE_F3  175
#define NOTE_FS3 185
#define NOTE_G3  196
#define NOTE_GS3 208
#define NOTE_A3  220
#define NOTE_AS3 233
#define NOTE_B3  247
#define NOTE_C4  262
#define NOTE_CS4 277
#define NOTE_D4  294
#define NOTE_DS4 311
#define NOTE_E4  330
#define NOTE_F4  349
#define NOTE_FS4 370
#define NOTE_G4  392
#define NOTE_GS4 415
#define NOTE_A4  440
#define NOTE_AS4 466
#define NOTE_B4  494
#define NOTE_C5  523
#define NOTE_CS5 554
#define NOTE_D5  587
#define NOTE_DS5 622
#define NOTE_E5  659
#define NOTE_F5  698
#define NOTE_FS5 740
#define NOTE_G5  784
#define NOTE_GS5 831
#define NOTE_A5  880
#define NOTE_AS5 932
#define NOTE_B5  988
#define NOTE_C6  1047
#define NOTE_CS6 1109
#define NOTE_D6  1175
#define NOTE_DS6 1245
#define NOTE_E6  1319
#define NOTE_F6  1397
#define NOTE_FS6 1480
#define NOTE_G6  1568
#define NOTE_GS6 1661
#define NOTE_A6  1760
#define NOTE_AS6 1865
#define NOTE_B6  1976
#define NOTE_C7  2093
#define NOTE_CS7 2217
#define NOTE_D7  2349
#define NOTE_DS7 2489
#define NOTE_E7  2637
#define NOTE_F7  2794
#define NOTE_FS7 2960
#define NOTE_G7  3136
#define NOTE_GS7 3322
#define NOTE_A7  3520
#define NOTE_AS7 3729
#define NOTE_B7  3951
#define NOTE_C8  4186
#define NOTE_CS8 4435
#define NOTE_D8  4699
#define NOTE_DS8 49
 1/*
 2  This code plays a melody on a passive buzzer module connected to an Arduino Uno board.
 3  The melody is played once in the setup() function and consists of eight notes with
 4  different durations.
 5
 6  Board: Arduino Uno R4
 7  Component: Passive buzzer module
 8*/
 9
10#include "pitches.h"
11
12const int buzzerPin = 9;
13
14// notes in the melody:
15int melody[] = {
16  NOTE_C4, NOTE_G3, NOTE_G3, NOTE_A3, NOTE_G3, 0, NOTE_B3, NOTE_C4
17};
18
19// note durations: 4 = quarter note, 8 = eighth note, etc.:
20int noteDurations[] = {
21  4, 8, 8, 4, 4, 4, 4, 4
22};
23
24void setup() {
25  // iterate over the notes of the melody:
26  for (int thisNote = 0; thisNote < 8; thisNote++) {
27    // to calculate the note duration, take one second divided by the note type.
28    //e.g. quarter note = 1000 / 4, eighth note = 1000/8, etc.
29    int noteDuration = 1000 / noteDurations[thisNote];
30    tone(buzzerPin, melody[thisNote], noteDuration);
31    // to distinguish the notes, set a minimum time between them.
32    // the note's duration + 30% seems to work well:
33    int pauseBetweenNotes = noteDuration * 1.30;
34    delay(pauseBetweenNotes);
35    // stop the tone playing:
36    noTone(buzzerPin);
37  }
38}
39
40void loop() {
41  // no need to repeat the melody.
42}
At the time when you finish uploading the codes to the R4 board, you can hear a melody containing seven notes.
Code Analysis
Including the pitches library: This library provides the frequency values for various musical notes, allowing you to use musical notation in your code.
Note
Please place the
pitches.hfile in the same directory as the code to ensure proper functioning. pitches.h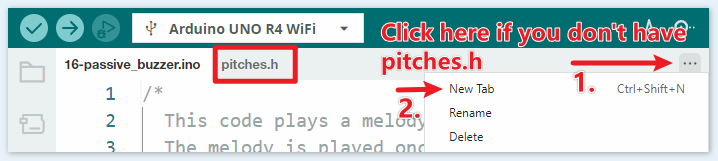
#include "pitches.h"
Defining constants and arrays:
buzzerPinis the digital pin on the Arduino where the buzzer is connected.melody[]is an array that stores the sequence of notes to be played.noteDurations[]is an array that stores the duration of each note in the melody.
const int buzzerPin = 8;
int melody[] = {
  NOTE_C4, NOTE_G3, NOTE_G3, NOTE_A3, NOTE_G3, 0, NOTE_B3, NOTE_C4
};
int noteDurations[] = {
  4, 8, 8, 4, 4, 4, 4, 4
};
Playing the melody:
The
forloop iterates over each note in the melody.The
tone()function plays a note on the buzzer for a specific duration.A delay is added between notes to distinguish them.
The
noTone()function stops the sound.
void setup() {
  for (int thisNote = 0; thisNote < 8; thisNote++) {
    int noteDuration = 1000 / noteDurations[thisNote];
    tone(buzzerPin, melody[thisNote], noteDuration);
    int pauseBetweenNotes = noteDuration * 1.30;
    delay(pauseBetweenNotes);
    noTone(buzzerPin);
  }
}
Empty loop function: Since the melody is played only once in the setup, there’s no code in the loop function.
Feel free to experiment with altering the notes and durations in the
melody[]andnoteDurations[]arrays to create your own melodies. If you’re interested, there is a GitHub repository (robsoncouto/arduino-songs ) that offers Arduino code for playing various songs. While their approach may differ from this project, you can consult their notes and durations for reference.