Note
Hello, welcome to the SunFounder Raspberry Pi & Arduino & ESP32 Enthusiasts Community on Facebook! Dive deeper into Raspberry Pi, Arduino, and ESP32 with fellow enthusiasts.
Why Join?
Expert Support: Solve post-sale issues and technical challenges with help from our community and team.
Learn & Share: Exchange tips and tutorials to enhance your skills.
Exclusive Previews: Get early access to new product announcements and sneak peeks.
Special Discounts: Enjoy exclusive discounts on our newest products.
Festive Promotions and Giveaways: Take part in giveaways and holiday promotions.
👉 Ready to explore and create with us? Click [here] and join today!
Tilt Switch
Overview
In this lesson, you will learn about tilt switch. Tilt switch can be used to detect whether objects tilt, which is of great value in practical applications. It can be used to judge the tilt of bridges, buildings, transmission line tower and so on, so it has an important guiding function in carrying out maintenance work.
Required Components
In this project, we need the following components.
It’s definitely convenient to buy a whole kit, here’s the link:
Name |
ITEMS IN THIS KIT |
LINK |
|---|---|---|
Elite Explorer Kit |
300+ |
You can also buy them separately from the links below.
COMPONENT INTRODUCTION |
PURCHASE LINK |
|---|---|
- |
|
- |
Fritzing Circuit
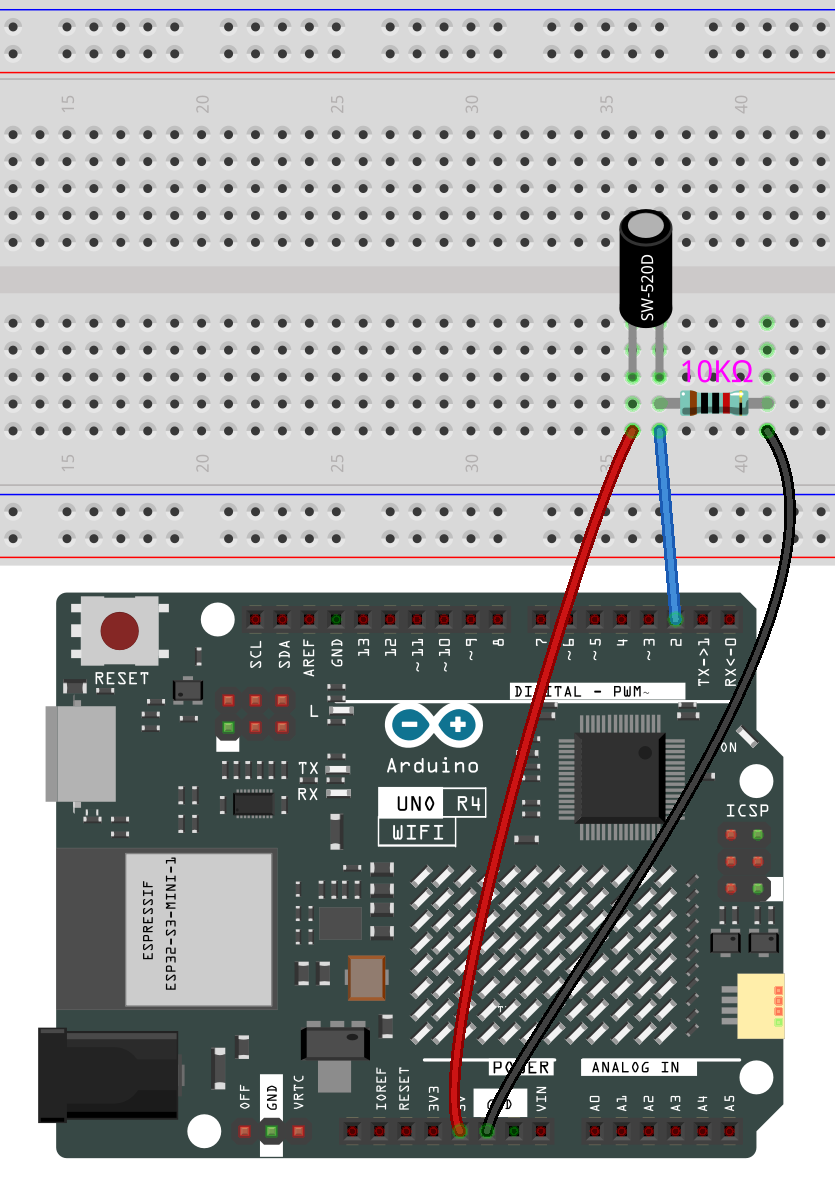
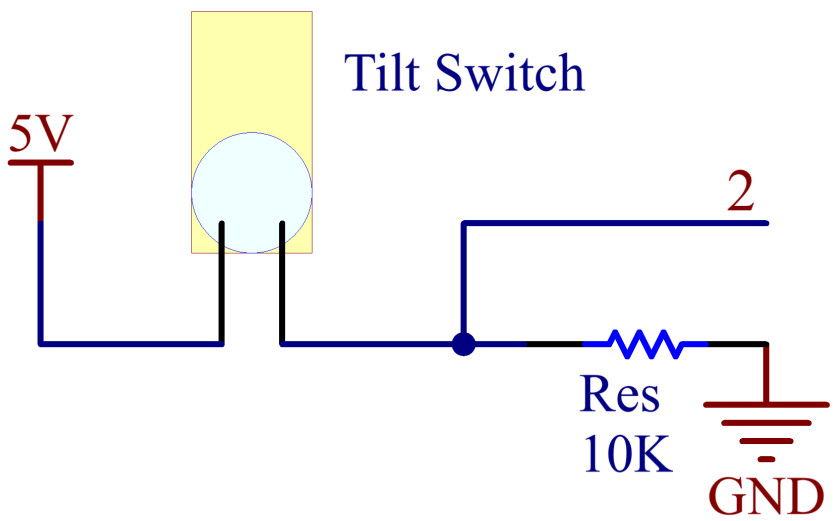
In this example, digital pin 2 is used to read the signal of Tilt Switch.
Schematic Diagram
Code
Note
You can open the file
04-tilt_switch.inounder the path ofelite-explorer-kit-main\basic_project\04-tilt_switchdirectly.Or copy this code into Arduino IDE.
 1/*
 2  The code monitors the state of a tilt switch connected to an Arduino.
 3  It initializes a serial communication for debugging and sets a designated
 4  digital pin as an input for the tilt switch. The state of the tilt switch
 5  is continuously read and sent to the serial monitor.
 6
 7  Board: Arduino Uno R4
 8  Component: Tilt switch
 9*/
10
11const int tiltPin = 2;  // Declare and initialize the pin for the tilt switch
12
13// Initialize the serial communication and set up the tilt switch pin as input
14void setup() {
15  Serial.begin(9600);       // Initialize serial communication at 9600 baud rate
16  pinMode(tiltPin, INPUT);  // Set the tilt switch pin as an input
17}
18
19// Continuously monitor the tilt switch state and output it to the serial monitor
20void loop() {
21  int tiltState = digitalRead(tiltPin);  // Read the state of the tilt switch
22  Serial.println(tiltState);             // Send the tilt switch state to the serial monitor
23  delay(10);                              // Wait for 10 millisecond before the next read
24}
Once the codes are uploaded to the uno r4 board, you can open the serial monitor to view the pin readings. The readings will display either “1” or “0” depending on whether the Tilt Switch is in a vertical position (with the internal metal ball making contact with the Wire Pins) or tilted.