Note
Hello, welcome to the SunFounder Raspberry Pi & Arduino & ESP32 Enthusiasts Community on Facebook! Dive deeper into Raspberry Pi, Arduino, and ESP32 with fellow enthusiasts.
Why Join?
Expert Support: Solve post-sale issues and technical challenges with help from our community and team.
Learn & Share: Exchange tips and tutorials to enhance your skills.
Exclusive Previews: Get early access to new product announcements and sneak peeks.
Special Discounts: Enjoy exclusive discounts on our newest products.
Festive Promotions and Giveaways: Take part in giveaways and holiday promotions.
👉 Ready to explore and create with us? Click [here] and join today!
Keypad
Overview
In this lesson, you will learn to use Keypad. Keypad can be applied into various kinds of devices, including mobile phone, fax machine, microwave oven and so on. It is commonly used in user input.
Required Components
In this project, we need the following components.
It’s definitely convenient to buy a whole kit, here’s the link:
Name |
ITEMS IN THIS KIT |
LINK |
|---|---|---|
Elite Explorer Kit |
300+ |
You can also buy them separately from the links below.
COMPONENT INTRODUCTION |
PURCHASE LINK |
|---|---|
- |
|
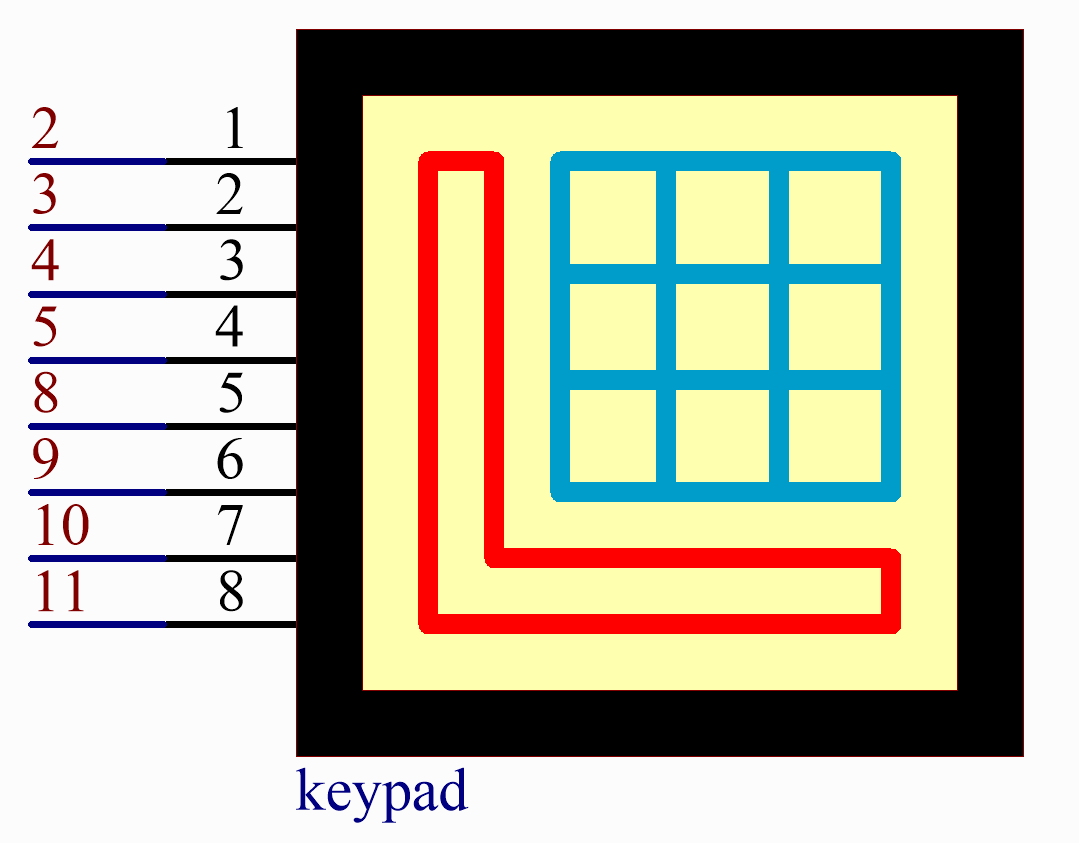
Wiring

Schematic Diagram
Code
Note
You can open the file
21-keypad.inounder the path ofelite-explorer-kit-main\basic_project\21-keypaddirectly.To install the library, use the Arduino Library Manager and search for “Adafruit Keypad” and install it.
 1/*
 2  The code use an Adafruit Keypad and display keypress events via the Serial Monitor.
 3  It initializes the keypad with a 4x4 layout, where each key is represented by a
 4  specific character. It continuously checks for keypad events (key press or release)
 5  and prints the corresponding key and event status to the Serial Monitor.
 6
 7  Board: Arduino Uno R4
 8  Component:  Keypad
 9  Library: https://github.com/adafruit/Adafruit_Keypad (Adafruit Keypad by Adafruit)
10*/
11
12// Include the Adafruit_Keypad library
13#include "Adafruit_Keypad.h"
14
15// Define the number of rows and columns for the keypad
16const byte ROWS = 4;
17const byte COLS = 4;
18
19// Define the characters mapped to each button on the 4x4 keypad
20char keys[ROWS][COLS] = {
21  { '1', '2', '3', 'A' },
22  { '4', '5', '6', 'B' },
23  { '7', '8', '9', 'C' },
24  { '*', '0', '#', 'D' }
25};
26
27// Define the Arduino pins connected to the row pinouts of the keypad
28byte rowPins[ROWS] = { 2, 3, 4, 5 };
29// Define the Arduino pins connected to the column pinouts of the keypad
30byte colPins[COLS] = { 8, 9, 10, 11 };
31
32// Initialize a custom keypad instance
33Adafruit_Keypad myKeypad = Adafruit_Keypad(makeKeymap(keys), rowPins, colPins, ROWS, COLS);
34
35// Setup function
36void setup() {
37  // Initialize Serial communication at 9600 baud rate
38  Serial.begin(9600);
39  // Initialize the custom keypad
40  myKeypad.begin();
41}
42
43// Main loop function
44void loop() {
45  // Update the state of keys
46  myKeypad.tick();
47
48  // Check if there are new keypad events
49  while (myKeypad.available()) {
50    // Read the keypad event
51    keypadEvent e = myKeypad.read();
52    // Print the key that triggered the event
53    Serial.print((char)e.bit.KEY);
54    // Print the type of event: pressed or released
55    if (e.bit.EVENT == KEY_JUST_PRESSED) Serial.println(" pressed");
56    else if (e.bit.EVENT == KEY_JUST_RELEASED) Serial.println(" released");
57  }
58
59  delay(10);
60}
After uploading the codes to the UNO board, on the serial monitor, you can see the value of the key currently pressed on the Keypad.
Code Analysis
Including the Library
We start by including the
Adafruit_Keypadlibrary, which allows us to easily interface with the keypad.#include "Adafruit_Keypad.h"
Note
To install the library, use the Arduino Library Manager and search for “Adafruit Keypad” and install it.
Keypad Configuration
const byte ROWS = 4;
const byte COLS = 4;
char keys[ROWS][COLS] = {
  { '1', '2', '3', 'A' },
  { '4', '5', '6', 'B' },
  { '7', '8', '9', 'C' },
  { '*', '0', '#', 'D' }
};
byte rowPins[ROWS] = { 2, 3, 4, 5 };
byte colPins[COLS] = { 8, 9, 10, 11 };
The
ROWSandCOLSconstants define the dimensions of the keypad.keysis a 2D array storing the label for each button on the keypad.rowPinsandcolPinsare arrays that store the Arduino pins connected to the keypad rows and columns.
Initialize Keypad
Create an instance of
Adafruit_KeypadcalledmyKeypadand initialize it.Adafruit_Keypad myKeypad = Adafruit_Keypad(makeKeymap(keys), rowPins, colPins, ROWS, COLS);
setup() Function
Initialize Serial communication and the custom keypad.
void setup() {
  Serial.begin(9600);
  myKeypad.begin();
}
Main Loop
Check for key events and display them in the Serial Monitor.
void loop() {
  myKeypad.tick();
  while (myKeypad.available()) {
    keypadEvent e = myKeypad.read();
    Serial.print((char)e.bit.KEY);
    if (e.bit.EVENT == KEY_JUST_PRESSED) Serial.println(" pressed");
    else if (e.bit.EVENT == KEY_JUST_RELEASED) Serial.println(" released");
  }
  delay(10);
}