Note
Hello, welcome to the SunFounder Raspberry Pi & Arduino & ESP32 Enthusiasts Community on Facebook! Dive deeper into Raspberry Pi, Arduino, and ESP32 with fellow enthusiasts.
Why Join?
Expert Support: Solve post-sale issues and technical challenges with help from our community and team.
Learn & Share: Exchange tips and tutorials to enhance your skills.
Exclusive Previews: Get early access to new product announcements and sneak peeks.
Special Discounts: Enjoy exclusive discounts on our newest products.
Festive Promotions and Giveaways: Take part in giveaways and holiday promotions.
👉 Ready to explore and create with us? Click [here] and join today!
Soil Moisture
Overview
In the agricultural industry, crops cannot directly acquire inorganic elements from the soil. Instead, water present in the soil acts as a solvent to dissolve these elements.
Crops absorb moisture from the soil through their root system to obtain nutrients and facilitate growth.
During the growth and development of crops, there are varying requirements for soil temperature. Hence, it is necessary to use a soil moisture sensor.
Required Components
In this project, we need the following components.
It’s definitely convenient to buy a whole kit, here’s the link:
Name |
ITEMS IN THIS KIT |
LINK |
|---|---|---|
Elite Explorer Kit |
300+ |
You can also buy them separately from the links below.
COMPONENT INTRODUCTION |
PURCHASE LINK |
|---|---|
- |
|
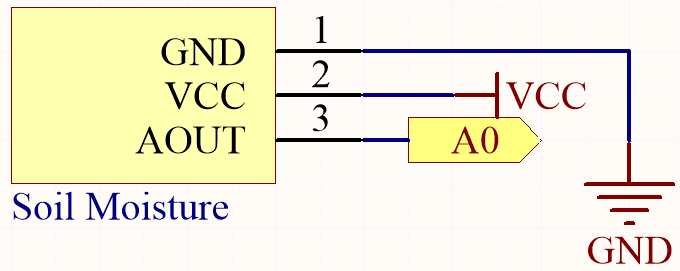
Wiring
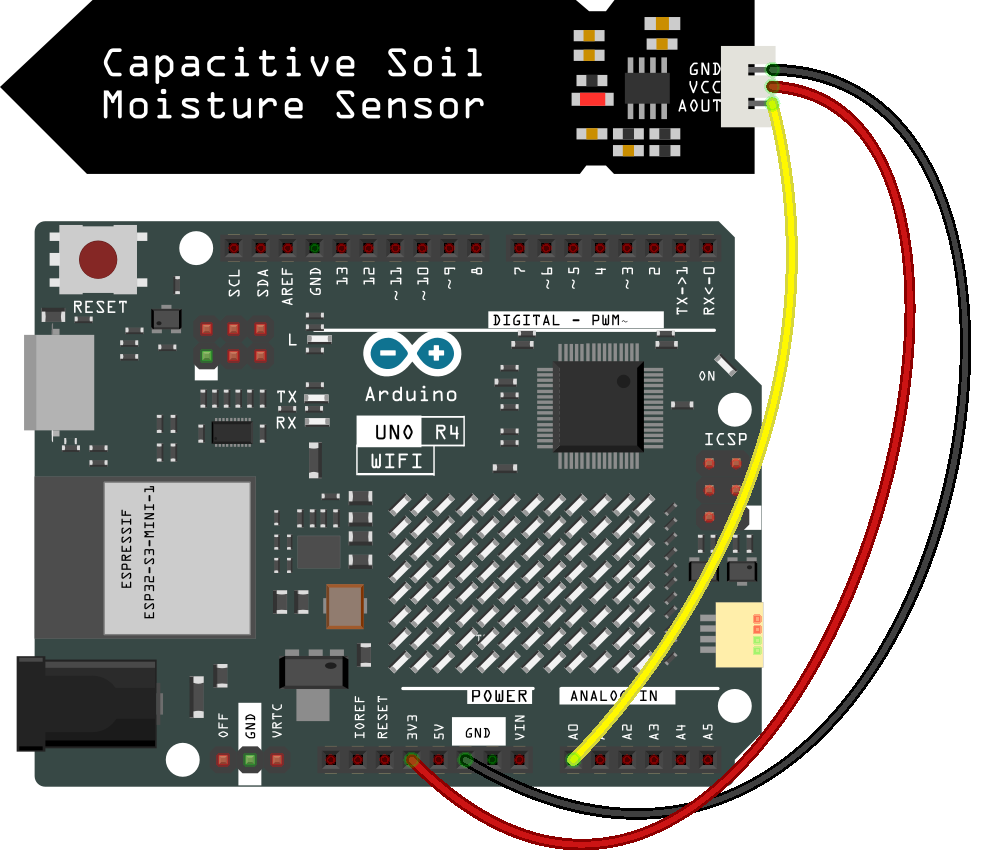
Schematic Diagram
Code
Note
Open the
03-moisture.inofile under the path ofelite-explorer-kit-main\basic_project\03-moisture.Or copy this code into Arduino IDE.
 1/*
 2  The Arduino code is designed to measure soil moisture using a soil moisture sensor
 3  connected to analog pin A0. The sensor's readings are sent to the Serial Monitor
 4  and are updated every 100 milliseconds.
 5
 6  Board: Arduino Uno R4
 7  Component: Soil moisture sensor
 8*/
 9
10const int sensorPin = A0;  // Define the analog pin for reading the soil moisture sensor
11
12// Initialize Serial communication for debugging and data visualization
13void setup() {
14  Serial.begin(9600);  // Set the baud rate to 9600 for the Serial Monitor
15}
16
17// Main loop where the program runs
18void loop() {
19  int sensorValue = analogRead(sensorPin);  // Read the sensor value from the defined analog pin
20  Serial.println(sensorValue);              // Print the sensor value to the Serial Monitor
21  delay(100);                                // Wait for 10 milliseconds before the next iteration
22}
Once the code is successfully uploaded, the serial monitor will print out the soil moisture value.
By inserting the module into the soil and watering it, the value of the soil moisture sensor will become smaller.