Nota
¡Hola, bienvenido a la Comunidad de Aficionados a Raspberry Pi, Arduino y ESP32 de SunFounder en Facebook! Profundiza en Raspberry Pi, Arduino y ESP32 con otros entusiastas.
¿Por qué unirse?
Soporte de expertos: Resuelve problemas posventa y desafíos técnicos con ayuda de nuestra comunidad y equipo.
Aprender y compartir: Intercambia consejos y tutoriales para mejorar tus habilidades.
Vistas previas exclusivas: Obtén acceso anticipado a anuncios de nuevos productos y avances.
Descuentos especiales: Disfruta de descuentos exclusivos en nuestros productos más nuevos.
Promociones festivas y sorteos: Participa en sorteos y promociones de fiestas.
👉 ¿Listo para explorar y crear con nosotros? Haz clic en [aquí] y únete hoy!
6.6 Dado Digital
Este proyecto se basa en el proyecto 2.5 Visualización de Números añadiendo un botón para controlar el dígito mostrado en el display de siete segmentos.
Al presionar el botón, el display de siete segmentos recorre los números del 1 al 6, y al soltar el botón, muestra un número aleatorio.
Este ciclo continúa cada vez que se presiona el botón.
Componentes Necesarios
En este proyecto, necesitamos los siguientes componentes.
Es definitivamente conveniente comprar un kit completo, aquí tienes el enlace:
Nombre |
ELEMENTOS EN ESTE KIT |
ENLACE |
|---|---|---|
Kit de Inicio ESP32 |
320+ |
También puedes comprarlos por separado en los enlaces a continuación.
INTRODUCCIÓN DE COMPONENTES |
ENLACE DE COMPRA |
|---|---|
Esquemático
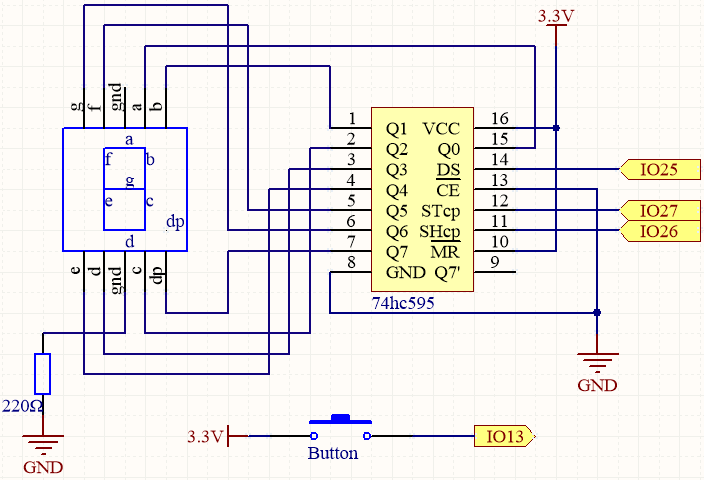
Este proyecto se basa en el proyecto 2.5 Visualización de Números añadiendo un botón para controlar el dígito mostrado en el display de siete segmentos.
El botón se conecta directamente a IO13 sin una resistencia de pull-up o pull-down externa porque IO13 tiene una resistencia de pull-up interna de 47K, eliminando la necesidad de una resistencia externa adicional.
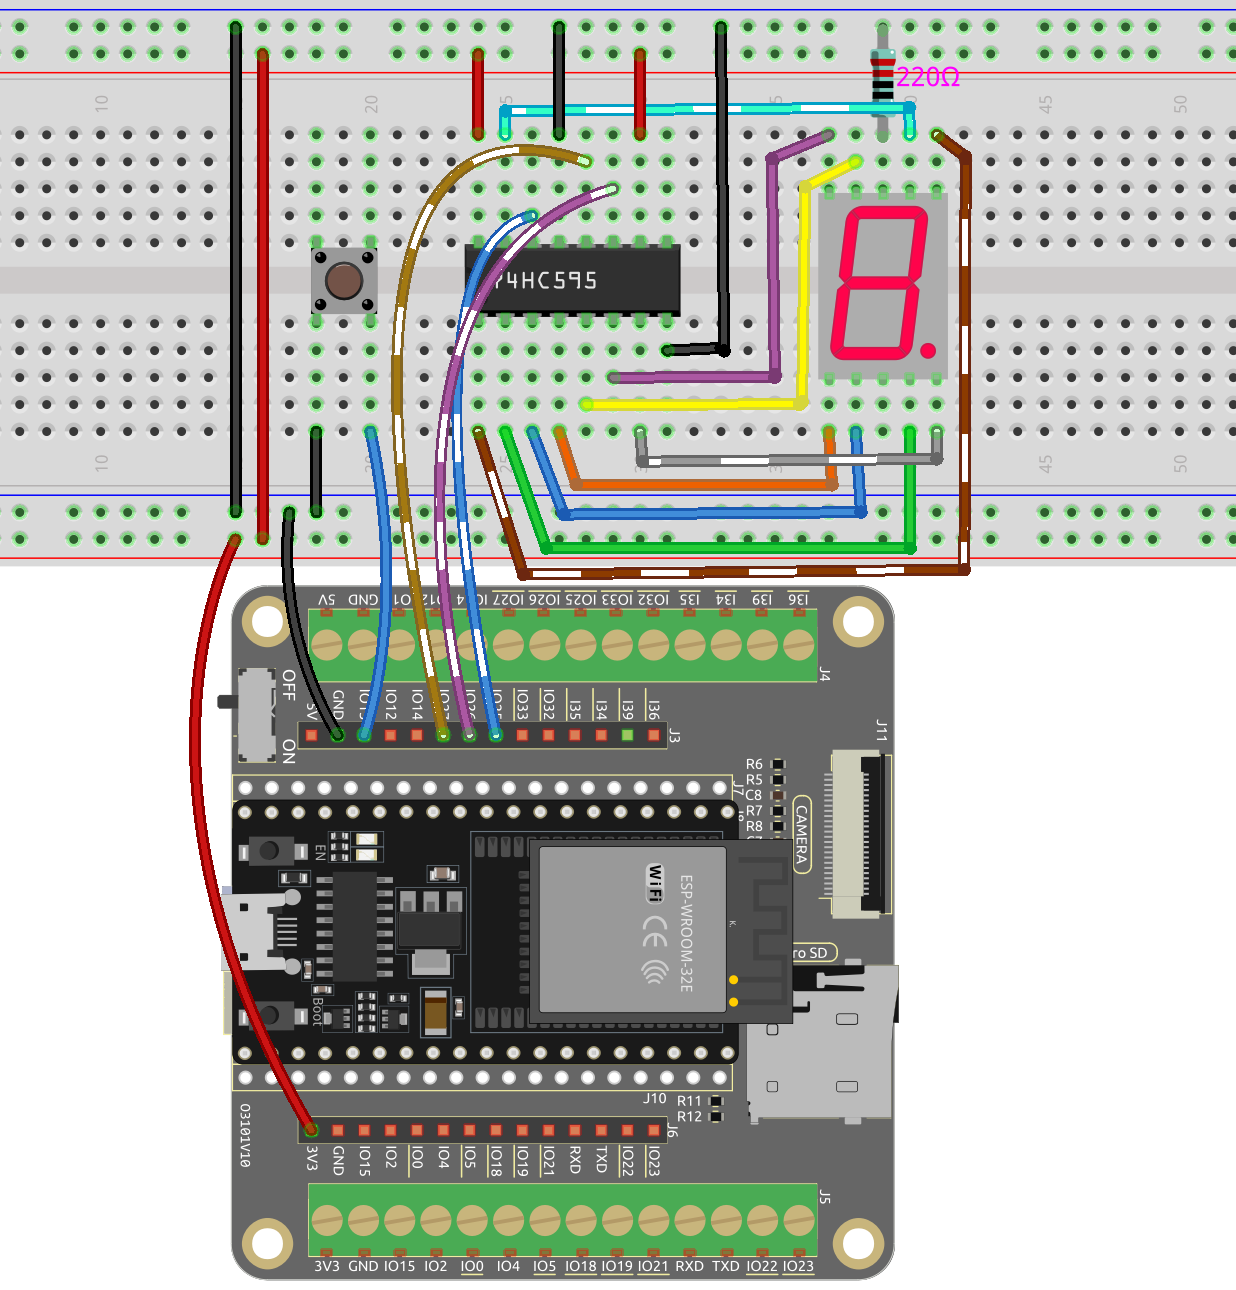
Cableado
Código
Nota
Abre el archivo
6.6_digital_dice.pyubicado en la rutaesp32-starter-kit-main\micropython\codes, o copia y pega el código en Thonny. Luego, haz clic en «Ejecutar Script Actual» o presiona F5 para ejecutarlo.Asegúrate de seleccionar el intérprete «MicroPython (ESP32).COMxx» en la esquina inferior derecha.
import machine
import time
import random

# Define the segment code for a common anode 7-segment display
SEGCODE = [0x3f, 0x06, 0x5b, 0x4f, 0x66, 0x6d, 0x7d, 0x07, 0x7f, 0x6f]

# Initialize the pins for the 74HC595 shift register
sdi = machine.Pin(25, machine.Pin.OUT)  # DS
rclk = machine.Pin(27, machine.Pin.OUT)  # STcp
srclk = machine.Pin(26, machine.Pin.OUT)  # SHcp

button = machine.Pin(13, machine.Pin.IN) # Button pin

# Define the hc595_shift function to shift data into the 74HC595 shift register
def hc595_shift(dat):
    # Set the RCLK pin to low
    rclk.off()

    # Iterate through each bit (from 7 to 0)
    for bit in range(7, -1, -1):
        # Extract the current bit from the input data
        value = 1 & (dat >> bit)

        # Set the SRCLK pin to low
        srclk.off()

        # Set the value of the SDI pin
        sdi.value(value)

        # Clock the current bit into the shift register by setting the SRCLK pin to high
        srclk.on()

    # Latch the data into the storage register by setting the RCLK pin to high
    rclk.on()

# Initialize the random seed
random.seed(time.ticks_us())


num = 1
button_state = False

# Define the button callback function to toggle the button state
def button_callback(pin):
    global button_state
    button_state = not button_state

# Attach the button callback function to the falling edge of the button pin
button.irq(trigger=machine.Pin.IRQ_FALLING, handler=button_callback)

# Continuously display the current digit on the 7-segment display, scrolling if button is not pressed
while True:

    # Display the current digit on the 7-segment display
    hc595_shift(SEGCODE[num])

    # If the button is pressed and button state is True
    if button_state:
        pass

    # If the button is pressed again and button state i False, generate a new random digit
    if not button_state:
        num = random.randint(1, 6)
        time.sleep_ms(10) # Adjust this value to control the display refresh rate
Mientras el programa está en ejecución, presionar el botón hará que el display de siete segmentos recorra y muestre aleatoriamente un número entre 1 y 6.
Al presionar el botón nuevamente, el display de siete segmentos se detendrá y revelará un número específico. Presiona el botón una vez más, y el display de siete segmentos reanudará el desplazamiento a través de los dígitos.