Note
Hello, welcome to the SunFounder Raspberry Pi & Arduino & ESP32 Enthusiasts Community on Facebook! Dive deeper into Raspberry Pi, Arduino, and ESP32 with fellow enthusiasts.
Why Join?
Expert Support: Solve post-sale issues and technical challenges with help from our community and team.
Learn & Share: Exchange tips and tutorials to enhance your skills.
Exclusive Previews: Get early access to new product announcements and sneak peeks.
Special Discounts: Enjoy exclusive discounts on our newest products.
Festive Promotions and Giveaways: Take part in giveaways and holiday promotions.
👉 Ready to explore and create with us? Click [here] and join today!
6.4 Reversing Aid
Imagine this: You’re in your car, about to reverse into a tight parking spot. With our project, you will have an ultrasonic module mounted on the rear of your vehicle, acting as a digital eye. As you engage the reverse gear, the module springs to life, emitting ultrasonic pulses that bounce off obstacles behind you.
The magic happens when these pulses return to the module. It swiftly calculates the distance between your car and the objects, transforming this data into real-time visual feedback displayed on a vibrant LCD screen. You’ll witness dynamic, color-coded indicators depicting the proximity of obstacles, ensuring you have a crystal-clear understanding of the surrounding environment.
But we didn’t stop there. To immerse you further into this driving experience, we incorporated a lively buzzer. As your car inches closer to an obstacle, the buzzer’s tempo intensifies, creating an auditory symphony of warnings. It’s like having a personal orchestra guiding you through the complexities of reverse parking.
This innovative project combines cutting-edge technology with an interactive user interface, making your reversing experience safe and stress-free. With the ultrasonic module, LCD display, and lively buzzer working harmoniously, you’ll feel empowered and confident while maneuvering in tight spaces, leaving you free to focus on the joy of driving.
Required Components
In this project, we need the following components.
It’s definitely convenient to buy a whole kit, here’s the link:
Name |
ITEMS IN THIS KIT |
LINK |
|---|---|---|
ESP32 Starter Kit |
320+ |
You can also buy them separately from the links below.
COMPONENT INTRODUCTION |
PURCHASE LINK |
|---|---|
- |
|
Schematic
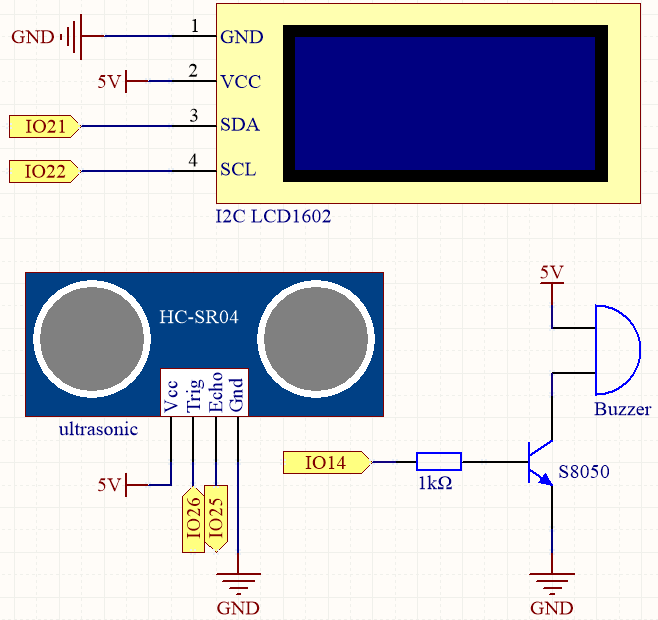
The ultrasonic sensor in the project emits high-frequency sound waves and measures the time it takes for the waves to bounce back after hitting an object. By analyzing this data, the distance between the sensor and the object can be calculated. To provide a warning when the object is too close, a buzzer is used to produce an audible signal. Additionally, the measured distance is displayed on an LCD screen for easy visualization.
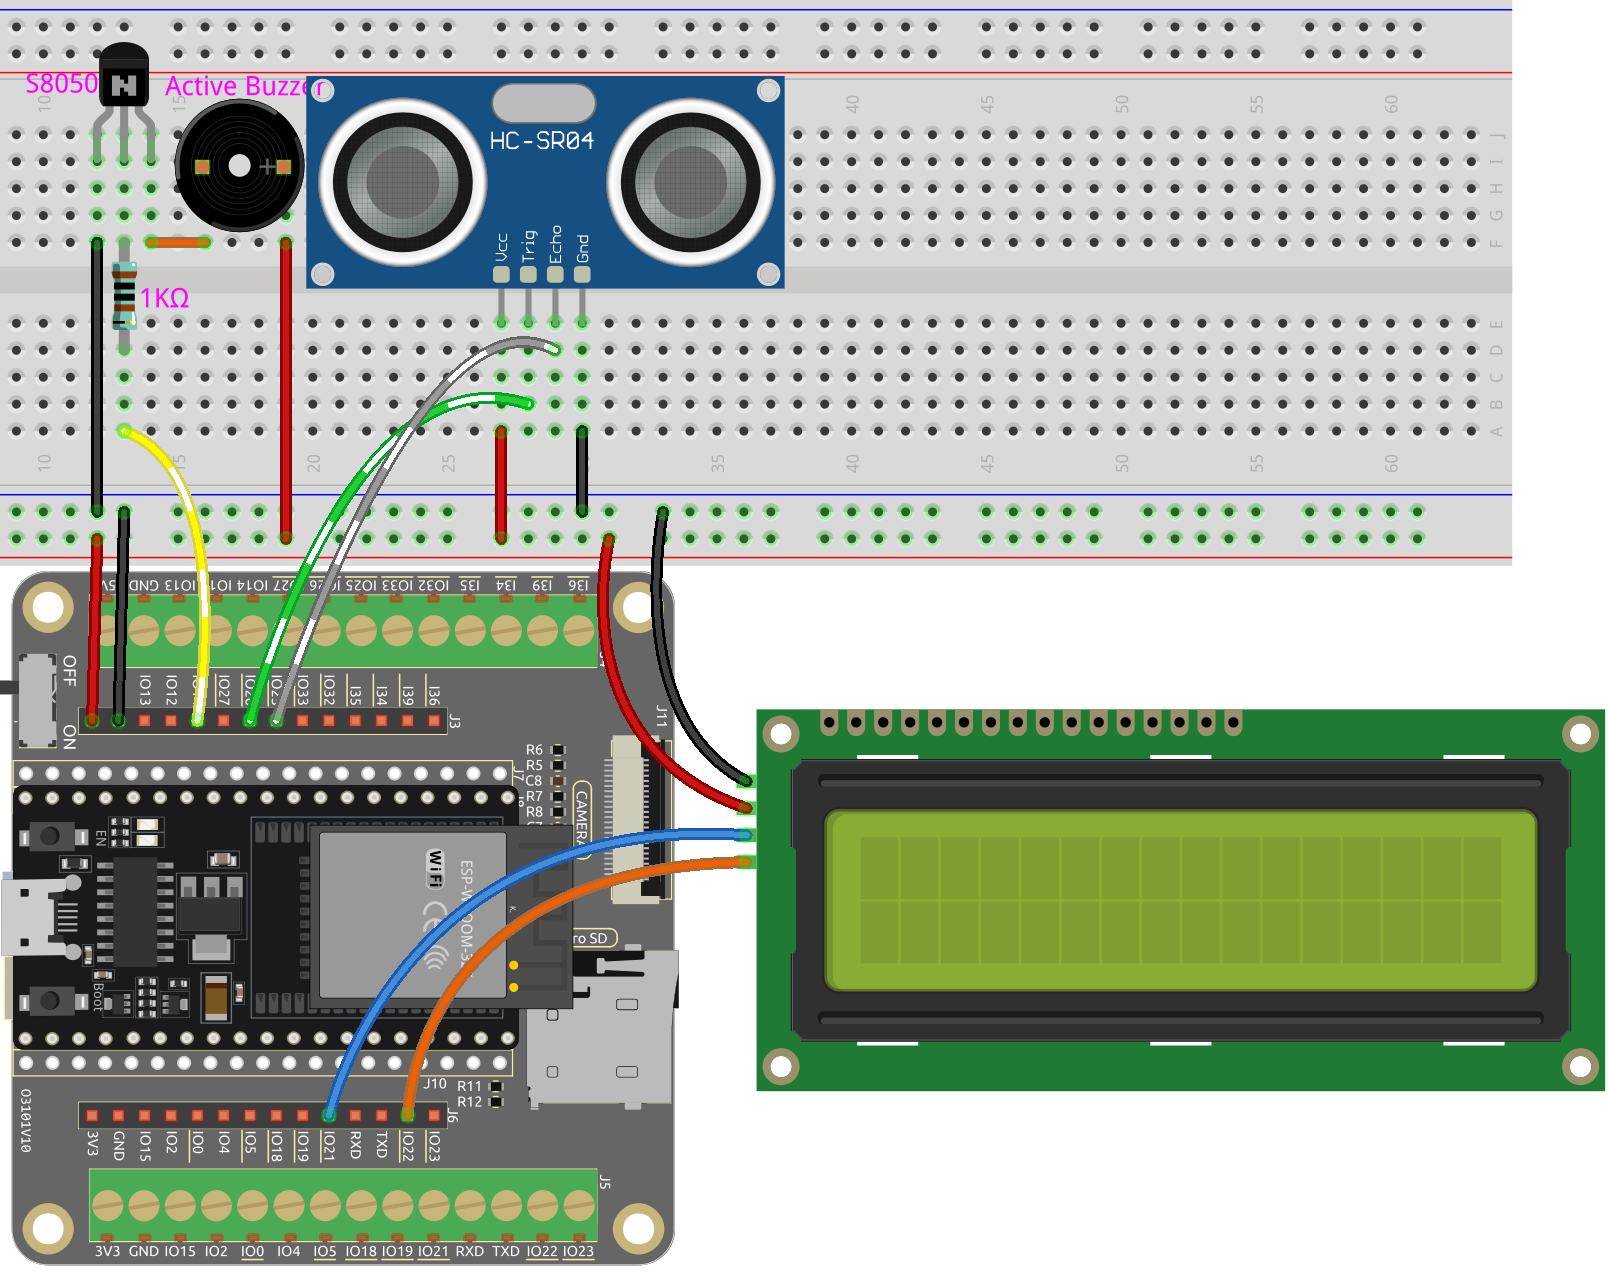
Wiring
Code
Note
Open the
6.4_reversing_aid.pyfile located in theesp32-starter-kit-main\micropython\codespath, or copy and paste the code into Thonny. Then, click “Run Current Script” or press F5 to execute it.Make sure to select the “MicroPython (ESP32).COMxx” interpreter in the bottom right corner.
# Import required libraries
from machine import Pin
import time
from lcd1602 import LCD
import _thread

# Initialize the buzzer
buzzer = Pin(14, Pin.OUT)

# Initialize the ultrasonic module
TRIG = Pin(26, Pin.OUT)
ECHO = Pin(25, Pin.IN)

# Initialize the LCD1602 display
lcd = LCD()

dis = 100

# Calculate the distance
def distance():
    # Ensure trigger is off initially
    TRIG.off()
    time.sleep_us(2)  # Wait for 2 microseconds

    # Send a 10-microsecond pulse to the trigger pin
    TRIG.on()
    time.sleep_us(10)
    TRIG.off()

    # Wait for the echo pin to go high
    while not ECHO.value():
        pass

    # Record the time when the echo pin goes high
    time1 = time.ticks_us()

    # Wait for the echo pin to go low
    while ECHO.value():
        pass

    # Record the time when the echo pin goes low
    time2 = time.ticks_us()

    # Calculate the time difference between the two recorded times
    during = time.ticks_diff(time2, time1)

    # Calculate and return the distance (in cm) using the speed of sound (340 m/s)
    return during * 340 / 2 / 10000

# Thread to continuously update the ultrasonic sensor reading
def ultrasonic_thread():
    global dis
    while True:
        dis = distance()

        # Clear the LCD screen
        lcd.clear()

        # Display the distance
        lcd.write(0, 0, 'Dis: %.2f cm' % dis)
        time.sleep(0.5)

# Start the ultrasonic sensor reading thread
_thread.start_new_thread(ultrasonic_thread, ())

# Beep function for the buzzer
def beep():
    buzzer.value(1)
    time.sleep(0.1)
    buzzer.value(0)
    time.sleep(0.1)

# Initialize the intervals variable
intervals = 10000000
previousMills = time.ticks_ms()
time.sleep(1)

# Main loop
while True:
    # Update intervals based on distance
    if dis < 0 and dis > 500:
        pass
    elif dis <= 10:
        intervals = 300
    elif dis <= 20:
        intervals = 500
    elif dis <= 50:
        intervals = 1000
    else:
        intervals = 2000

    # Print the distance if it's not -1
    if dis != -1:
        print('Distance: %.2f' % dis)
    time.sleep_ms(100)

    # Check if it's time to beep
    currentMills = time.ticks_ms()
    if time.ticks_diff(currentMills, previousMills) >= intervals:
        beep()
        previousMills = currentMills
When the script is running, the ultrasonic module will continuously detect the distance of obstacles in front of it, and display the distance on the Shell and I2C LCD1602.
As the obstacle gets closer, the beeping frequency of the buzzer will become more rapid.
The
ultrasonic_thread()function runs in a separate thread so that it can update the distance measurement continuously without blocking the main loop.
Note
If the code and wiring are correct, but the LCD still fails to display any content, you can adjust the potentiometer on the back to increase the contrast.