Note
Hello, welcome to the SunFounder Raspberry Pi & Arduino & ESP32 Enthusiasts Community on Facebook! Dive deeper into Raspberry Pi, Arduino, and ESP32 with fellow enthusiasts.
Why Join?
Expert Support: Solve post-sale issues and technical challenges with help from our community and team.
Learn & Share: Exchange tips and tutorials to enhance your skills.
Exclusive Previews: Get early access to new product announcements and sneak peeks.
Special Discounts: Enjoy exclusive discounts on our newest products.
Festive Promotions and Giveaways: Take part in giveaways and holiday promotions.
👉 Ready to explore and create with us? Click [here] and join today!
5.14 IR Remote Control
An infrared receiver is a component that receives infrared signals and can independently detect and output signals compatible with TTL level. It is similar in size to a regular plastic-packaged transistor and is commonly used in various applications such as infrared remote control and infrared transmission.
In this project, we will use an infrared receiver to detect signals from a remote control. When a button on the remote control is pressed and the infrared receiver receives the corresponding signal, it can decode the signal to determine which button was pressed. By decoding the received signal, we can identify the specific key or command associated with it.
The infrared receiver allows us to incorporate remote control functionality into our project, enabling us to interact with and control devices using infrared signals.
Required Components
In this project, we need the following components.
It’s definitely convenient to buy a whole kit, here’s the link:
Name |
ITEMS IN THIS KIT |
LINK |
|---|---|---|
ESP32 Starter Kit |
320+ |
You can also buy them separately from the links below.
COMPONENT INTRODUCTION |
PURCHASE LINK |
|---|---|
Available Pins
Here is a list of available pins on the ESP32 board for this project.
Available Pins
IO13, IO12, IO14, IO27, IO26, IO25, IO15, IO0, IO5, IO18, IO19, IO21, IO22, IO23
Schematic
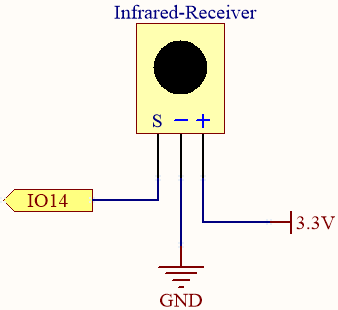
When you press a button on the remote control, the infrared receiver detects the signal, and you can use an infrared library to decode it. This decoding process allows you to obtain the key value associated with the button press.
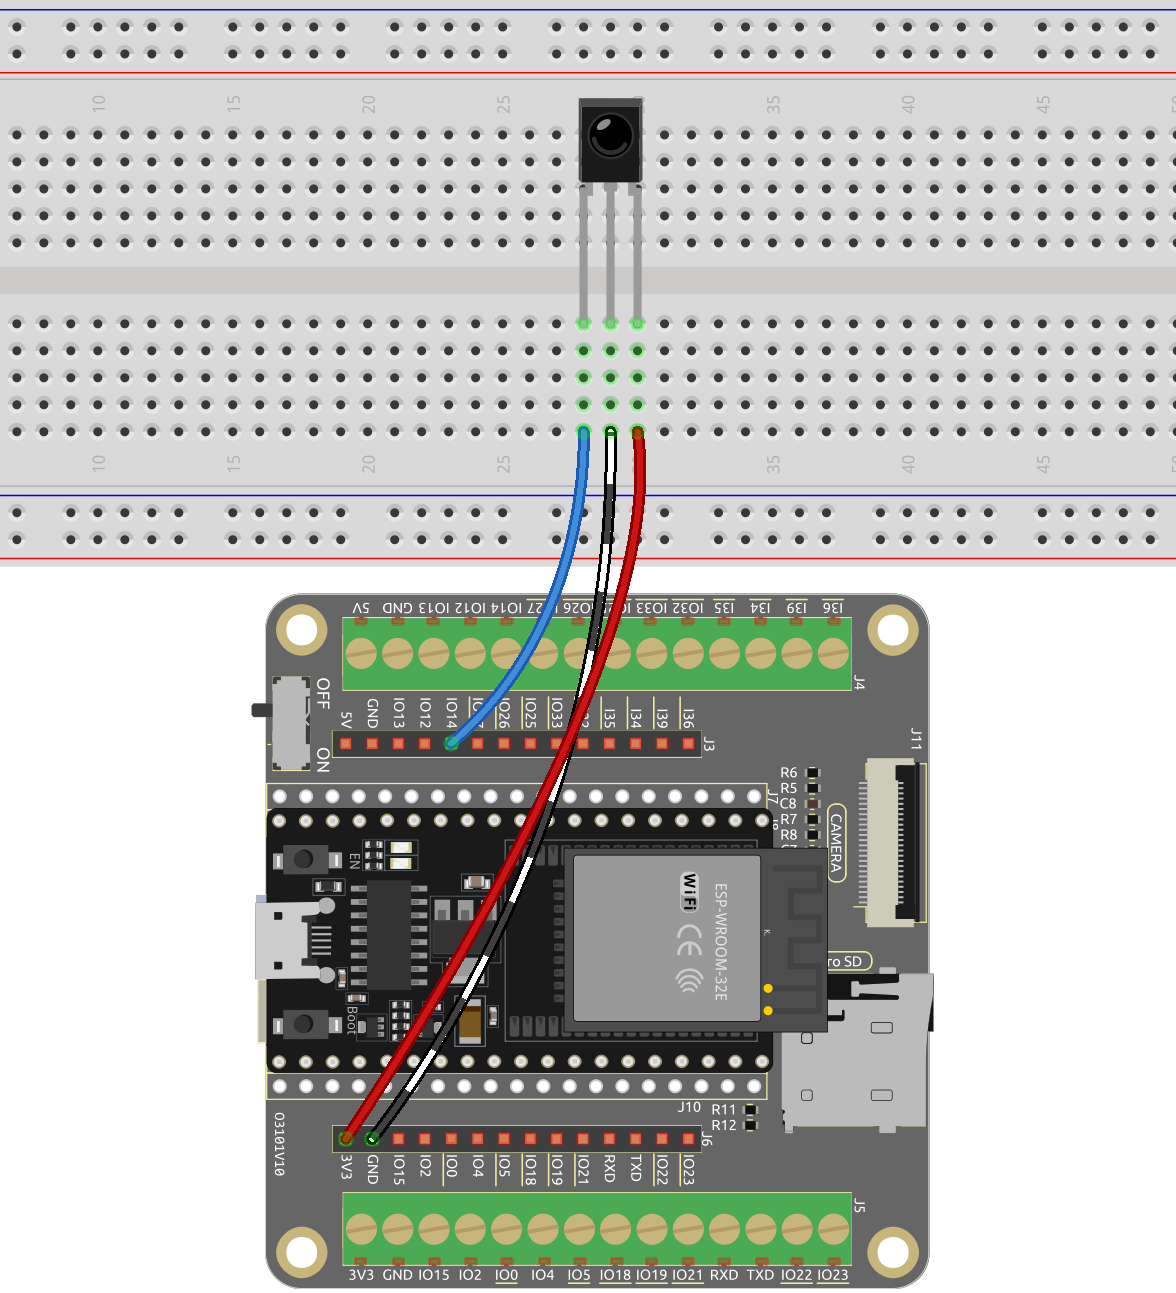
Wiring
Code
Note
Open the
5.14_ir_receiver.pyfile located in theesp32-starter-kit-main\micropython\codespath, or copy and paste the code into Thonny. Then, click “Run Current Script” or press F5 to execute it.Make sure to select the “MicroPython (ESP32).COMxx” interpreter in the bottom right corner.
Here, you need to utilize the libraries found in the
ir_rxfolder. Please ensure they have been uploaded to the ESP32. For a comprehensive tutorial, refer to 1.4 Upload the Libraries (Important).
import time
from machine import Pin, freq
from ir_rx.print_error import print_error
from ir_rx.nec import NEC_8

pin_ir = Pin(14, Pin.IN) # IR receiver

# Decode the received data and return the corresponding key name
def decodeKeyValue(data):
    if data == 0x16:
        return "0"
    if data == 0x0C:
        return "1"
    if data == 0x18:
        return "2"
    if data == 0x5E:
        return "3"
    if data == 0x08:
        return "4"
    if data == 0x1C:
        return "5"
    if data == 0x5A:
        return "6"
    if data == 0x42:
        return "7"
    if data == 0x52:
        return "8"
    if data == 0x4A:
        return "9"
    if data == 0x09:
        return "+"
    if data == 0x15:
        return "-"
    if data == 0x7:
        return "EQ"
    if data == 0x0D:
        return "U/SD"
    if data == 0x19:
        return "CYCLE"
    if data == 0x44:
        return "PLAY/PAUSE"
    if data == 0x43:
        return "FORWARD"
    if data == 0x40:
        return "BACKWARD"
    if data == 0x45:
        return "POWER"
    if data == 0x47:
        return "MUTE"
    if data == 0x46:
        return "MODE"
    return "ERROR"

# User callback
def callback(data, addr, ctrl):
    if data < 0:  # NEC protocol sends repeat codes.
        pass
    else:
        print(decodeKeyValue(data))


ir = NEC_8(pin_ir, callback) # Instantiate the NEC_8 receiver

# Show debug information
ir.error_function(print_error)

# keep the script running until interrupted by a keyboard interrupt (Ctrl+C)
try:
    while True:
        pass
except KeyboardInterrupt:
    ir.close()  # Close the receiver
When the program is running, press the key on the remote control, the value and name of the key will appear in the Shell.
Note
The new remote control features a plastic tab at the end to insulate the battery inside. To power up the remote when using it, simply remove this plastic piece.
How it works?
While this program may appear somewhat complex at first glance, it actually accomplishes the fundamental functions of the IR receiver using just a few lines of code.
import time
from machine import Pin, freq
from ir_rx.nec import NEC_8

pin_ir = Pin(14, Pin.IN) # IR receiver

# User callback
def callback(data, addr, ctrl):
    if data < 0:  # NEC protocol sends repeat codes.
        pass
    else:
        print(decodeKeyValue(data))

ir = NEC_8(pin_ir, callback)  # Instantiate receiver
In this code, an
irobject is instantiated, allowing it to read the signals captured by the IR receiver at any given moment.The resulting information is then stored in the
datavariable within the callback function.If the IR receiver receives duplicate values (e.g., when a button is pressed and held down), the
datawill be less than 0, and thisdataneeds to be filtered out.Otherwise, the
datawould be a usable value, albeit in an unreadable code. ThedecodeKeyValue(data)function is then utilized to decode it into a more comprehensible format.def decodeKeyValue(data): if data == 0x16: return "0" if data == 0x0C: return "1" if data == 0x18: return "2" if data == 0x5E: ...
Next, we incorporate several debug functions into the program. While these functions are essential, they are not directly related to the desired outcome we aim to achieve.
from ir_rx.print_error import print_error

ir.error_function(print_error) # Show debug information
Lastly, we use an empty loop for the main program and implement a try-except structure to ensure the program exits with the
irobject properly terminated.try: while True: pass except KeyboardInterrupt: ir.close()