Note
Hello, welcome to the SunFounder Raspberry Pi & Arduino & ESP32 Enthusiasts Community on Facebook! Dive deeper into Raspberry Pi, Arduino, and ESP32 with fellow enthusiasts.
Why Join?
Expert Support: Solve post-sale issues and technical challenges with help from our community and team.
Learn & Share: Exchange tips and tutorials to enhance your skills.
Exclusive Previews: Get early access to new product announcements and sneak peeks.
Special Discounts: Enjoy exclusive discounts on our newest products.
Festive Promotions and Giveaways: Take part in giveaways and holiday promotions.
👉 Ready to explore and create with us? Click [here] and join today!
2.2 Fading LED
In the previous project, we controlled the LED by turning it on and off using digital output. In this project, we will create a breathing effect on the LED by utilizing Pulse Width Modulation (PWM). PWM is a technique that allows us to control the brightness of an LED or the speed of a motor by varying the duty cycle of a square wave signal.
With PWM, instead of simply turning the LED on or off, we will be adjusting the amount of time the LED is on versus the amount of time it is off within each cycle. By rapidly switching the LED on and off at varying intervals, we can create the illusion of the LED gradually brightening and dimming, simulating a breathing effect.
By using the PWM capabilities of the ESP32 board, we can achieve smooth and precise control over the LED’s brightness. This breathing effect adds a dynamic and visually appealing element to your projects, creating an eye-catching display or ambiance.
Required Components
In this project, we need the following components.
It’s definitely convenient to buy a whole kit, here’s the link:
Name |
ITEMS IN THIS KIT |
LINK |
|---|---|---|
ESP32 Starter Kit |
320+ |
You can also buy them separately from the links below.
COMPONENT INTRODUCTION |
PURCHASE LINK |
|---|---|
Available Pins
Here is a list of available pins on the ESP32 board for this project.
Available Pins |
IO13, IO12, IO14, IO27, IO26, IO25, IO33, IO32, IO15, IO2, IO0, IO4, IO5, IO18, IO19, IO21, IO22, IO23 |
Schematic
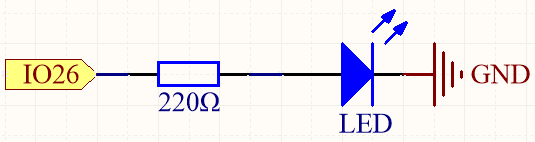
This project is the same circuit as the first project 2.1 Hello, LED!, but the signal type is different. The first project is to output digital high and low levels (0&1) directly from pin26 to make the LED light up or turn off, this project is to output PWM signal from pin26 to control the brightness of the LED.
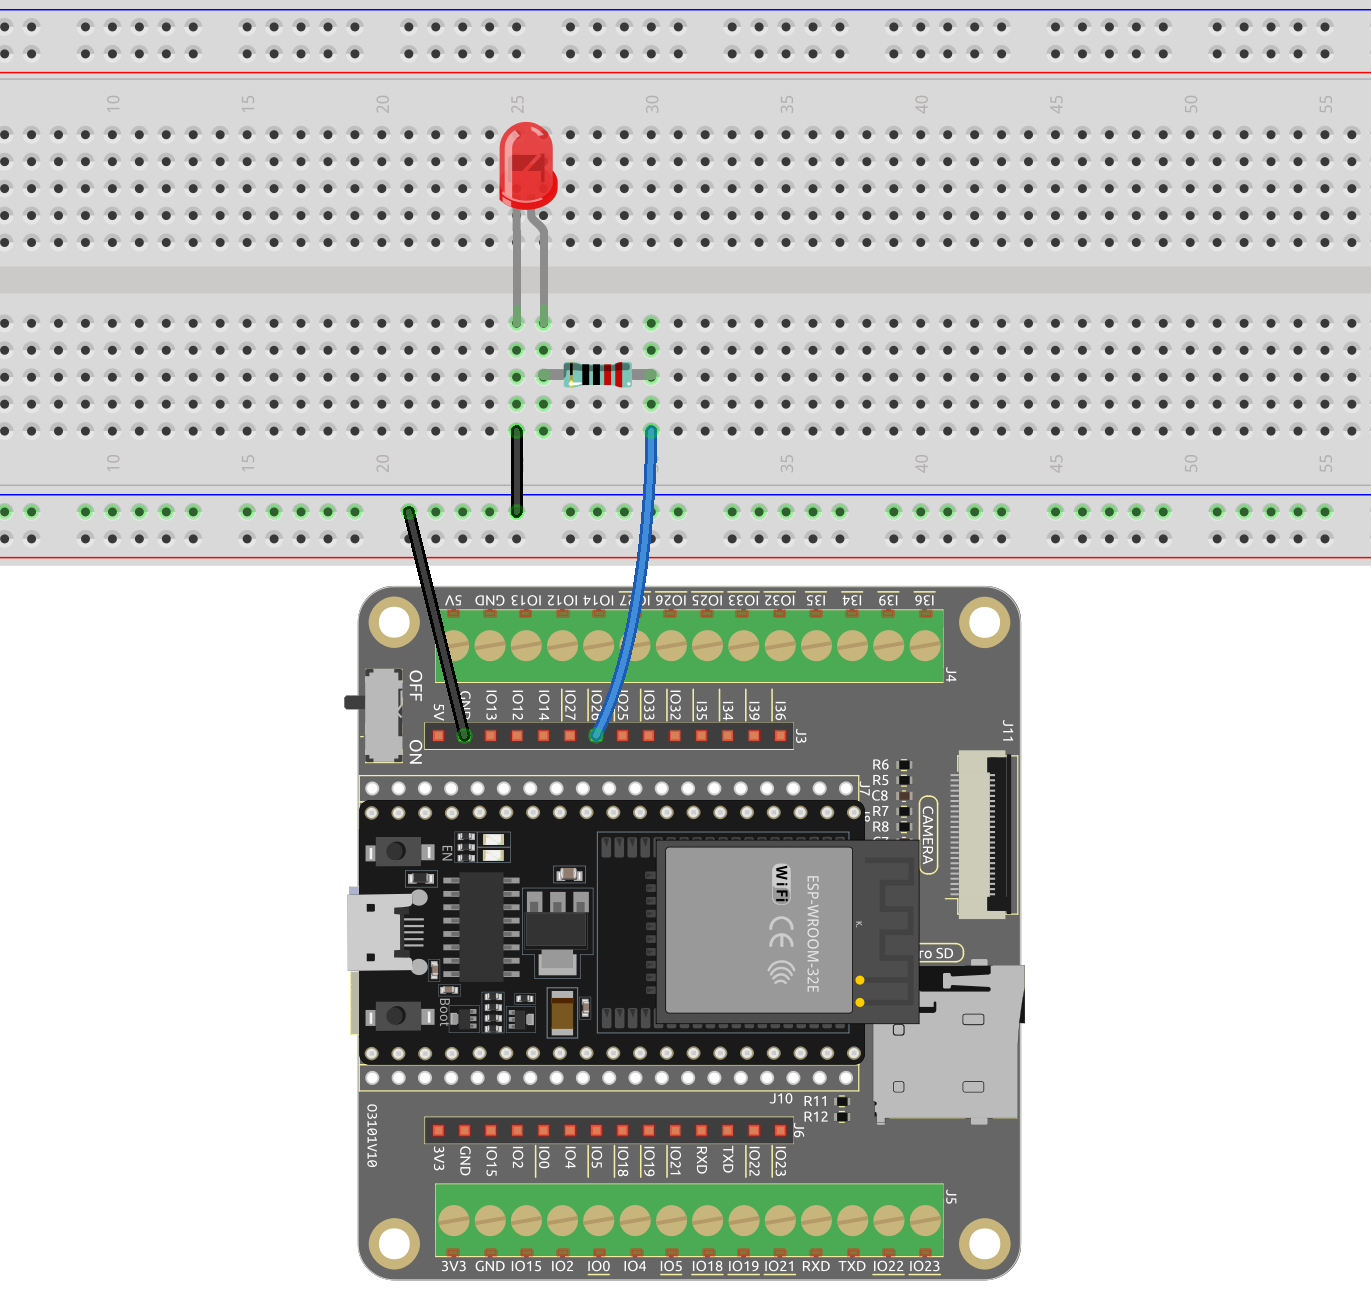
Wiring
Code
Note
Open the
2.2_fading_led.pyfile located in theesp32-starter-kit-main\micropython\codespath, or copy and paste the code into Thonny. Then, click “Run Current Script” or press F5 to execute it.Make sure to select the “MicroPython (ESP32).COMxx” interpreter in the bottom right corner.
# Import the necessary libraries
from machine import Pin, PWM
import time

# Create a PWM object
led = PWM(Pin(26), freq=1000)

while True:
    # Gradually increase brightness
    for duty_cycle in range(0, 1024, 1):
        led.duty(duty_cycle)
        time.sleep(0.01)

    # Gradually decrease brightness
    for duty_cycle in range(1023, -1, -1):
        led.duty(duty_cycle)
        time.sleep(0.01)
The LED will gradually become brighter as the code runs.
How it works?
Overall, this code demonstrates how to use PWM signals to control the brightness of an LED.
It imports two modules,
machineandtime. Themachinemodule provides low-level access to the microcontroller’s hardware, while thetimemodule provides functions for time-related operations.import machine import time
Then initializes a
PWMobject for controlling the LED connected to pin 26 and sets the frequency of the PWM signal to 1000 Hz.led = PWM(Pin(26), freq=1000)
Fade the LED in and out using a loop: The outer
while Trueloop runs indefinitely. Two nestedforloops are used to gradually increase and decrease the LED’s brightness. The duty cycle ranges from 0 to 1023, representing a 0% to 100% duty cycle.# Import the necessary libraries from machine import Pin, PWM import time # Create a PWM object led = PWM(Pin(26), freq=1000) while True: # Gradually increase brightness for duty_cycle in range(0, 1024, 2): led.duty(duty_cycle) time.sleep(0.01) # Gradually decrease brightness for duty_cycle in range(1023, -1, -2): led.duty(duty_cycle) time.sleep(0.01)
range(): Create a sequence of integers from 0 to 1023.The duty cycle of the PWM signal is set to each value in the sequence using the
duty()method of thePWMobject.time.sleep(): Pause the execution of the program for 10 milliseconds between each iteration of the loop, creating a gradual increase in brightness over time.