注釈
こんにちは、SunFounderのRaspberry Pi & Arduino & ESP32愛好家コミュニティへようこそ!Facebook上でRaspberry Pi、Arduino、ESP32についてもっと深く掘り下げ、他の愛好家と交流しましょう。
参加する理由は?
エキスパートサポート:コミュニティやチームの助けを借りて、販売後の問題や技術的な課題を解決します。
学び&共有:ヒントやチュートリアルを交換してスキルを向上させましょう。
独占的なプレビュー:新製品の発表や先行プレビューに早期アクセスしましょう。
特別割引:最新製品の独占割引をお楽しみください。
祭りのプロモーションとギフト:ギフトや祝日のプロモーションに参加しましょう。
👉 私たちと一緒に探索し、創造する準備はできていますか?[ ここ]をクリックして今すぐ参加しましょう!
QMC5883L
概要
このチュートリアルでは、GY-87 IMUモジュールに焦点を当て、特にそのQMC5883L磁力計について探求します。チュートリアルの最初の部分では、QMC5883L磁力計の校正方法について案内します。これは正確な磁場測定に不可欠です。Arduinoに校正スケッチをアップロードし、リアルタイムで校正を行い、プロジェクトにこれらの設定を適用する方法を学びます。チュートリアルの第二部では、Arduino Uno上でMPU6050(加速度計とジャイロスコープ)とQMC5883LをAdafruit MPU6050およびQMC5883LCompassライブラリを使って初期化する方法を取り上げます。センサーデータを読み取り、シリアルモニターに表示する基本的なスキルを身につけます。これは、ナビゲーション、動作追跡、方向検出などのアプリケーションに不可欠です。
必要なコンポーネント
このプロジェクトでは、以下のコンポーネントが必要です。
キット全体を購入するのは便利です。リンクはこちら:
名称 |
このキットのアイテム数 |
リンク |
|---|---|---|
Elite Explorer Kit |
300+ |
下記のリンクから個別に購入することもできます。
コンポーネント紹介 |
購入リンク |
|---|---|
- |
|
- |
配線図

回路図
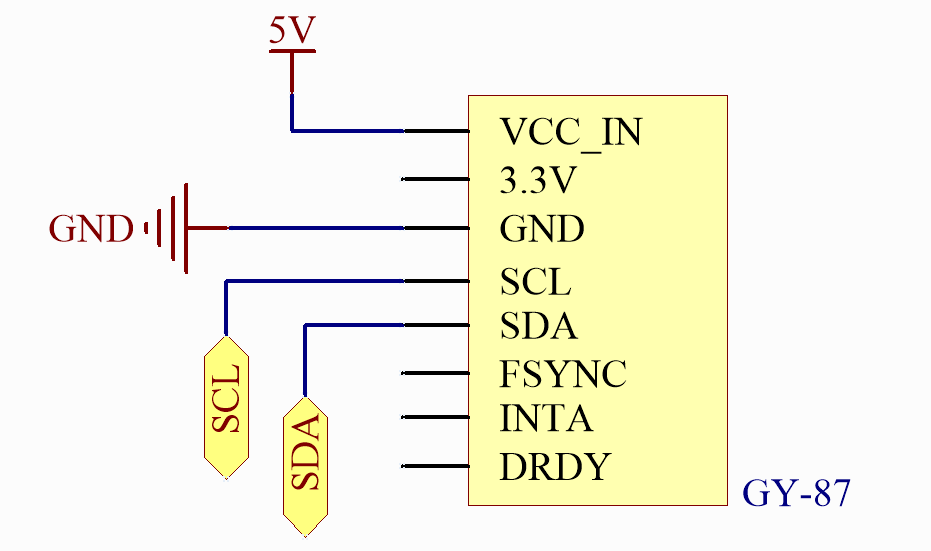
ライブラリのインストール
注釈
ライブラリをインストールするには、Arduino Library Managerを使用します。
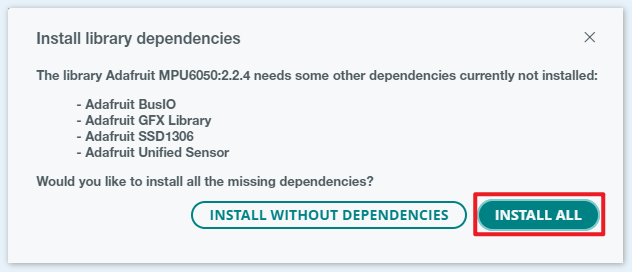
「Adafruit MPU6050」 を検索してインストール
各ライブラリをインストールする際は、すべての依存関係のインストールを選択してください。
「QMC5883LCompass」 を検索してインストール
QMC5883Lの校正
注釈
09-gy87_compass_calibration.inoファイルをelite-explorer-kit-main\basic_project\09-gy87_compass_calibrationのパスから直接開くことができます。または、このコードをArduino IDEにコピーします。
 1/*
 2  This code is used to calibrate the QMC5883L magnetometer in the gy-87 module.
 3
 4  Upload this calibration sketch onto your Arduino to provide calibration for
 5  your QMC5883L chip. After upload, run the serial monitor and follow the directions.
 6  When prompted, copy the last line into your project's actual sketch.
 7
 8  Board: Arduino Uno R4
 9  Component: GY-87 IMU Module
10  Library: https://github.com/adafruit/Adafruit_MPU6050  (Adafruit MPU6050 by Adafruit)
11           https://github.com/mprograms/QMC5883LCompass  (QMC5883LCompass by MPrograms)
12           https://github.com/adafruit/Adafruit-BMP085-Library  (Adafruit BMP085 Library by Adafruit)
13*/
14
15#include <Adafruit_MPU6050.h>
16#include <QMC5883LCompass.h>
17
18Adafruit_MPU6050 mpu;
19QMC5883LCompass compass;
20
21void setup() {
22  Serial.begin(9600);
23
24  initializeMPU6050();
25
26  // Enable I2C bypass on MPU6050 to directly access the QMC5883L magnetometer
27  mpu.setI2CBypass(true);
28
29  compass.init();
30
31  Serial.println("This will provide calibration settings for your QMC5883L chip. When prompted, move the magnetometer in all directions until the calibration is complete.");
32  Serial.println("Calibration will begin in 5 seconds.");
33  delay(5000);
34
35  Serial.println("CALIBRATING. Keep moving your sensor...");
36  compass.calibrate();
37
38  Serial.println("DONE. Copy the lines below and paste it into your projects sketch.);");
39  Serial.println();
40  Serial.print("compass.setCalibrationOffsets(");
41  Serial.print(compass.getCalibrationOffset(0));
42  Serial.print(", ");
43  Serial.print(compass.getCalibrationOffset(1));
44  Serial.print(", ");
45  Serial.print(compass.getCalibrationOffset(2));
46  Serial.println(");");
47  Serial.print("compass.setCalibrationScales(");
48  Serial.print(compass.getCalibrationScale(0));
49  Serial.print(", ");
50  Serial.print(compass.getCalibrationScale(1));
51  Serial.print(", ");
52  Serial.print(compass.getCalibrationScale(2));
53  Serial.println(");");
54}
55
56void loop() {
57  delay(1000);
58}
59
60void initializeMPU6050() {
61  // Check if the MPU6050 sensor is detected
62  if (!mpu.begin()) {
63    Serial.println("Failed to find MPU6050 chip");
64    while (1)
65      ;  // Halt if sensor not found
66  }
67  Serial.println("MPU6050 Found!");
68
69  // set accelerometer range to +-8G
70  mpu.setAccelerometerRange(MPU6050_RANGE_8_G);
71
72  // set gyro range to +- 500 deg/s
73  mpu.setGyroRange(MPU6050_RANGE_500_DEG);
74
75  // set filter bandwidth to 21 Hz
76  mpu.setFilterBandwidth(MPU6050_BAND_21_HZ);
77
78  Serial.println("");
79  delay(100);
80}
コードのアップロード後、シリアルモニターを開きます。シリアルモニターの指示に従ってQMC5883Lを校正します。センサーの移動を求められた場合、図8の校正方法を使用することをお勧めします。または、センサーを地面と平行に保ち、シリアルモニターが校正が完了したことを示すまで時計回りまたは反時計回りに回転させます。
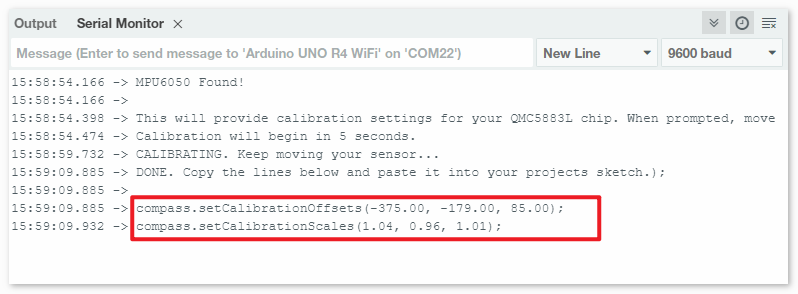
校正データがすべて収集されると、スケッチは compass.setCalibrationOffsets(-375.00, -179.00, 85.00); や compass.setCalibrationScales(1.04, 0.96, 1.01); のようなコードを提供します。このコードをコピーしてください。今後の参考のために保存しておくことをお勧めします。
QMC5883Lを使用する場合:プロジェクトのスケッチを開き、 compass.init() の呼び出しの直下にコピーしたコードを貼り付けます。以下のようにします:
void initializeQMC5883L() {

  compass.init();

  // You should replace the code below according to your calibration results
  compass.setCalibrationOffsets(-375.00, -179.00, 85.00);
  compass.setCalibrationScales(1.04, 0.96, 1.01);

}
コード
注釈
磁力計はコンパスとして使用する前に校正する必要があり(QMC5883Lの校正)、使用中に水平に保持し、 鉄製品、磁化した材料、電流を運ぶワイヤーから遠ざける 必要があります。
注釈
09-gy87_qmc5883l.inoファイルをelite-explorer-kit-main\basic_project\09-gy87_qmc5883lのパスから直接開くことができます。または、このコードをArduino IDEにコピーします。
校正手順から得られたコードを、関数
initializeQMC5883L()のcompass.init()のコードの下に配置します。
  1/*
  2  This Arduino code interfaces with the GY-87 IMU  module, focusing specifically on
  3  the QMC5883L magnetometer for measuring magnetic field data. It initializes the
  4  QMC5883L sensor and continuously outputs its readings, including directional data,
  5  to the Serial Monitor.
  6
  7  Board: Arduino Uno R4
  8  Component: GY-87 IMU Module
  9  Library: https://github.com/adafruit/Adafruit_MPU6050  (Adafruit MPU6050 by Adafruit)
 10           https://github.com/mprograms/QMC5883LCompass  (QMC5883LCompass by MPrograms)
 11*/
 12
 13// Include required libraries
 14#include <Adafruit_MPU6050.h>
 15#include <Adafruit_Sensor.h>
 16#include <Wire.h>
 17#include <QMC5883LCompass.h>
 18
 19// Initialize sensor objects
 20Adafruit_MPU6050 mpu;
 21QMC5883LCompass compass;
 22
 23void setup() {
 24  // Initialize the serial communication with a baud rate of 9600
 25  Serial.begin(9600);
 26
 27  // Initialize the MPU6050 sensor (accelerometer and gyroscope)
 28  initializeMPU6050();
 29
 30  // Enable I2C bypass on MPU6050 to directly access the QMC5883L magnetometer
 31  mpu.setI2CBypass(true);
 32
 33  // Initialize the QMC5883L magnetometer sensor
 34  initializeQMC5883L();
 35}
 36
 37
 38void loop() {
 39  // Print QMC5883L data
 40  printQMC5883L();
 41
 42  delay(500);
 43}
 44
 45void initializeQMC5883L() {
 46  compass.init();
 47
 48  // You should replace the code below according to your calibration results
 49  compass.setCalibrationOffsets(-549.00, -66.00, 160.00);
 50  compass.setCalibrationScales(0.97, 1.02, 1.02);
 51}
 52
 53void printQMC5883L() {
 54
 55  Serial.println();
 56  Serial.println("QMC5883L ------------");
 57
 58  int x, y, z, a;
 59  char myArray[3];
 60
 61  compass.read();
 62
 63  x = compass.getX();
 64  y = compass.getY();
 65  z = compass.getZ();
 66
 67  a = compass.getAzimuth();
 68
 69  compass.getDirection(myArray, a);
 70
 71  Serial.print("X: ");
 72  Serial.print(x);
 73
 74  Serial.print(" Y: ");
 75  Serial.print(y);
 76
 77  Serial.print(" Z: ");
 78  Serial.print(z);
 79
 80  Serial.print(" Azimuth: ");
 81  Serial.print(a);
 82
 83  Serial.print(" Direction: ");
 84  Serial.print(myArray[0]);
 85  Serial.print(myArray[1]);
 86  Serial.println(myArray[2]);
 87
 88  Serial.println("QMC5883L ------------");
 89  Serial.println();
 90}
 91
 92void initializeMPU6050() {
 93  // Check if the MPU6050 sensor is detected
 94  if (!mpu.begin()) {
 95    Serial.println("Failed to find MPU6050 chip");
 96    while (1)
 97      ;  // Halt if sensor not found
 98  }
 99  Serial.println("MPU6050 Found!");
100
101  // set accelerometer range to +-8G
102  mpu.setAccelerometerRange(MPU6050_RANGE_8_G);
103
104  // set gyro range to +- 500 deg/s
105  mpu.setGyroRange(MPU6050_RANGE_500_DEG);
106
107  // set filter bandwidth to 21 Hz
108  mpu.setFilterBandwidth(MPU6050_BAND_21_HZ);
109
110  Serial.println("");
111  delay(100);
112}
コード解析
ライブラリのインクルードとセンサーの初期化 このセクションでは、MPU6050およびQMC5883Lセンサーに必要なライブラリをインクルードし、そのオブジェクトを初期化します。
#include <Adafruit_MPU6050.h>
#include <Adafruit_Sensor.h>
#include <Wire.h>
#include <QMC5883LCompass.h>

Adafruit_MPU6050 mpu;
QMC5883LCompass compass;
Setup関数
シリアル通信、MPU6050センサーを初期化し、MPU6050をI2Cバイパスモードに設定してQMC5883L磁力計への直接アクセスを可能にします。その後、QMC5883L磁力計を初期化します。
void setup() {
  // Initialize the serial communication with a baud rate of 9600
  Serial.begin(9600);

  // Initialize the MPU6050 sensor (accelerometer and gyroscope)
  initializeMPU6050();

  // Enable I2C bypass on MPU6050 to directly access the QMC5883L magnetometer
  mpu.setI2CBypass(true);

  // Initialize the QMC5883L magnetometer sensor
  initializeQMC5883L();
}
ループ関数
QMC5883L磁力計からデータを連続的に読み取り、シリアルモニターに出力します。
void loop() {
  printQMC5883L();
  delay(500);
}
QMC5883L初期化関数
QMC5883L磁力計を初期化し、校正します。校正値は特定の校正データに基づいて調整する必要があります。(QMC5883Lの校正)
void initializeQMC5883L() {
  compass.init();

  // You should replace the code below according to your calibration results
  compass.setCalibrationOffsets(-549.00, -66.00, 160.00);
  compass.setCalibrationScales(0.97, 1.02, 1.02);
}
QMC5883Lデータ表示関数
この関数は磁力計のX、Y、Z値と方位角を読み取り、シリアルモニターに出力します。
void printQMC5883L() {

  Serial.println();
  Serial.println("QMC5883L ------------");

    int x, y, z, a;
    char myArray[3];

    compass.read();

    x = compass.getX();
    y = compass.getY();
    z = compass.getZ();

    a = compass.getAzimuth();

    compass.getDirection(myArray, a);

    Serial.print("X: ");
    Serial.print(x);

    Serial.print(" Y: ");
    Serial.print(y);

    Serial.print(" Z: ");
    Serial.print(z);

    Serial.print(" Azimuth: ");
    Serial.print(a);

    Serial.print(" Direction: ");
    Serial.print(myArray[0]);
    Serial.print(myArray[1]);
    Serial.println(myArray[2]);

  Serial.println("QMC5883L ------------");
  Serial.println();
}