注釈
こんにちは、SunFounderのRaspberry Pi & Arduino & ESP32愛好家コミュニティへようこそ!Facebook上でRaspberry Pi、Arduino、ESP32についてもっと深く掘り下げ、他の愛好家と交流しましょう。
参加する理由は?
エキスパートサポート:コミュニティやチームの助けを借りて、販売後の問題や技術的な課題を解決します。
学び&共有:ヒントやチュートリアルを交換してスキルを向上させましょう。
独占的なプレビュー:新製品の発表や先行プレビューに早期アクセスしましょう。
特別割引:最新製品の独占割引をお楽しみください。
祭りのプロモーションとギフト:ギフトや祝日のプロモーションに参加しましょう。
👉 私たちと一緒に探索し、創造する準備はできていますか?[ ここ]をクリックして今すぐ参加しましょう!
赤外線レシーバー
概要
赤外線レシーバーは、赤外線信号を受信し、独立して赤外線を受信し、TTLレベルと互換性のある信号を出力する部品です。通常のプラスチックパッケージのトランジスタとサイズが似ており、様々な種類の赤外線リモコンや赤外線伝送に適しています。
必要なコンポーネント
このプロジェクトには、以下のコンポーネントが必要です。
全セットを購入するのが便利です。こちらがリンクです:
名称 |
このキットのアイテム数 |
リンク |
|---|---|---|
Elite Explorer Kit |
300+ |
以下のリンクから個別に購入することもできます。
コンポーネント紹介 |
購入リンク |
|---|---|
- |
|
配線図

回路図
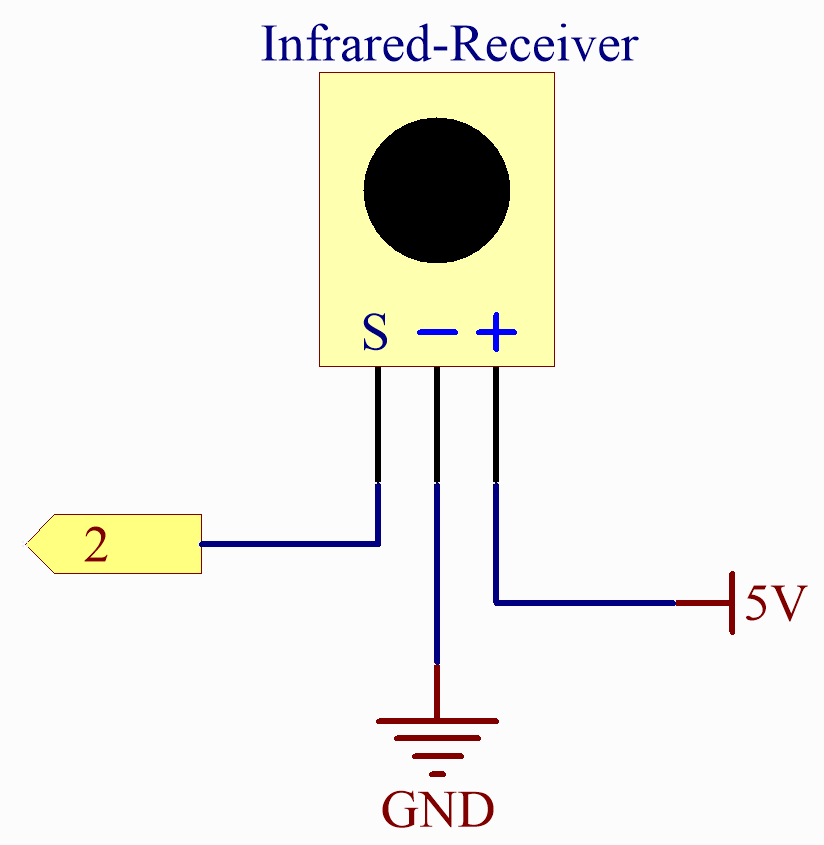
コード
注釈
ファイル
22-ir_receiver.inoをelite-explorer-kit-main\basic_project\22-ir_receiverのパスで直接開くことができます。または、このコードをArduino IDEにコピーする。
 1/*
 2  This Arduino receive and decode infrared (IR) signals from a remote control. It uses
 3  the IRremote library to receive the IR signals and map them to corresponding keys like
 4  numbers, mathematical operations, and other function keys.
 5
 6  Board: Arduino Uno R4
 7  Component: Infrared Receiver
 8  Library: https://github.com/Arduino-IRremote/Arduino-IRremote (IRremote by shirriff, z3t0, ArminJo)
 9*/
10
11// Include the necessary libraries
12#include <IRremote.h>
13
14// Define the pin numbers for the IR receiver
15const int IR_RECEIVE_PIN = 2;
16
17void setup() {
18  Serial.begin(9600);                                     // Start serial communication at 9600 baud rate
19  IrReceiver.begin(IR_RECEIVE_PIN, ENABLE_LED_FEEDBACK);  // Start the IR receiver
20}
21
22void loop() {
23  // Check if there is any incoming IR signal
24  if (IrReceiver.decode()) {
25    IrReceiver.printIRResultShort(&Serial);                 // Print the received data in one line
26    // Serial.println(IrReceiver.decodedIRData.command, HEX);  // Print the command in hexadecimal format
27    Serial.println(decodeKeyValue(IrReceiver.decodedIRData.command));  // Map and print the decoded IR signal to corresponding key value
28    Serial.println(IrReceiver.decodedIRData.decodedRawData, HEX); // Print "old" raw data
29    IrReceiver.resume();  // Enable receiving of the next value
30  }
31}
32
33// Function to map received IR signals to corresponding keys
34String decodeKeyValue(long result) {
35  // Each case corresponds to a specific IR command
36  switch (result) {
37    case 0x16:
38      return "0";
39    case 0xC:
40      return "1";
41    case 0x18:
42      return "2";
43    case 0x5E:
44      return "3";
45    case 0x8:
46      return "4";
47    case 0x1C:
48      return "5";
49    case 0x5A:
50      return "6";
51    case 0x42:
52      return "7";
53    case 0x52:
54      return "8";
55    case 0x4A:
56      return "9";
57    case 0x9:
58      return "+";
59    case 0x15:
60      return "-";
61    case 0x7:
62      return "EQ";
63    case 0xD:
64      return "U/SD";
65    case 0x19:
66      return "CYCLE";
67    case 0x44:
68      return "PLAY/PAUSE";
69    case 0x43:
70      return "FORWARD";
71    case 0x40:
72      return "BACKWARD";
73    case 0x45:
74      return "POWER";
75    case 0x47:
76      return "MUTE";
77    case 0x46:
78      return "MODE";
79    case 0x0:
80      return "ERROR";
81    default:
82      return "ERROR";
83  }
84}
ここでは
IRremoteライブラリを使用しています。 Library Manager からインストールできます。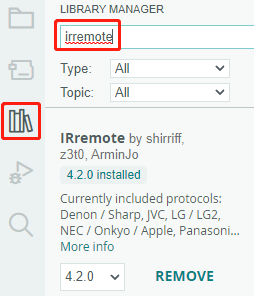
注釈
リモコンの背面には、電源を遮断する透明なプラスチック片があり、リモコンを使用する前にそれを取り出してください。
コード解析
このコードは、 IRremote ライブラリを使用して赤外線(IR)リモコンを操作するように設計されています。以下がその詳細です:
ライブラリを含めて定数を定義します。まず、IRremoteライブラリを含め、IRレシーバー用のピン番号を2として定義します。
#include <IRremote.h>
const int IR_RECEIVE_PIN = 2;
9600のボーレートでシリアル通信を初期化し、指定されたピン(
IR_RECEIVE_PIN)でIRレシーバーを初期化し、LEDフィードバックを有効にします(該当する場合)。void setup() { Serial.begin(9600); // Start serial communication at 9600 baud rate IrReceiver.begin(IR_RECEIVE_PIN, ENABLE_LED_FEEDBACK); // Start the IR receiver }
ループは継続的に実行され、受信したIRリモコン信号を処理します。
void loop() {
  // Check if there is any incoming IR signal
  if (IrReceiver.decode()) {
    // IrReceiver.printIRResultShort(&Serial);                 // Print the received data in one line
    // Serial.println(IrReceiver.decodedIRData.command, HEX);  // Print the command in hexadecimal format
    Serial.println(decodeKeyValue(IrReceiver.decodedIRData.command));  // Map and print the decoded IR signal to corresponding key value

    IrReceiver.resume();  // Enable receiving of the next value
  }
}
IR信号が受信され、正常にデコードされたかをチェックします。
IRコマンドをデコードし、カスタム関数
decodeKeyValue()を使用してdecodedValueに格納します。デコードされたIR値をシリアルモニターに表示します。
次の信号のIR信号受信を再開します。
受信したIR信号を対応するキーにマッピングするヘルパー関数

// Function to map received IR signals to corresponding keys
String decodeKeyValue(long result) {
  // Each case corresponds to a specific IR command
  switch (result) {
    case 0x16:
      return "0";
    case 0xC:
      return "1";
    case 0x18:
      return "2";
    case 0x5E:
      return "3";
    case 0x8:
      return "4";
    case 0x1C:
      return "5";
    case 0x5A:
      return "6";
    case 0x42:
      return "7";
    case 0x52:
      return "8";
    case 0x4A:
      return "9";
    case 0x9:
      return "+";
    case 0x15:
      return "-";
    case 0x7:
      return "EQ";
    case 0xD:
      return "U/SD";
    case 0x19:
      return "CYCLE";
    case 0x44:
      return "PLAY/PAUSE";
    case 0x43:
      return "FORWARD";
    case 0x40:
      return "BACKWARD";
    case 0x45:
      return "POWER";
    case 0x47:
      return "MUTE";
    case 0x46:
      return "MODE";
    case 0x0:
      return "ERROR";
    default:
      return "ERROR";
  }
}