注釈
こんにちは、SunFounderのRaspberry Pi & Arduino & ESP32愛好家コミュニティへようこそ!Facebook上でRaspberry Pi、Arduino、ESP32についてもっと深く掘り下げ、他の愛好家と交流しましょう。
参加する理由は?
エキスパートサポート:コミュニティやチームの助けを借りて、販売後の問題や技術的な課題を解決します。
学び&共有:ヒントやチュートリアルを交換してスキルを向上させましょう。
独占的なプレビュー:新製品の発表や先行プレビューに早期アクセスしましょう。
特別割引:最新製品の独占割引をお楽しみください。
祭りのプロモーションとギフト:ギフトや祝日のプロモーションに参加しましょう。
👉 私たちと一緒に探索し、創造する準備はできていますか?[ ここ]をクリックして今すぐ参加しましょう!
チルトスイッチ
概要
このレッスンでは、チルトスイッチについて学びます。チルトスイッチは、物体が傾いているかどうかを検出するために使用でき、実用的な応用で大きな価値があります。橋や建物、送電線タワーの傾斜を判断するために使用され、メンテナンス作業を行う上で重要な指針となります。
必要なコンポーネント
このプロジェクトでは、以下のコンポーネントが必要です。
全てのキットを一式購入するのが便利です。こちらがリンクです:
名称 |
このキットのアイテム数 |
リンク |
|---|---|---|
Elite Explorer Kit |
300+ |
下記のリンクから個別に購入することもできます。
コンポーネント紹介 |
購入リンク |
|---|---|
- |
|
- |
配線図
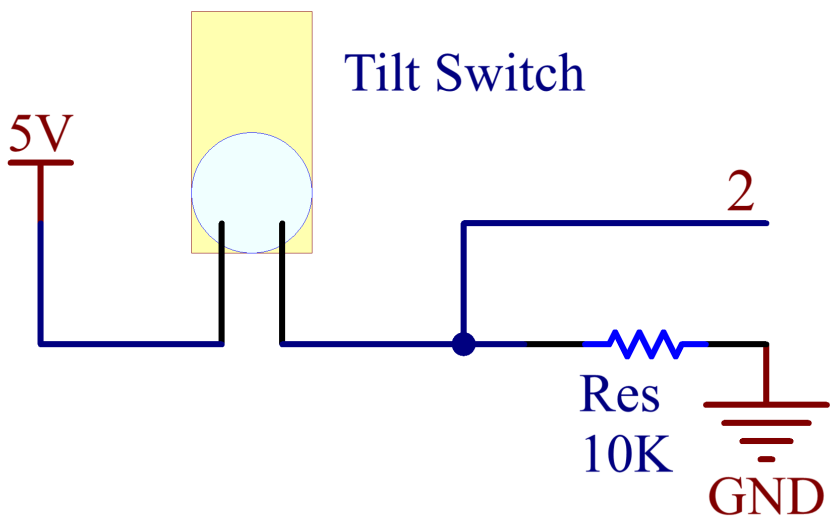
この例では、デジタルピン2を使用してチルトスイッチのシグナルを読み取ります。

回路図
コード
注釈
elite-explorer-kit-main\basic_project\04-tilt_switchのパスの下にある04-tilt_switch.inoファイルを直接開く。または、このコードをArduino IDEにコピーします。
 1/*
 2  The code monitors the state of a tilt switch connected to an Arduino.
 3  It initializes a serial communication for debugging and sets a designated
 4  digital pin as an input for the tilt switch. The state of the tilt switch
 5  is continuously read and sent to the serial monitor.
 6
 7  Board: Arduino Uno R4
 8  Component: Tilt switch
 9*/
10
11const int tiltPin = 2;  // Declare and initialize the pin for the tilt switch
12
13// Initialize the serial communication and set up the tilt switch pin as input
14void setup() {
15  Serial.begin(9600);       // Initialize serial communication at 9600 baud rate
16  pinMode(tiltPin, INPUT);  // Set the tilt switch pin as an input
17}
18
19// Continuously monitor the tilt switch state and output it to the serial monitor
20void loop() {
21  int tiltState = digitalRead(tiltPin);  // Read the state of the tilt switch
22  Serial.println(tiltState);             // Send the tilt switch state to the serial monitor
23  delay(10);                              // Wait for 10 millisecond before the next read
24}
コードがuno r4ボードにアップロードされると、シリアルモニターを開いてピンの読み取りを表示できます。チルトスイッチが垂直位置にある場合(内部の金属ボールがワイヤーピンに接触している場合)や傾斜している場合に応じて、「1」または「0」が表示されます。