注釈
こんにちは、SunFounderのRaspberry Pi & Arduino & ESP32愛好家コミュニティへようこそ!Facebook上でRaspberry Pi、Arduino、ESP32についてもっと深く掘り下げ、他の愛好家と交流しましょう。
参加する理由は?
エキスパートサポート:コミュニティやチームの助けを借りて、販売後の問題や技術的な課題を解決します。
学び&共有:ヒントやチュートリアルを交換してスキルを向上させましょう。
独占的なプレビュー:新製品の発表や先行プレビューに早期アクセスしましょう。
特別割引:最新製品の独占割引をお楽しみください。
祭りのプロモーションとギフト:ギフトや祝日のプロモーションに参加しましょう。
👉 私たちと一緒に探索し、創造する準備はできていますか?[ ここ]をクリックして今すぐ参加しましょう!
サーミスタ
概要
このレッスンでは、サーミスタの使用方法を学びます。サーミスタは、計測機器回路の温度補正用の電子回路部品として使用できます。電流計、流量計、ガス分析装置などで使われています。また、過熱保護、非接触リレー、恒温、自動利得制御、モーター始動、時間遅延、カラーテレビの自動消磁、火災報知器、温度補償などにも使用されます。
必要なコンポーネント
このプロジェクトでは、以下のコンポーネントが必要です。
全てのキットを一式購入するのが便利です。こちらがリンクです:
名称 |
このキットのアイテム数 |
リンク |
|---|---|---|
Elite Explorer Kit |
300+ |
下記のリンクから個別に購入することもできます。
コンポーネント紹介 |
購入リンク |
|---|---|
- |
|
配線図
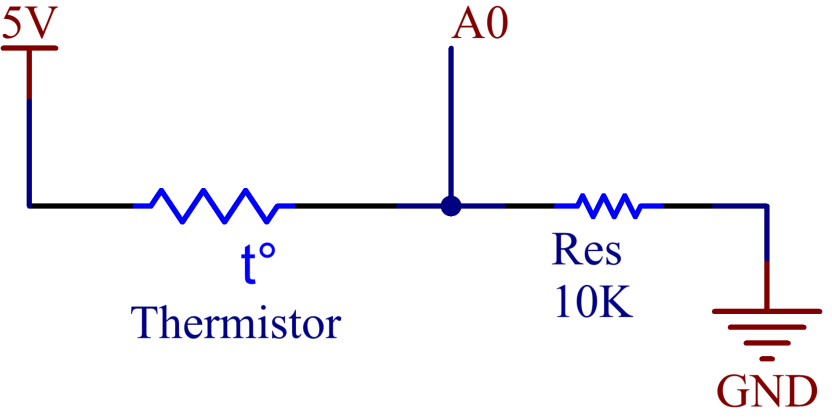
この例では、アナログピンA0を使用してサーミスタの値を取得します。サーミスタの一方の端子は5Vに接続され、もう一方の端子はA0に配線されます。同時に、もう一方の端子をGNDに接続する前に10kΩの抵抗器を接続します。

回路図
コード
注釈
elite-explorer-kit-main\basic_project\02-thermistorのパスの下にある02-thermistor.inoファイルを直接開くことができます。または、このコードをArduino IDEにコピーします。
 1/*
 2  The code reads temperature data from a thermistor connected to analog pin A0 on an Arduino board.
 3  It calculates the temperature in both Celsius and Fahrenheit using the Steinhart-Hart equation and
 4  prints the results to the Serial Monitor. The code uses a pull-up resistor and the thermistor's
 5  beta value for the calculations.
 6
 7  Board: Arduino Uno R4
 8  Component: Thermistor
 9*/
10
11const int analogPin = A0;   // Analog pin where the thermistor is connected
12const int beta = 3950;      // Beta value of the thermistor
13const int resistance = 10;  // Value of the pull-up resistor in kΩ
14
15void setup() {
16  Serial.begin(9600);  // Initialize Serial communication at 9600 baud rate
17}
18
19void loop() {
20  // Read the analog value from the thermistor
21  int analogValue = analogRead(analogPin);
22
23  // Calculate temperature in Celsius using the Steinhart-Hart equation
24  float tempC = beta / (log((1025.0 * resistance / analogValue - resistance) / resistance) + beta / 298.0) - 273.0;
25
26  // Convert the temperature to Fahrenheit
27  float tempF = 1.8 * tempC + 32.0;
28
29  // Print temperature in Celsius to the Serial Monitor
30  Serial.print("Temp: ");
31  Serial.print(tempC);
32  Serial.println(" degree Celsius");
33
34  // Print temperature in Fahrenheit to the Serial Monitor
35  Serial.print("Temp: ");
36  Serial.print(tempF);
37  Serial.println(" degree Fahrenheit");
38
39  delay(200);  // Pause for 200 milliseconds before the next reading
40}
uno r4 ボードにコードをアップロードした後、シリアルモニターを開いて現在の温度を確認できます。
ケルビン温度は、公式 TK=1/(ln(RT/RN)/B+1/TN) を使用して計算されます。この方程式は、Steinhart-Hart equation から導出され、計算を簡素化しています。この公式に関する詳細情報は、 サーミスター の詳細紹介ページで見ることができます。