注釈
こんにちは、SunFounderのRaspberry Pi & Arduino & ESP32愛好家コミュニティへようこそ!Facebook上でRaspberry Pi、Arduino、ESP32についてもっと深く掘り下げ、他の愛好家と交流しましょう。
参加する理由は?
エキスパートサポート:コミュニティやチームの助けを借りて、販売後の問題や技術的な課題を解決します。
学び&共有:ヒントやチュートリアルを交換してスキルを向上させましょう。
独占的なプレビュー:新製品の発表や先行プレビューに早期アクセスしましょう。
特別割引:最新製品の独占割引をお楽しみください。
祭りのプロモーションとギフト:ギフトや祝日のプロモーションに参加しましょう。
👉 私たちと一緒に探索し、創造する準備はできていますか?[ ここ]をクリックして今すぐ参加しましょう!
ジョイスティックモジュール
概要
ジョイスティックは、基部で回転するスティックから成る入力デバイスであり、その角度や方向を制御しているデバイスに報告します。ジョイスティックは、ビデオゲームやロボットの制御によく使用されます。ここでは、ジョイスティックPS2を使用します。
必要なコンポーネント
このプロジェクトには、以下のコンポーネントが必要です。
全セットを購入するのが便利です。こちらがリンクです:
名称 |
このキットのアイテム数 |
リンク |
|---|---|---|
Elite Explorer Kit |
300+ |
以下のリンクから個別に購入することもできます。
コンポーネント紹介 |
購入リンク |
|---|---|
- |
|
配線図
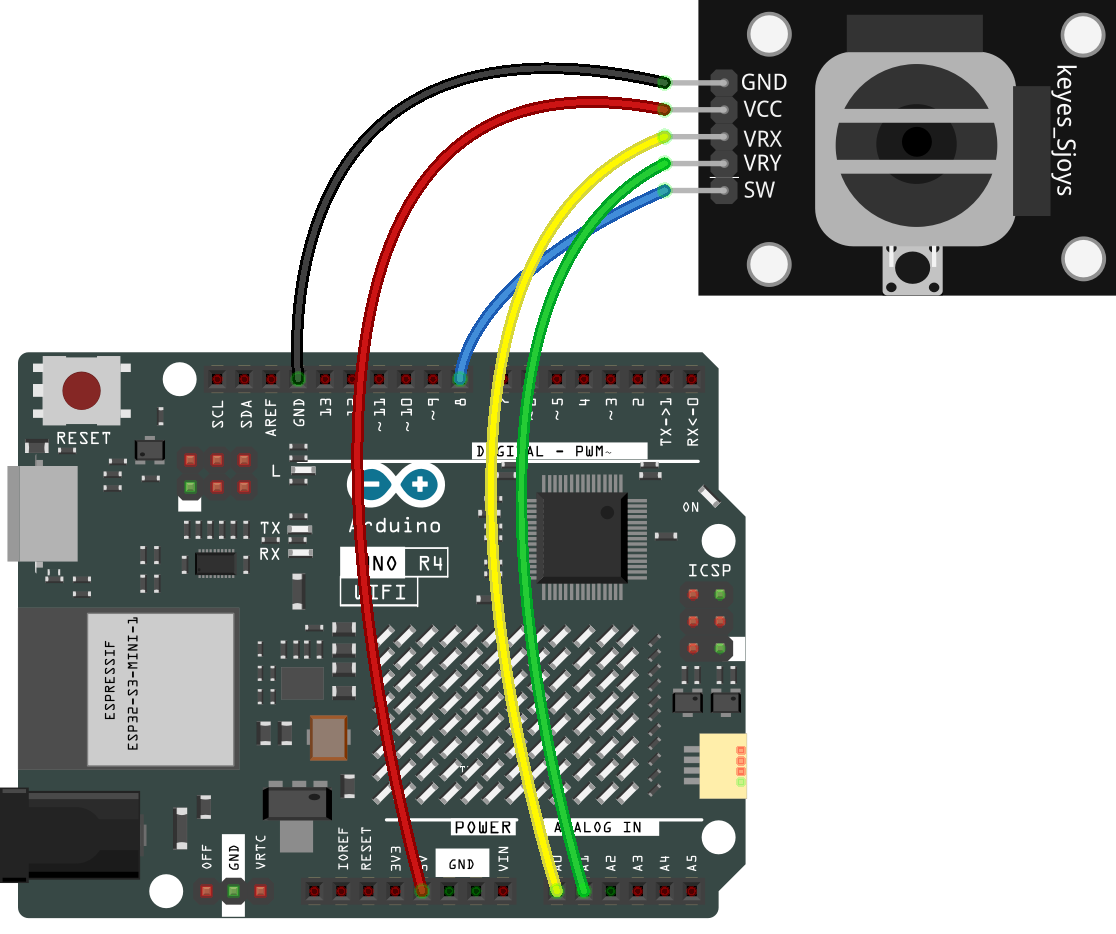
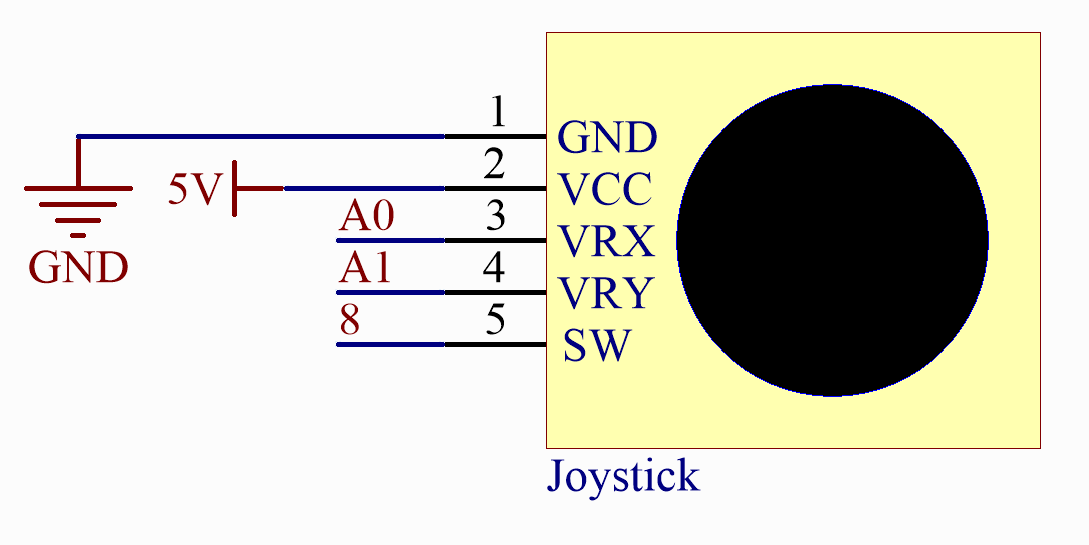
回路図
このモジュールには2つのアナログ出力(X、Yの両軸オフセットに対応)があります。
この実験では、Unoボードを使用してジョイスティックのノブの移動方向を検出します。
コード
注釈
ファイル
20-joystick.inoをelite-explorer-kit-main\basic_project\20-joystickのパスで直接開くことができます。または、このコードをArduino IDEにコピーしてください。
 1/*
 2  The code reads values from a joystick module and prints them on the serial monitor.
 3  The joystick module has two analog axes (X and Y), which are connected to Arduino
 4  pins A0 and A1. The decimal form of the X and Y axis values is read and displayed
 5  on the serial monitor.
 6
 7  Board: Arduino Uno R4
 8  Component: Joystick Module
 9*/
10
11const int xPin = A0;  //the VRX attach to
12const int yPin = A1;  //the VRY attach to
13const int swPin = 8;  //the SW attach to
14
15void setup() {
16  pinMode(swPin, INPUT_PULLUP);
17  Serial.begin(9600);
18}
19
20void loop() {
21  Serial.print("X: ");
22  Serial.print(analogRead(xPin), DEC);  // print the value of VRX in DEC
23  Serial.print("|Y: ");
24  Serial.print(analogRead(yPin), DEC);  // print the value of VRX in DEC
25  Serial.print("|Z: ");
26  Serial.println(digitalRead(swPin));  // print the value of SW
27  delay(50);
28}
今、ロッカーを押すと、シリアルモニターに表示されるX軸とY軸の座標がそれに応じて変化します。ボタンを押すと、座標Z=0も表示されます。
コード解析
このコードは、シリアルモニターを使用して、ジョイスティックPS2のVRXおよびVRYピンの値を表示します。
void loop()
{
    Serial.print("X: ");
    Serial.print(analogRead(xPin), DEC);  // print the value of VRX in DEC
    Serial.print("|Y: ");
    Serial.print(analogRead(yPin), DEC);  // print the value of VRX in DEC
    Serial.print("|Z: ");
    Serial.println(digitalRead(swPin));  // print the value of SW
    delay(50);
}