Note
Hello, welcome to the SunFounder Raspberry Pi & Arduino & ESP32 Enthusiasts Community on Facebook! Dive deeper into Raspberry Pi, Arduino, and ESP32 with fellow enthusiasts.
Why Join?
Expert Support: Solve post-sale issues and technical challenges with help from our community and team.
Learn & Share: Exchange tips and tutorials to enhance your skills.
Exclusive Previews: Get early access to new product announcements and sneak peeks.
Special Discounts: Enjoy exclusive discounts on our newest products.
Festive Promotions and Giveaways: Take part in giveaways and holiday promotions.
👉 Ready to explore and create with us? Click [here] and join today!
7.11 Somatosensory Controller
If you watch a lot of robot movies, you’ve probably seen images like this. The protagonist turned his wrist and the giant robot followed; the protagonist shakes his fist, and the robot follows, which is very cool.
The use of this technology is already common in universities and research institutes, and the arrival of 5G will greatly expand its application areas. “Surgical robot da Vinci” remote surgery medical is a typical example.
A robotic system of this type is typically composed of two modules: a human motion capture module and a robotic arm actuation module (some application scenarios also include a data communication module).
The MPU6050 is used here to implement human motion capture (by mounting it on a glove) and the servo is used to represent robotic arm motion.
Required Components
In this project, we need the following components.
It’s definitely convenient to buy a whole kit, here’s the link:
Name |
ITEMS IN THIS KIT |
LINK |
|---|---|---|
Kepler Kit |
450+ |
You can also buy them separately from the links below.
SN |
COMPONENT |
QUANTITY |
LINK |
|---|---|---|---|
1 |
1 |
||
2 |
Micro USB Cable |
1 |
|
3 |
1 |
||
4 |
Several |
||
5 |
1 |
||
6 |
1 |
Schematic
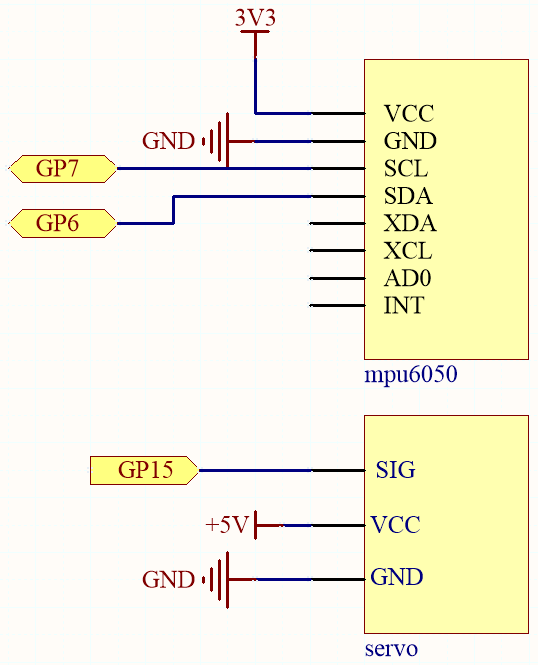
The MPU6050 calculates the attitude angle based on the acceleration values in each direction.
The program will control the servo to make the corresponding deflection angle as the attitude angle changes.
Wiring

Code
Note
Open the
7.11_somatosensory_controller.pyfile under the path ofkepler-kit-main/micropythonor copy this code into Thonny, then click “Run Current Script” or simply press F5 to run it.Don’t forget to click on the “MicroPython (Raspberry Pi Pico)” interpreter in the bottom right corner.
For detailed tutorials, please refer to Open and Run Code Directly.
Here you need to use the
imu.pyandvector3d.py, please check if it has been uploaded to Pico W, for a detailed tutorial refer to 1.4 Upload the Libraries to Pico.
from imu import MPU6050
from machine import I2C, Pin
import time
import math

# Initialize I2C communication for MPU6050 accelerometer
i2c = I2C(1, sda=Pin(6), scl=Pin(7), freq=400000)
mpu = MPU6050(i2c)

# Initialize PWM for the servo on pin 15 with a frequency of 50Hz
servo = machine.PWM(machine.Pin(15))
servo.freq(50)

# Function to map a value from one range to another
def interval_mapping(x, in_min, in_max, out_min, out_max):
    return (x - in_min) * (out_max - out_min) / (in_max - in_min) + out_min

# Function to calculate the Euclidean distance between two points
def dist(a, b):
    return math.sqrt((a * a) + (b * b))

# Function to calculate the rotation along the y-axis
def get_y_rotation(x, y, z):
    radians = math.atan2(x, dist(y, z))
    return -math.degrees(radians)

# Function to calculate the rotation along the x-axis
def get_x_rotation(x, y, z):
    radians = math.atan2(y, dist(x, z))
    return math.degrees(radians)

# Function to control the servo based on the angle
# Maps the angle (0-180) to the PWM duty cycle for servo control
def servo_write(pin, angle):
    pulse_width = interval_mapping(angle, 0, 180, 0.5, 2.5)  # Map angle to pulse width in ms (0.5ms to 2.5ms)
    duty = int(interval_mapping(pulse_width, 0, 20, 0, 65535))  # Convert pulse width to PWM duty cycle (0-65535)
    pin.duty_u16(duty)  # Set the duty cycle for the servo PWM

# Define the number of readings to average for smoother motion
times = 25

# Main loop
while True:
    total = 0
    # Take multiple readings to average the angle for smoothness
    for i in range(times):
        angle = get_y_rotation(mpu.accel.x, mpu.accel.y, mpu.accel.z)  # Get the y-axis rotation value from the accelerometer
        total += angle  # Accumulate the readings

    average_angle = int(total / times)  # Calculate the average angle
    # Map the average angle (-90 to 90) to the servo's movement range (0 to 180 degrees)
    servo_write(servo, interval_mapping(average_angle, -90, 90, 0, 180))

    time.sleep(0.1)  # Add a small delay to reduce jitter in the servo movement
As soon as the program runs, the servo will turn left and right as you tilt the MPU6050 (or turn your wrist if it is mounted on a glove).