Note
Hello, welcome to the SunFounder Raspberry Pi & Arduino & ESP32 Enthusiasts Community on Facebook! Dive deeper into Raspberry Pi, Arduino, and ESP32 with fellow enthusiasts.
Why Join?
Expert Support: Solve post-sale issues and technical challenges with help from our community and team.
Learn & Share: Exchange tips and tutorials to enhance your skills.
Exclusive Previews: Get early access to new product announcements and sneak peeks.
Special Discounts: Enjoy exclusive discounts on our newest products.
Festive Promotions and Giveaways: Take part in giveaways and holiday promotions.
👉 Ready to explore and create with us? Click [here] and join today!
2.9 Feel the Magnetism
The most common type of reed switch contains a pair of magnetizable, flexible, metal reeds whose end portions are separated by a small gap when the switch is open.
A magnetic field from an electromagnet or a permanent magnet will cause the reeds to attract each other, thus completing an electrical circuit. The spring force of the reeds causes them to separate, and open the circuit, when the magnetic field ceases.
A common example of a reed switch application is to detect the opening of a door or windows, for a security alarm.
Required Components
In this project, we need the following components.
It’s definitely convenient to buy a whole kit, here’s the link:
Name |
ITEMS IN THIS KIT |
LINK |
|---|---|---|
Kepler Kit |
450+ |
You can also buy them separately from the links below.
SN |
COMPONENT |
QUANTITY |
LINK |
|---|---|---|---|
1 |
1 |
||
2 |
Micro USB Cable |
1 |
|
3 |
1 |
||
4 |
Several |
||
5 |
1(10KΩ) |
||
6 |
1 |
Schematic
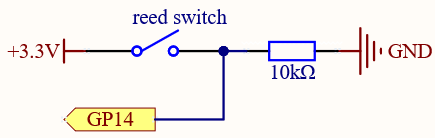
By default, GP14 is low; and will go high when the magnet is near the reed switch.
The purpose of the 10K resistor is to keep the GP14 at a steady low level when no magnet is near.
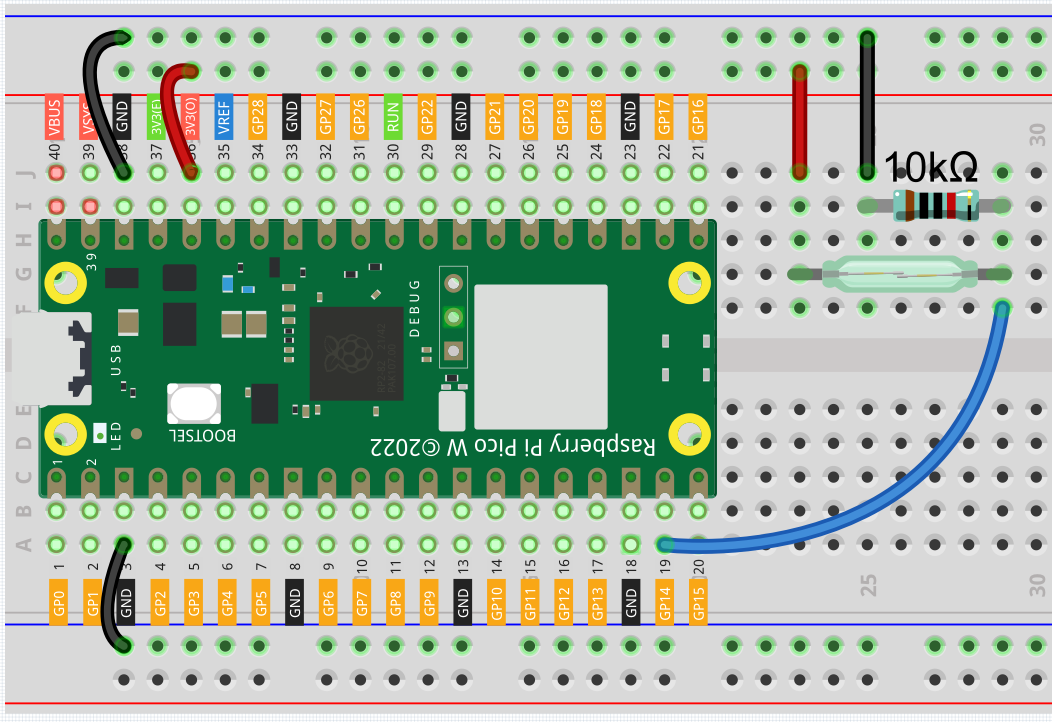
Wiring
Code
Note
Open the
2.9_feel_the_magnetism.pyfile under the path ofkepler-kit-main/micropythonor copy this code into Thonny, then click “Run Current Script” or simply press F5 to run it.Don’t forget to click on the “MicroPython (Raspberry Pi Pico)” interpreter in the bottom right corner.
For detailed tutorials, please refer to Open and Run Code Directly.
import machine
import utime
reed = machine.Pin(14, machine.Pin.IN)
while True:
    if reed.value() == 1:
        print("There are magnets here!!")
        utime.sleep(1)
When the code is run, GP14 goes high when a magnet is near the reed switch, otherwise it goes low. Just like the button in the 2.5 Reading Button Value chapter.
Learn More
This time, we tried a flexible way of using switches: interrupt requests, or IRQs.: interrupt requests, or IRQs.
For example, you are reading a book page by page, as if a program is executing a thread. At this time, someone came to you to ask a question and interrupted your reading. Then the person is executing the interrupt request: asking you to stop what you are doing, answer his questions, and then let you return to reading the book after the end.
MicroPython interrupt request also works in the same way, it allows certain operations to interrupt the main program.
Note
Open the
2.9_feel_the_magnetism_irq.pyfile under the path ofkepler-kit-main/micropythonor copy this code into Thonny, then click “Run Current Script” or simply press F5 to run it.Don’t forget to click on the “MicroPython (Raspberry Pi Pico)” interpreter in the bottom right corner.
For detailed tutorials, please refer to Open and Run Code Directly.
import machine
import utime

reed_switch = machine.Pin(14, machine.Pin.IN)

def detected(pin):
    print("Magnet!")

reed_switch.irq(trigger=machine.Pin.IRQ_RISING, handler=detected)
Here first a callback function detected(pin) is defined, called the interrupt handler. It will be executed when an interrupt request is triggered. Then, an interrupt request is set up in the main program, which contains two parts: the trigger and the handler.
In this program, trigger is IRQ_RISING, which indicates that the value of the pin is raised from low to high (i.e., button press).
handler is detected , the callback function we defined before.