Note
Hello, welcome to the SunFounder Raspberry Pi & Arduino & ESP32 Enthusiasts Community on Facebook! Dive deeper into Raspberry Pi, Arduino, and ESP32 with fellow enthusiasts.
Why Join?
Expert Support: Solve post-sale issues and technical challenges with help from our community and team.
Learn & Share: Exchange tips and tutorials to enhance your skills.
Exclusive Previews: Get early access to new product announcements and sneak peeks.
Special Discounts: Enjoy exclusive discounts on our newest products.
Festive Promotions and Giveaways: Take part in giveaways and holiday promotions.
👉 Ready to explore and create with us? Click [here] and join today!
6.2 Temperature - Humidity
Humidity and temperature are closely related from the physical quantity itself to the actual people’s life. The temperature and humidity of human environment will directly affect the thermoregulatory function and heat transfer effect of human body. It will further affect the thinking activity and mental state, thus affecting the efficiency of our study and work.
Temperature is one of the seven basic physical quantities in the International System of Units, which is used to measure the degree of hot and cold of an object. Celsius is one of the more widely used temperature scales in the world, expressed by the symbol “℃”.
Humidity is the concentration of water vapor present in the air. The relative humidity of air is commonly used in life and is expressed in %RH. Relative humidity is closely related to temperature. For a certain volume of sealed gas, the higher the temperature, the lower the relative humidity, and the lower the temperature, the higher the relative humidity.
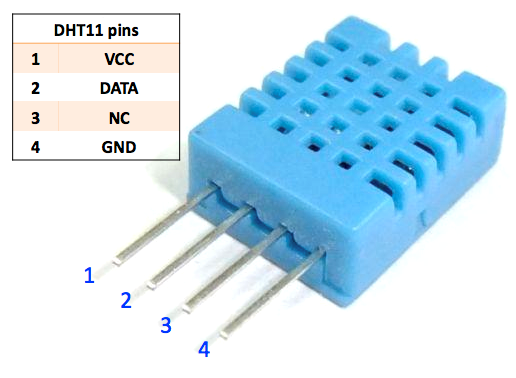
A basic digital temperature and humidity sensor, the DHT11, is provided in this kit. It uses a capacitive humidity sensor and thermistor to measure the surrounding air and outputs a digital signal on the data pins (no analog input pins are required).
Required Components
In this project, we need the following components.
It’s definitely convenient to buy a whole kit, here’s the link:
Name |
ITEMS IN THIS KIT |
LINK |
|---|---|---|
Kepler Kit |
450+ |
You can also buy them separately from the links below.
SN |
COMPONENT |
QUANTITY |
LINK |
|---|---|---|---|
1 |
1 |
||
2 |
Micro USB Cable |
1 |
|
3 |
1 |
||
4 |
Several |
||
5 |
1 |
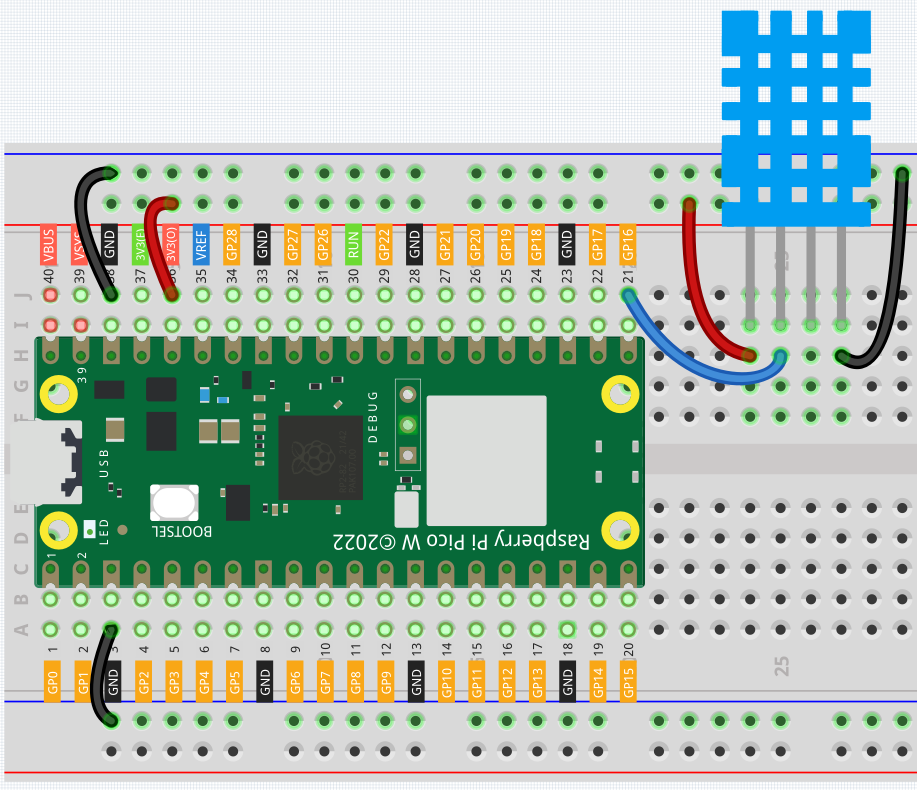
Schematic
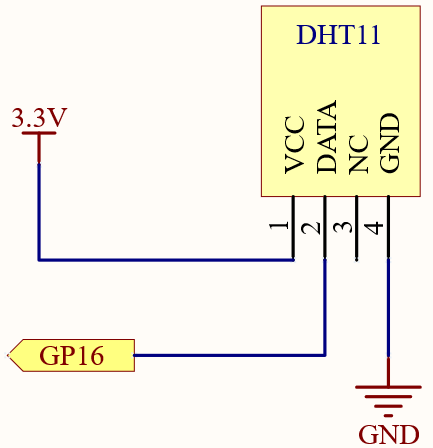
Wiring
Code
Note
Open the
6.2_temperature_humidity.pyfile under the path ofkepler-kit-main/micropythonor copy this code into Thonny, then click “Run Current Script” or simply press F5 to run it.Don’t forget to click on the “MicroPython (Raspberry Pi Pico)” interpreter in the bottom right corner.
For detailed tutorials, please refer to Open and Run Code Directly.
Here you need to use the library called
dht.py, please check if it has been uploaded to Pico W, for a detailed tutorial refer to 1.4 Upload the Libraries to Pico.
from machine import Pin
import utime as time
from dht import DHT11, InvalidPulseCount

pin = Pin(16, Pin.IN)
sensor = DHT11(pin)
time.sleep(5)  # initial delay

while True:
    try:
        sensor.measure()
        string = "Temperature:{}\nHumidity: {}".format(sensor.temperature, sensor.humidity)
        print(string)
        time.sleep(4)

    except InvalidPulseCount as e:
        print('Bad pulse count - retrying ...')
After the code is run, you will see the Shell continuously print out the temperature and humidity, and as the program runs steadily, these two values will become more and more accurate.
How it works?
In the dht library, we have integrated the relevant functionality into the DHT11 class.
from dht import DHT11, InvalidPulseCount
Initialize the DHT11 object. This device only needs a digital input to be used.
pin = Pin(16, Pin.IN)
sensor = DHT11(pin)
Use sensor.measure() to read the current temperature and humidity, which will be stored in sensor.temperature, sensor.humidity.
They are then printed out.
Finally the DHT11 sampling rate is 1HZ, a time.sleep(1) is needed in the loop.
while True:
    try:
        sensor.measure()
        string = "Temperature:{}\nHumidity: {}".format(sensor.temperature, sensor.humidity)
        print(string)
        time.sleep(4)

    except InvalidPulseCount as e:
        print('Bad pulse count - retrying ...')