Note

Hello, welcome to the SunFounder Raspberry Pi & Arduino & ESP32 Enthusiasts Community on Facebook! Dive deeper into Raspberry Pi, Arduino, and ESP32 with fellow enthusiasts.

Why Join?

  • Expert Support: Solve post-sale issues and technical challenges with help from our community and team.

  • Learn & Share: Exchange tips and tutorials to enhance your skills.

  • Exclusive Previews: Get early access to new product announcements and sneak peeks.

  • Special Discounts: Enjoy exclusive discounts on our newest products.

  • Festive Promotions and Giveaways: Take part in giveaways and holiday promotions.

👉 Ready to explore and create with us? Click [here] and join today!

7.5 GAME - 10 Second

To challenge your concentration, follow me next to make a game device. Make a magic wand by connecting the tilt switch with a stick. When you shake the wand, the 4-digit segment display will start counting, and when you shake it again, it will stop counting. In order to win, you must keep the displayed count at 10.00. You can play the game with your friends to see who is the time wizard.

Required Components

In this project, we need the following components.

It’s definitely convenient to buy a whole kit, here’s the link:

Name

ITEMS IN THIS KIT

LINK

Kepler Kit

450+

Kepler Ultimate Kit

You can also buy them separately from the links below.

SN

COMPONENT

QUANTITY

LINK

1

Raspberry Pi Pico W

1

BUY

2

Micro USB Cable

1

3

Breadboard

1

BUY

4

Jumper Wires

Several

BUY

5

Resistor

5(4-220Ω, 1-10KΩ)

BUY

6

4-Digit 7-Segment Display

1

7

74HC595

1

BUY

8

Tilt Switch

1

Schematic

sch_10_second

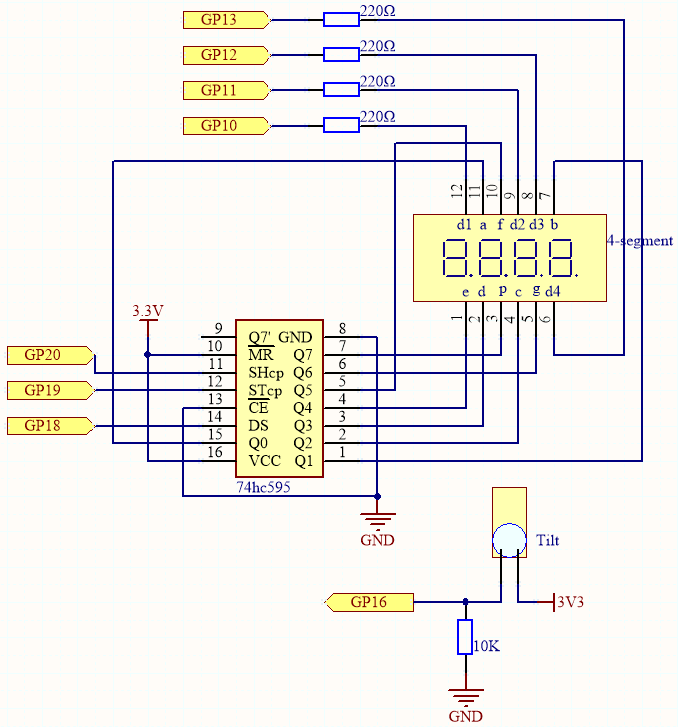
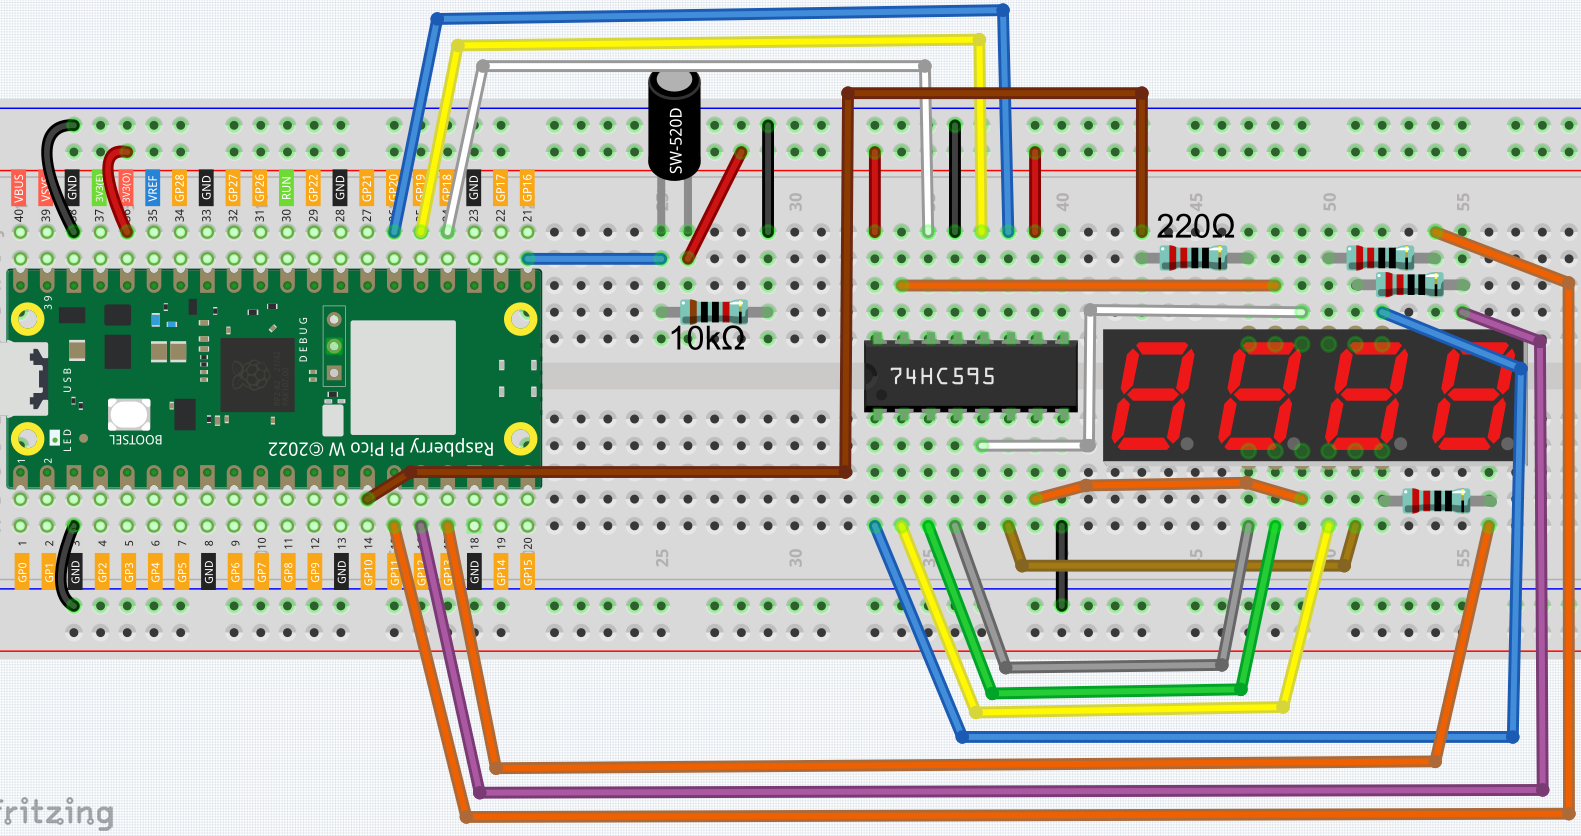
  • This circuit is based on 5.3 Time Counter with the addition of a tilt switch.

  • GP16 is high when the tilt switch is upright; low when tilted.

Wiring
wiring_game_10_second

Code

Note

  • Open the 7.5_game_10_second.py file under the path of kepler-kit-main/micropython or copy this code into Thonny, then click “Run Current Script” or simply press F5 to run it.

  • Don’t forget to click on the “MicroPython (Raspberry Pi Pico)” interpreter in the bottom right corner.

  • For detailed tutorials, please refer to Open and Run Code Directly.

import machine
import time

# 7-segment display codes for digits 0-9, using hexadecimal to represent LED segments
SEGCODE = [0x3f,0x06,0x5b,0x4f,0x66,0x6d,0x7d,0x07,0x7f,0x6f]

# Define pins for shift register communication (74HC595)
sdi = machine.Pin(18, machine.Pin.OUT)   # Serial Data Input
rclk = machine.Pin(19, machine.Pin.OUT)  # Register Clock (Latch)
srclk = machine.Pin(20, machine.Pin.OUT) # Shift Register Clock

# Initialize list to store 4 digit control pins
placePin = []

# Define control pins for each of the four digits (common anodes)
pin = [10,13,12,11]  # Pin numbers for the 4-digit display
for i in range(4):
    placePin.append(None)  # Reserve space in list
    placePin[i] = machine.Pin(pin[i], machine.Pin.OUT)  # Initialize pin as output

# Function to select which digit (0-3) to display by controlling the common anode pins
def pickDigit(digit):
    for i in range(4):
        placePin[i].value(1)  # Turn off all digits
    placePin[digit].value(0)  # Turn on the selected digit

# Function to clear the display by sending '0x00' to the shift register
def clearDisplay():
    hc595_shift(0x00)

# Function to send data to the shift register (74HC595)
def hc595_shift(dat):
    rclk.low()  # Pull latch low to prepare for data shifting
    time.sleep_us(200)  # Small delay for timing stability
    for bit in range(7, -1, -1):  # Loop through each bit (MSB first)
        srclk.low()  # Prepare to send the next bit
        time.sleep_us(200)
        value = 1 & (dat >> bit)  # Extract the current bit from the data
        sdi.value(value)  # Set the data line to the current bit value
        time.sleep_us(200)
        srclk.high()  # Pulse the shift clock to store the bit in the register
        time.sleep_us(200)
    time.sleep_us(200)
    rclk.high()  # Pulse the register clock to move the data to the output

# Function to display a number on the 7-segment display
# This function breaks down the number into its individual digits and displays them one at a time
def display(num):
    pickDigit(0)  # Select the units place
    hc595_shift(SEGCODE[num % 10])  # Display units

    pickDigit(1)  # Select the tens place
    hc595_shift(SEGCODE[num % 100 // 10])  # Display tens

    pickDigit(2)  # Select the hundreds place
    hc595_shift(SEGCODE[num % 1000 // 100] + 0x80)  # Display hundreds (with decimal point)

    pickDigit(3)  # Select the thousands place
    hc595_shift(SEGCODE[num % 10000 // 1000])  # Display thousands

# Initialize the tilt switch sensor on pin 16
tilt_switch = machine.Pin(16, machine.Pin.IN)

# Boolean flag to control whether the counting should continue
count_flag = False

# Interrupt handler for the tilt switch, toggles the counting flag on each trigger
def shake(pin):
    global timeStart, count_flag
    count_flag = not count_flag  # Toggle the counting state
    if count_flag == True:
        timeStart = time.ticks_ms()  # Record the time when counting starts

# Set up an interrupt on the tilt switch to detect shaking and call the shake() function
tilt_switch.irq(trigger=machine.Pin.IRQ_RISING, handler=shake)

# Initialize the count variable to zero
count = 0

# Main loop to continuously update the display based on the elapsed time since the tilt switch was triggered
while True:
    if count_flag == True:
        count = int((time.ticks_ms() - timeStart) / 10)  # Calculate the count in tenths of a second
    display(count)  # Update the display with the current count

The 4-digit 7-segment display will begin counting when you shake the wand, and will stop counting when you shake it again. You win if you manage to keep the displayed count at 10.00. The game will continue after one more shake.